Terminal Moraine: Difference between revisions
From Halopedia, the Halo wiki
(Ugh. Replacing slideshows and normal galleries with portraits. If this is a double edit, please excuse me!) |
Cally99117 (talk | contribs) m (→Gallery) |
||
| Line 35: | Line 35: | ||
==Gallery== | ==Gallery== | ||
<gallery widths=" | <gallery widths="150" orientation="landscape"> | ||
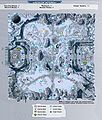
File:Term.jpg|A strategic map of Terminal Moraine. | File:Term.jpg|A strategic map of Terminal Moraine. | ||
</gallery> | </gallery> | ||
Revision as of 14:58, July 20, 2010
Template:Multiplayer Map Infobox
Terminal Moraine is a Halo Wars multiplayer map.[1] [2]
Layout
Terminal Moraine is a snow-covered map in Halo Wars. It is a 2v2, with the two teamed players starting right next to each other. There are Rebel bases situated to the right and the left of the starting bases, and the most notable feature of this map are the alcoves. The middle left and right sections are cut off from the rest of the map by Forerunner hardlight bridges. Inside each alcove, there is a building site (defended by rebels), a Forerunner secondary reactor and two small building spaces. The map's picture shows one of these alcoves. The light bridges switch between off and on automatically about every 60 seconds, and units caught on the bridge when it deactivates will fall to their deaths.
Tactics
It is recommended that the player take at least one of these side bases, fortify the area, and use one of the individual building slots to create an airpad or Summit to build aircraft. Aircraft do not have to wait for the light bridge, so they can come and go freely. A good tactic is to pin down enemies on the bridge by placing infantry in the sniper towers on either side to either defend the base or trap the enemy's ground units. Don't expect to retreat once you cross the bridge. For the UNSC, it is useful to have at least one unit in the sniper towers on the outside (not the ones in the alcoves), as then your units can be Pelican airlifted onto the other side without waiting or the risk of the bridge deactivating. Alternatively, you can also wait for the opponent to come to the bridge, then quickly airlift units (preferably Scorpion tanks or other heavy vehicles) to the mainland, and engage the opponent until the bridge deactivates.
Buildings can be constructed at one of the side pads even if the base is still controlled by the rebels. Therefore, it is possible to train units directly at the pads to destroy the base.Though, in general, whatever forces you brought to the rebel base in the first place should be adequate.
A tactic that is useful for defending a side base if you are the UNSC is to make around 7-8 cobras. Have 4 in a square formation on the base side of the light bridge and have the other 4 planted on the edge of the cliff that the side base resides on. Next make 4 flamethrowers. Have 2 of them garrison the sniper towers on the base side of the bridge and have the other two on the sides of the light bridge. Next make wolverines to fill the rest of your population and have them residing on sides of the cliff alongside the other cobras. Finally upgrade your bases forward turrets to rail guns and have the rear turrets missile launchers. The cobras at the mouth of the bridge provide anti vehicle fire but also as blockades that prevent ground units from getting through. This makes any units trying to destroy the cobra easy prey for the side cobra's and the bridge when it deactivates. The 4 flamethrowers provide anti infantry cover for your cobra's and the wolverines take care of any aircraft that go around your cobras. Remember to keep cobras cued at your bases vehicle depot so you can replace any destroyed cobra's quickly!
Gallery
Trivia
- The term "Terminal Moraine" is used in glaciology for a deposit of rocks,soil, and debris at the farthest extent of the glacier.
Sources
