Scenario Seven: Finishing Blow
From Halopedia, the Halo wiki
|
Prev: |
|
|
Next: |
|
| Scenario Seven: Finishing Blow | |
|---|---|

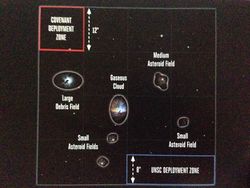
The scenario map for this mission. | |
|
Game: |
|
|
Location: |
|
|
Objective(s): |
|
 |
Halopedia doesn't currently have a walkthrough for this level; could you write one? |
| “ | 'Engage.'
The order was short and simple, but a spontaneous cheer erupted on the bridge as the fusion drives flared. The UNSC was finally taking the fight to the enemy. |
” |
Scenario Seven: Finishing Blow is the seventh mission in the The Fall of Reach campaign of Halo: Fleet Battles. It is featured in the Halo: Fleet Battles - The Fall of Reach campaign guide.[1]
Scenario[edit]
| “ | With the Fleet of Valiant Prudence stretched thin, the Long Night of Solace appeared open for a direct attack. Distracted by Operation: LEFT HOOK[sic], Rho 'Barutamee's forces were out of position when a Navy task force pounced on a cut-off Covenant scout fleet. | ” |
- The Battlefield: 4' x 4'
- Covenant Deployment Zone: 12" x 12" as per the Scenario Map.
- UNSC Deployment Zone: 24" x 8" as per the Scenario Map.
TERRAIN[edit]
Terrain is placed as shown on the Scenario Map.
DEPLOYMENT[edit]
Both players roll their 5 Order Dice, the player with the higher number of Command Icons can choose to deploy first or second. All Elements deployed must be placed inside the designated Deployment Zones. In the event of a draw, re-roll until a winner is determined. Players will alternate deployment, and any Wings created by a Battle Group are deployed within 8" of any Element from its parent Battle Group.
MAXIMUM TURN LIMIT[edit]
The Maximum Turn Limit of this Scenario is 8 Turns with the player scoring highest being the winner.
VICTORY CONDITIONS[edit]
- The Covenant will score 1 Victory Point for every BR of UNSC Elements Destroyed.
- The UNSC will score 1 Victory Point for every BR of Covenant Elements Destroyed.
- The UNSC will score an additional 1 Victory Point for every Covenant Capital Element Destroyed.
OPTIONAL RULES[edit]
We suggest players use the following Reach Campaign Optional Rules: Battle Damage, Dominance and Reinforcements.
THE FORCES[edit]
- Covenant Fleet: 760 Pts
- Fleet Commander: Rho 'Barutamee 100 Pts
- Covenant Battle Group 1: 280 Pts
- 1x ORS Heavy Cruiser (acting as FLAGSHIP)
- 2x SDV Line Elements (Line Formation)
- 1x Wing of 4 Tarasque Bombers
- 1x Wing of 3 Seraph Interceptors
- Covenant Battle Group 2: 190 Pts
- 1x CCS Battle Cruiser
- 1x SDV Heavy Corvette Elements (Oblique Formation)
- 1x Wing of 3 Tarasque Bombers
- Covenant Battle Group 3: 190 Pts
- 1x Ket Battle Cruiser
- 1x SDV Heavy Corvette Elements (Line Formation)
- 1x Wing of 3 Seraph Interceptors
- UNSC Fleet: 615 Pts
- Fleet Commander: Michael Stanforth 100 Pts
- Battle Group 1: 215 Pts
- 1x Supported Epoch Heavy Carrier (acting as FLAGSHIP)
- 1x Paris Class Frigate Elements (Trident Formation)
- 1x Wing of 3 Longsword Bombers
- 1x Wing of 3 Broadsword Interceptors
- Battle Group 2: 170 Pts
- 1x Marathon Heavy Cruiser Element
- 3x Paris Class Frigate Elements (Arrowhead Formation)
- 1x Wing of 2 Broadsword Interceptors
- Battle Group 3: 230 Pts
- 1x Supported Marathon Heavy Cruiser
- 1x Marathon Heavy Cruiser
- 1x Paris Class Frigate Elements (Trident Formation)
- 1x Wing of 4 Longsword Bombers
Production note[edit]
In the flavor text for this mission, Operation: LEFT JAB is mistakenly referred to as Operation: LEFT HOOK.
Sources[edit]
| Preceded by Scenario Six: Left Jab |
Halo: Fleet Battles Campaign Scenarios Scenario Seven: Finishing Blow |
Succeeded by Scenario Eight: Rally Point Zulu |
| ||||||||||||||