Uplift Reserve: Difference between revisions
From Halopedia, the Halo wiki
General5 7 (talk | contribs) (*cough*Proof*cough*) |
No edit summary |
||
| Line 28: | Line 28: | ||
[[File:Uplift Reserve.jpg|thumb|right|250px|This mission's beacon is a Drone Fighter's Optics Package.]] | [[File:Uplift Reserve.jpg|thumb|right|250px|This mission's beacon is a Drone Fighter's Optics Package.]] | ||
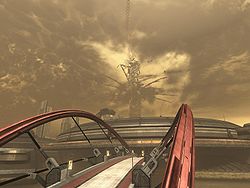
[[File:ohes noes.jpg|thumb|right|250px|The Orbital Elevator Collapes.]] | |||
==Transcript== | ==Transcript== | ||
Revision as of 17:11, November 8, 2009
|
Prev: |
|
|
Next: |
|
| Uplift Reserve | |
|---|---|

| |
|
Game: |
|
|
Player: |
|
|
Date: |
|
|
Location: |
|
 |
Halopedia has a walkthrough guide for this level; see Uplift Reserve/Walkthrough. |
Uplift Reserve is a Halo 3: ODST Campaign level. Played from Dutch's point of view, it takes place in the Uplift Reserve in New Mombasa.[1]
Summary
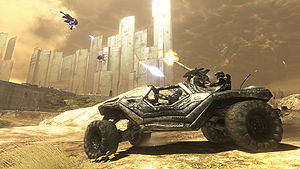
Uplift Reserve is the chronologically second flashback level of the game. The level opens 30 minutes after the drop, as a UAV observes Dutch walking on the beach of Uplift Reserve. He watches the aircraft fly by, right into New Mombasa, and proceeds to move out of the park through the heavy Covenant resistance, which includes Wraiths and multiple other vehicles. Several Marine platoons are also present in the area, and at one point Dutch is tasked with finding one of them. While driving into the last section of the park, Dutch witnesses the collapse of the Orbital Elevator. In the end, he manages to drive out of the park, through a gap in the wall surrounding it, right into the streets of the city.[2]
Transcript
Dutch
Uplift Nature Reserve
30 minutes after drop
Two Drone Fighters fly toward the city over the Uplift Nature Reserve, one of the Drone's cameras zooms in on an SOEIV on the beach, and an ODST walking away from it. The ODST is Dutch who watches the Fighters fly overhead.
{Gameplay}
Dutch: Good hunting boys! But I'm keepin' my boots on the ground.
Dutch heads up a hill to a clearing where Marines are engaging Covenant armor and infantry, a group of Marines are taking cover near an overturned Warthog, one of the Marines spots him.
Marine #1: Trooper, over here! Help us secure this vehicle!
Together they take out the enemy infantry.
Marine #1: Thanks for the assist, trooper! Get this Warthog movin', our CO needs us to clear this sector.
Dutch: Affirmative.
They engage heavy Covenant armor, including Wraiths, Choppers and Ghosts.
Marine #1: Watch that Chopper! Hit it head on and it'll tear us to pieces.
Marine #1:Keep movin'! Don't let that Wraith take a shot at us!
Marine #1: Swing behind the Wraith! It's got less armor in back!
After defeating the first Wraith, another moves up and a Phantom arrives dropping off reinforcements; those are soon defeated as well.
Marine #1: Colonel! Sector's clear, and we found some backup!
Colonel: Say again Marine! I got Drones overhead and ONI brass yellin' in my ear!
Dutch: ODST reporting for duty, sir!
Colonel: Nice of you to drop in, trooper! Head to the next section of the park, to my second platoon's location! They're taking heavy casualties, in need of assistance.
Dutch: Roger that, I'm Oscar Mike.
Marine #1: Where's the rest of your team, trooper?
Dutch: Scattered, dead, I don't know.
Marine #1: That's too bad, we're gonna need all the men we can get.
The Marines move to another section of the park where they encounter Shades, Choppers, Banshees and more infantry, the Marines head up the hill taking out the Covenant defenses.
Brute: Warn the Chieftain! The enemy has breached our lines!
A Brute on a Ghost will try to escape.
Marine #1: Take out that Ghost! Before it raises an alarm!
Colonel: Trooper, you're almost at second platoon's location. Give 'em a hand and push toward the primary objective!
Dutch: What is the objective, Colonel?
Colonel: You know the Covenant Carrier that slipped away from the city? We need to secure its old LZ, and snatch a Tier One asset.
Dutch arrives at second platoon's location, they are under heavy fire from more Covenant armor and infantry.
Marine #2: Trooper this is second platoon! See what you can do about those Wraiths!
Dutch: Where's the Colonel?
Marine #2: He's near the Covenant LZ, once we take out this enemy armor we can roll across the bridge to his location.
Marine #2: Trooper, drive toward the Space Elevator, it'll lead you to the bridge.
If the player takes too long.
Marine #2: Move your ass trooper, get across the bridge, now!
As the Marines cross the bridge, the Space Elevator, already weakened from the Slipspace rupture, explodes in different sections and collapses, sending debris flying for miles.
Marine #2: Look, the elevator! INCOMING!!!
A part of the elevator crashes into the building Dutch and the Marines are driving to.
Dutch: What the hell just happened?
Marine #2: Slipspace Rupture! Must've weakened the support rings.
Colonel: All units {coughs} target assets are on the move, everyone clear the area, before more debris comes down {coughs}.
Marine #2: Colonel? Sir? Damn, he's gone. Trooper, head up the hill! We gotta find a way outta this park.
If the player stops:
Marine #2: Keep driving uphill trooper, it's the only way out.
Dutch soon arrives at the Assault Carrier's old LZ, where a group of Marines are pinned down by more Covenant troops.
If the player drives over to the Marines, one of them has broken his ankle, another tends to him, but the first Marine has lost his mind.
Crazed Marine: No, no, no! You're not listening! It's a zoo, okay?
Medic: Well, technically it's a corporate-funded wildlife reserve.
Crazed Marine: Semantics! This whole place is one...big...cage!
Medic: Listen Marine, you're wounded, you need to try and relax.
Crazed Marine: Except we, we're the zebras, all fenced in and ready for the slaughter!
Medic: And the Covenant?
Crazed Marine: They're the lions...RAAAR!
Medic: Careful, you just strained a metaphor.
Crazed Marine: Oh, oh God, is that serious?
Medic: Only if you keep it up.
Dutch finally reaches the top of the hill, and is faced by one final Wraith, a War Chieftain and many Covenant forces.
War Chieftain: Let no humans escape to say what they have seen!
Marine #2: Find a hole in that wall trooper, drive right through it.
If the player stays:
Marine #2: Make the jump, now!
Once the player drives off the cliff the level ends.
{Cutscene}
Dutch's Warthog/Ghost/Chopper flies off the cliff and lands on the streets below, bouncing once, then crashes into a building, Dutch falling out after the bounce, his helmet falls off.
Dutch: Uh, Lord? I didn't train to be a pilot, please tell me I don't have any more flying to do today.
The view switches to a Superintendent camera, that watches as a Drone Fighter crashes into the Uplift Reserve Statue. The Superintendent's avatar shows the 'sad face' image. The optics detaches from the fighter and crashes to the ground, where the Rookie later finds it. Dutch gets up, helmet in one hand.
Dutch: So was that a yes or a no?
The vehicle Dutch was driving previously explodes behind him, making him drop his helmet. He turns around to face it and says:
Dutch: Amen.
Cutscene ends, fades back to the Rookie.
Trivia
- Despite the mission being 30 minutes after the drop, it is shown that Dutch has only just left his Drop pod. This can mean that either Dutch was unconscious for a short period of time or simply overlooked by Bungie.
- There is also an achievement called Wraith Killer which requires the player to destroy every Wraith encountered during the course of the level in order to be unlocked.[3]
- Near the Covenant landing zone with the gravity lift base, where a group of Marines are taking cover behind a ridge, there's a crazed Marine with a broken ankle, and another Marine trying to calm him down. This is likely a reference to the AWOL Marine in Halo: Combat Evolved and Halo 3's suicidal marine.
- The Covenant landing zone appears to be an aesthetically upgraded version of the one encountered on The Truth and Reconciliation in Halo: Combat Evolved.
- In the area when you encounter the first Shade turrets, if you turn left towards the shore you will see a dead zebra.
- This is possibly the easiest level to get Vidmaster Challenge: Classic, by getting in a Ghost or Chopper and boosting till the end of the level.
- At the end of the level, the vehicle you use will always be the one in the cutscene. You can use a Warthog, a Ghost, or a Chopper. They will have the same speed when the vehicle lands and plunges into the wall, and will blow up at the same time. If you jump off without a vehicle, the Warthog cutscene will play instead.
- Wraiths in this level self-destruct if the pilot is killed, much like the Anti-Air Wraiths in Halo 3. However, Wraiths in this level can be commandeered using the same method that can be used with Anti-Air Wraiths.
- Because the Wraith was not intended to be used for this level, if the Wraith is sent over the cliff using the above method, it will transform into either a Warthog, a Ghost, or a Chopper.
- Even if you have a fully manned vehicle, when you jump the cliff, the vehicle you are using will be empty, except for Dutch.
- During the Second Warthog fight when you drive over the hill inside a tunnel, allied warthogs will either stop near the Ghost on the rock or drive around in front of the Tunnel. it is possible to move them into the next area but they may drive right back to the start. This is probably an AI navigation error in the game code.
- If you go to the shore right before the area with the Shade turrets, you can see Old Mombasa across the water.
- In the beginning of the level, a barrage of plasma fires can be seen flying into the air from an unknown point of origin in Old Mombasa. It is possible that the plasma fire is being unleashed by the Anti-Aircraft Battery installations deployed along the beach on the level, Outskirts (Level) from Halo 2.
Sources
