Headlong: Difference between revisions
From Halopedia, the Halo wiki
m (Reverted edits by 72.208.21.21 (Talk); changed back to last version by 210.174.41.209) |
m ("Semi-asymmetrical" is not a thing. There's Symmetrical, Semi-symmetrical, and Asymmetrical. This map is Asymmetrical.) Tags: Undo Mobile edit Advanced mobile edit |
||
| (238 intermediate revisions by more than 100 users not shown) | |||
| Line 1: | Line 1: | ||
:'' | {{Status|Gameplay}} | ||
{{Multiplayer map infobox | |||
|name=Headlong | |||
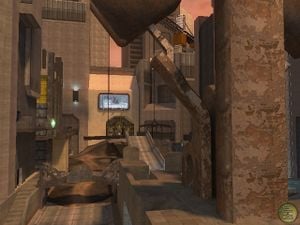
== | |image=[[File:H2 Headlong profile.jpg|300px]] | ||
|game=''[[Halo 2]]'' | |||
|devname=<code>headlong</code>{{Ref/File|Id=H2EK|H2EK|H2EK\tags\scenarios\multi\headlong\headlong.scenario}} | |||
|map=War Games Map_Set/: 622-3{{Ref/Site|Id=mombasa waypoint|D=01|M=6|Y=2020|URL=https://www.halowaypoint.com/en-us/universe/locations/new-mombasa|Site=Halo Waypoint|Page=Universe - New Mombasa}} | |||
|location=[[Section 14]], [[New Mombasa]], [[Earth]] | |||
|terrain=Construction Zone | |||
|symmetry=Asymmetrical | |||
|playernumber=6-16 | |||
|gametypes=*[[Slayer]] | |||
*[[1 Flag CTF]] | |||
*[[Assault|1 Bomb Assault]] | |||
|pagegamelabel=H2 | |||
}} | |||
{{Center|{{Article quote|Although during the day Section 14 monitors almost all harbor traffic, at night it's one of the city's most notorious hangouts.}}}} | |||
== | '''Headlong''' is a [[multiplayer]] map in ''[[Halo 2]]'', The map was remade as [[Breakneck]] for ''[[Halo: Combat Evolved Anniversary]]'',{{Ref/Site|D=01|M=6|Y=2020|URL=http://halo.xbox.com/en-us/news/headline/the-halo-bulletin-91411-/239029|Site=Halo Waypoint|Page=The Halo Bulletin: 9/14/11}} then [[Guillotine]] for ''[[Halo 5: Guardians]]''.{{Ref/Site|Id=HW|D=01|M=6|Y=2020|URL=https://www.halowaypoint.com/en-us/community/blog-posts/november-sneak-peek|Site=Halo Waypoint|Page=Halo Community Update - November Sneak Peek}} | ||
==Universe and lore== | |||
Prior to the [[Covenant]]’s [[Battle for Earth|assault]], [[Section 14]] was a construction site founded on one of the many coastal sites of New Mombasa’s mainland territory. This portion of docks was renowned for being the primary monitoring outpost of ports traffic along Nyali, Tudor, and New Mombasa island itself.{{Ref/Reuse|mombasa waypoint}} | |||
==Overview== | |||
This map is found mostly in [[Big Team Battle]] [[matchmaking]] [[Matchmaking#Playlists|playlists]] due to the size and number of vehicles, with [[Capture the Flag]] and [[Assault]] being the most common game types assigned. This map seems to be a port under construction. | |||
Headlong is also the map in which the game "Rations", the inspiration for the ''[[Infection]]'' gametype ''Save One Bullet'' in ''[[Halo 3]]'', was played. The players starts off with a pistol and shotgun and must escape the zombies with [[Type-1 energy sword|energy swords]]. The weapons on the map are shotguns and they do not respawn. | |||
Some of the features are a half-assembled bridge, two [[teleporter]] systems, two floating cranes, [[Active camouflage]], an [[Overshield]], and a large base under construction. The default vehicles for this map are two [[M12 Warthog|Warthogs]] (either a [[M12 Chaingun Warthog|normal Warthog]] or a [[M12G1 Warthog|Gauss Warthog]]); two Ghosts; a [[Type-26 Banshee|Banshee]], and a [[M808B Scorpion|Scorpion]] or [[Zurdo-pattern Wraith|Wraith]]. | |||
===Territories=== | |||
*Gate Bridge | *Gate Bridge | ||
*Statue | *Statue | ||
| Line 19: | Line 36: | ||
*Building Site | *Building Site | ||
*Corner Building | *Corner Building | ||
*Construction Pit | *Construction Pit | ||
===Strategies=== | |||
The obvious tactic for this map in [[Slayer]] is to get to the high ground. The recommended [[weapons]] are usually a [[SRS99C-S2 AM sniper rifle|sniper rifle]] or a [[BR55 battle rifle|battle rifle]], along with a short-range weapon to complement them. Just stay in the buildings and pick off the players beneath you. However, it is safe to say that you won't be alone due to the fact that the map is only found in custom games and [[Big Team Battle Slayer|Big Team Battles]]. There is no cover in the center of the map so it's better if you stay in the buildings or on the catwalks that link them together. | |||
The best combination for this map is a mid-range and a short-range weapon, for example, a battle rifle and a [[M90 shotgun|shotgun]], the battle rifle being for open area encounters, and the shotgun being for close-quarter combat encounters with opposing players. There are also about three areas of the map only reachable by Banshee. One of them is a large roof atop one of the buildings near where the Warthogs spawn. It is almost at the height that the game wont allow the banshee to fly above. This is a great place to snipe people from way afar and you can see a great deal of the map and if you run out of ammo, you can always jump. | |||
The [[M41 SPNKR|rocket launcher]] is also advisable due to the large number of vehicles on the map. | |||
====Capture The Flag==== | |||
This is a more direct strategy but usually works. When you go to attack the flag base, rather than making some elaborate route to attack the base, get two or three special team-mates to run through the bottom of their base and have the rest of the team go to the base through the top. The distractions from your other teammates created at the top of the base will give way for you and your other team-mates to go up to the base with no problems. Any player run into could be easily overcome by your teammates. Then grab the flag and instead of jumping down, run towards the lift and take that way out. Have somebody ready with a Warthog outside the building with the energy sword. | |||
When the player carrying the flag comes out he jumps in the warthog and goes to the base and returns the flag. The beauty of this technique is that you are not going to be as predictable as others you go through the airlift. You do not jump down and struggle and go on into a long battle over the flag. This is where most people either get the flag or lose it. However this tactic relies on a lot of good cooperation and communication between teammates. | |||
==Production notes== | |||
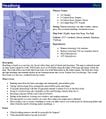
Early design documents for the map requested that the [[Mongoose|ATV]] be added to the map, prior to it being cut from the game.{{Ref/Game|H2|[[:File:H2 Headlong DesignDoc.jpg|Headlong design document]]|Id=headlongdesign}} Headlong was the last map completed for ''Halo 2'', following [[Zanzibar]]'s completion for the [[E3]] demo.{{Ref/Site|D=01|M=6|Y=2020|URL=https://twitter.com/MaxHoberman/status/1074976236408057856|Site=Twitter|Page=Max Hoberman|Quote=Here's our original design doc for Halo 2's Headlong. This was the last mp map we made for the shipping game, added after we made Zanzibar for E3. I never loved it because the team start didn't follow my guidelines. It had its moments though.}} | |||
== | == Trivia == | ||
*Headlong is by far the most popular map to super jump on, due to all the high buildings and very high ceiling barrier. | |||
*It's notable that the monument in the center of the map is actually an obscured image of Bungie's "Seventh Column" symbol. | |||
*Inside the yellow paneled building, there's graffiti that says, "Part of the Solution", a doodle of a hippo, and two signs in Bungie colors (white and blue) with a picture of a man's head with glasses and a picture of boots right above that sign. | |||
*If you can super jump onto the building behind the crane holding the piece of bridge, look at the glass. You can see the giant structure of New Mombasa shown in the Halo 2 demo in the beginning. | |||
*If you look carefully at the ground, there are vehicle tracks. | |||
*Above the area where the [[Covenant]] vehicles are parked, there is an advertisement for a [[Hog]]. If you zoom in on the sign, you can read it. It says: "Hog: Drive with reckless abandon in the new 12th gen hog. Comfort, luxury, bone crushing power. It's beauty and the beast." | |||
*It is possible to force a way out of the map, through the invisible wall. Get in a banshee, and then have another player jump on top of your wings. Slowly fly to the very tall building with a door at the bottom, and a sloped roof. Flying towards the roof, you should hit a wall. The other player can jump off the Banshee, through the wall. Also, the Banshee can fly through the wall if flown slowly along the wall at an angle. | |||
*Near the sea on the side with the Warthogs there is a wall, which looks just like the one from the Halo 2 E3 2003 demo at the final cutscene before the [[Kez'katu-pattern Phantom|Phantom]], crashes. | |||
*In the Shotgun building, you will find 2 rusty long barrels. You can shoot the tips of these off with certain weapons and they will fly around shooting gas everywhere, like propane tanks in ''[[Halo 3]]''. | |||
*On Page 200 of the Strategy Guide for the Game by Piggyback, there is a typo that says that Colossus is the name of the map, not Headlong. | |||
*If you fly out to sea and turn left you will see a glass wall and it will reflect a prototype edition of the map before it was evolved into Headlong as we know it.{{Citation needed}} | |||
*You can faintly hear a speaker at the beginning of a game. | |||
*The map looked strikingly different during the Halo 2 alpha. | |||
==Gallery== | |||
{{Linkbox|gallery=yes}} | |||
<gallery> | |||
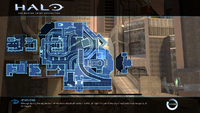
File:HMCC Headlong.PNG|Map of the map in ''[[Halo: The Master Chief Collection]]''. | |||
File:H2 Headlong DesignDoc.jpg|Original design document for Headlong. | |||
</gallery> | |||
{{ | ==Sources== | ||
{{Ref/Sources}} | |||
{{Levels|H2|mode=yes}} | |||
Latest revision as of 14:15, November 13, 2024
| Headlong | |
|---|---|

| |
| Map overview | |
|
Game: |
|
|
Map file name (?): |
|
| Lore information | |
|
Map designation (?): |
War Games Map_Set/: 622-3[2] |
|
Location: |
|
| Gameplay overview | |
|
Terrain: |
Construction Zone |
|
Map layout: |
Asymmetrical |
|
Recommended number of players: |
6-16 |
|
Recommended gametype(s): |
|
| “ | Although during the day Section 14 monitors almost all harbor traffic, at night it's one of the city's most notorious hangouts. | ” |
Headlong is a multiplayer map in Halo 2, The map was remade as Breakneck for Halo: Combat Evolved Anniversary,[3] then Guillotine for Halo 5: Guardians.[4]
Universe and lore[edit]
Prior to the Covenant’s assault, Section 14 was a construction site founded on one of the many coastal sites of New Mombasa’s mainland territory. This portion of docks was renowned for being the primary monitoring outpost of ports traffic along Nyali, Tudor, and New Mombasa island itself.[2]
Overview[edit]
This map is found mostly in Big Team Battle matchmaking playlists due to the size and number of vehicles, with Capture the Flag and Assault being the most common game types assigned. This map seems to be a port under construction.
Headlong is also the map in which the game "Rations", the inspiration for the Infection gametype Save One Bullet in Halo 3, was played. The players starts off with a pistol and shotgun and must escape the zombies with energy swords. The weapons on the map are shotguns and they do not respawn.
Some of the features are a half-assembled bridge, two teleporter systems, two floating cranes, Active camouflage, an Overshield, and a large base under construction. The default vehicles for this map are two Warthogs (either a normal Warthog or a Gauss Warthog); two Ghosts; a Banshee, and a Scorpion or Wraith.
Territories[edit]
- Gate Bridge
- Statue
- Alley
- Building Site
- Corner Building
- Construction Pit
Strategies[edit]
The obvious tactic for this map in Slayer is to get to the high ground. The recommended weapons are usually a sniper rifle or a battle rifle, along with a short-range weapon to complement them. Just stay in the buildings and pick off the players beneath you. However, it is safe to say that you won't be alone due to the fact that the map is only found in custom games and Big Team Battles. There is no cover in the center of the map so it's better if you stay in the buildings or on the catwalks that link them together.
The best combination for this map is a mid-range and a short-range weapon, for example, a battle rifle and a shotgun, the battle rifle being for open area encounters, and the shotgun being for close-quarter combat encounters with opposing players. There are also about three areas of the map only reachable by Banshee. One of them is a large roof atop one of the buildings near where the Warthogs spawn. It is almost at the height that the game wont allow the banshee to fly above. This is a great place to snipe people from way afar and you can see a great deal of the map and if you run out of ammo, you can always jump.
The rocket launcher is also advisable due to the large number of vehicles on the map.
Capture The Flag[edit]
This is a more direct strategy but usually works. When you go to attack the flag base, rather than making some elaborate route to attack the base, get two or three special team-mates to run through the bottom of their base and have the rest of the team go to the base through the top. The distractions from your other teammates created at the top of the base will give way for you and your other team-mates to go up to the base with no problems. Any player run into could be easily overcome by your teammates. Then grab the flag and instead of jumping down, run towards the lift and take that way out. Have somebody ready with a Warthog outside the building with the energy sword.
When the player carrying the flag comes out he jumps in the warthog and goes to the base and returns the flag. The beauty of this technique is that you are not going to be as predictable as others you go through the airlift. You do not jump down and struggle and go on into a long battle over the flag. This is where most people either get the flag or lose it. However this tactic relies on a lot of good cooperation and communication between teammates.
Production notes[edit]
Early design documents for the map requested that the ATV be added to the map, prior to it being cut from the game.[5] Headlong was the last map completed for Halo 2, following Zanzibar's completion for the E3 demo.[6]
Trivia[edit]
- Headlong is by far the most popular map to super jump on, due to all the high buildings and very high ceiling barrier.
- It's notable that the monument in the center of the map is actually an obscured image of Bungie's "Seventh Column" symbol.
- Inside the yellow paneled building, there's graffiti that says, "Part of the Solution", a doodle of a hippo, and two signs in Bungie colors (white and blue) with a picture of a man's head with glasses and a picture of boots right above that sign.
- If you can super jump onto the building behind the crane holding the piece of bridge, look at the glass. You can see the giant structure of New Mombasa shown in the Halo 2 demo in the beginning.
- If you look carefully at the ground, there are vehicle tracks.
- Above the area where the Covenant vehicles are parked, there is an advertisement for a Hog. If you zoom in on the sign, you can read it. It says: "Hog: Drive with reckless abandon in the new 12th gen hog. Comfort, luxury, bone crushing power. It's beauty and the beast."
- It is possible to force a way out of the map, through the invisible wall. Get in a banshee, and then have another player jump on top of your wings. Slowly fly to the very tall building with a door at the bottom, and a sloped roof. Flying towards the roof, you should hit a wall. The other player can jump off the Banshee, through the wall. Also, the Banshee can fly through the wall if flown slowly along the wall at an angle.
- Near the sea on the side with the Warthogs there is a wall, which looks just like the one from the Halo 2 E3 2003 demo at the final cutscene before the Phantom, crashes.
- In the Shotgun building, you will find 2 rusty long barrels. You can shoot the tips of these off with certain weapons and they will fly around shooting gas everywhere, like propane tanks in Halo 3.
- On Page 200 of the Strategy Guide for the Game by Piggyback, there is a typo that says that Colossus is the name of the map, not Headlong.
- If you fly out to sea and turn left you will see a glass wall and it will reflect a prototype edition of the map before it was evolved into Headlong as we know it.[citation needed]
- You can faintly hear a speaker at the beginning of a game.
- The map looked strikingly different during the Halo 2 alpha.
Gallery[edit]

|
Browse more images in this article's gallery page. |
Map of the map in Halo: The Master Chief Collection.
Sources[edit]
- ^ Halo 2 Editing Kit, game file
H2EK\tags\scenarios\multi\headlong\headlong.scenario - ^ a b Halo Waypoint, Universe - New Mombasa (Retrieved on Jun 1, 2020) [archive]
- ^ Halo Waypoint, The Halo Bulletin: 9/14/11 (Retrieved on Jun 1, 2020) [archive]
- ^ Halo Waypoint, Halo Community Update - November Sneak Peek (Retrieved on Jun 1, 2020) [archive]
- ^ Halo 2, Headlong design document
- ^ Twitter, Max Hoberman: "Here's our original design doc for Halo 2's Headlong. This was the last mp map we made for the shipping game, added after we made Zanzibar for E3. I never loved it because the team start didn't follow my guidelines. It had its moments though." (Retrieved on Jun 1, 2020) [archive]
| |||||||||||||||||||||||||||||||

