Beaver Creek: Difference between revisions
From Halopedia, the Halo wiki
(Undo revision 924760 by Bdgroot-117 (talk)) |
BaconShelf (talk | contribs) mNo edit summary |
||
| (48 intermediate revisions by 31 users not shown) | |||
| Line 1: | Line 1: | ||
{{ | {{Status|Gameplay}} | ||
{{Multiplayer map infobox | |||
{{Multiplayer | |||
|name=Beaver Creek | |name=Beaver Creek | ||
|image=[[File: | |image=[[File:H2 BeaverCreek.png|300px]] | ||
|game=''[[Halo 2]]'' | |game=''[[Halo 2]]'' | ||
|location=[[Installation 05]] | |devname=<code>beavercreek</code>{{Ref/File|Id=H2EK|H2EK|H2EK\tags\scenarios\multi\halo\beavercreek\beavercreek.scenario}} | ||
|map=War Games Map_Set/: 250-5.{{Ref/Site|Id=HU|URL=https://www.halowaypoint.com/en-us/universe/locations/delta-halo|Site=Halo Waypoint|Page=Delta Halo|D=27|M=10|Y=2015}} | |||
|location=[[Installation 05]]{{Ref/Reuse|HU}} | |||
|terrain=Canyon | |terrain=Canyon | ||
| | |symmetry=Semi-symmetrical | ||
|playernumber=2-8 | |||
|gametypes=*[[Slayer]] | |gametypes=*[[Slayer]] | ||
*[[Capture the Flag|CTF]] | *[[Capture the Flag|CTF]] | ||
*[[Assault]] | *[[Assault]] | ||
| | |pagegamelabel=H2 | ||
}} | }} | ||
{{Article | {{Article quote|These forgotten structures were once the site of many bitter battles but have since been reclaimed by nature.}} | ||
'''Beaver Creek''' is a multiplayer | '''Beaver Creek''' is a multiplayer map from ''Halo 2''. It is set in a tiny canyon featuring two symmetrical bases that are separated by a small creek. ''Beaver Creek'' is a remake of the map ''[[Battle Creek]]'' from ''[[Halo: Combat Evolved]]'', and was remade as [[Battle Canyon]] for ''[[Halo: Combat Evolved Anniversary]]''. | ||
== | ==Setting== | ||
During the [[Battle of Installation 05]], the {{UNSCShip|Coral Sea}} conducted extensive scans of the [[Installation 05|ring]], collecting data on many locations of interest that would later be utilized for UNSC [[War Games]] simulations. Beaver Creek is one of many steep, narrow canyons used to bury the vast power generators used to power the dense web of telemetry conduits employed by Delta Halo to maintain its [[Slipspace translocation|translocation grid]].{{Ref/Reuse|HU}} | |||
==Description== | |||
===Layout=== | |||
[[File:H2 BeaverCreek Overhead.png|250px|left|thumb|Beaver Creek as seen from above.]] | |||
Two bases lie on opposite sides of this small map, separated by a small stream. Above the stream a giant rock walkway leads to a [[M41 SPNKR|rocket launcher]]. | |||
On the left side of each base a path leads to the upper portion of the map. On one side the path leads to a small cave housing a Sniper Rifle (Blue side), on the other side this path leads to another small cave which houses a Magnum (Red side). Upon exiting the cave with the Magnum a small ledge is visible which gives you access to the Rocket Launcher. The bases on this map consist of multiple entrance points. Each has an underground entrance out front and on the left sides that connect underground and lead up to the hallway that is accessed by the main front entrance. | On the left side of each base, a path leads to the upper portion of the map. On one side, the path leads to a small cave housing a Sniper Rifle (Blue side), on the other side this path leads to another small cave which houses a Magnum (Red side). Upon exiting the cave with the Magnum a small ledge is visible which gives you access to the Rocket Launcher. The bases on this map consist of multiple entrance points. Each has an underground entrance out front and on the left sides that connect underground and lead up to the hallway that is accessed by the main front entrance. | ||
All hallways eventually lead to the main room which, depending on the game; will house either the bomb planting site or the flag. Both bases have two way [[teleporter]]s at their rear. At both sides of the bases the roof can be accessed by either the rocks that are sitting there or by the stonewalls. Two glass windows are used to gain access to the base from the roof. One window is above a hallway near the lower entrance and the other is above the main room. | All hallways eventually lead to the main room which, depending on the game; will house either the bomb planting site or the flag. Both bases have two way [[teleporter]]s at their rear. At both sides of the bases the roof can be accessed by either the rocks that are sitting there or by the stonewalls. Two glass windows are used to gain access to the base from the roof. One window is above a hallway near the lower entrance and the other is above the main room. | ||
The [[Overshield]] has also been moved from near the | The [[Overshield]] has also been moved from near the teleporter to the middle of the map, in the river. | ||
===Differences from ''Battle Creek'' in ''Halo: Combat Evolved''=== | |||
Significant changes from Battle Creek include breakable glass roofs on the bases, and ramps instead of ladders leading to the [[SRS99C-S2 AM sniper rifle|sniper rifle]] and [[M6C magnum|magnum]], which replaces the second sniper rifle. | |||
===Weapons on map=== | |||
#[[BR55 battle rifle|Battle rifle]] | |||
#[[M7 SMG|SMG]] | |||
#[[M6C magnum|Magnum]] | |||
#[[M90 shotgun|Shotgun]] | |||
#[[SRS99C-S2 AM sniper rifle|Sniper rifle]] | |||
#[[M41 SPNKR|Rocket launcher]] | |||
#[[Type-25 plasma pistol|Plasma pistol]] | |||
#[[Okarda'phaa-pattern plasma rifle|Plasma rifle]] | |||
#[[Type-33 needler|Needler]] | |||
==Tactics== | ==Tactics== | ||
#The pathways up the hills next to the bases each lead up to a wonderful sniping position. Both also contain a sniper rifle in default games, and it's very difficult to be killed except for assassinations and other snipers. If your team can hold the sniper rifle spawns, and are halfway decent snipers, | #The pathways up the hills next to the bases each lead up to a wonderful sniping position. Both also contain a sniper rifle in default games, and it's very difficult to be killed except for assassinations and other snipers. If your team can hold the sniper rifle spawns, and are halfway decent snipers, you will almost certainly get a victory. | ||
#The space in between bases and the teleporters are definitely the hot spots for battles. Keep this in mind, and navigate around/above/into, depending on your situation. | #The space in between bases and the teleporters are definitely the hot spots for battles. Keep this in mind, and navigate around/above/into, depending on your situation. | ||
#You ''can'' super bounce into the tree near the red base sniper spawn, but it's rarely worth it. | #You ''can'' super bounce into the tree near the red base sniper spawn, but it's rarely worth it. | ||
| Line 47: | Line 53: | ||
#The tight corridors of the bases make it almost impossible to sneak in there and get the flag and get out in one piece. The solution? Crouch walk! Although it may be slow but you'll be invisible on the motion tracker so enemies are quite likely to run right into you and you'll be ready! | #The tight corridors of the bases make it almost impossible to sneak in there and get the flag and get out in one piece. The solution? Crouch walk! Although it may be slow but you'll be invisible on the motion tracker so enemies are quite likely to run right into you and you'll be ready! | ||
#If you and/or your team can grab the rocket launcher you'll be unstoppable as long as you regularly grab more ammo. In CTF have one person grab the flag while the rocket man covers him. Or have the rocket man run a distraction while some one grabs the flag. But you have to watch out for snipers or you will have some problems. | #If you and/or your team can grab the rocket launcher you'll be unstoppable as long as you regularly grab more ammo. In CTF have one person grab the flag while the rocket man covers him. Or have the rocket man run a distraction while some one grabs the flag. But you have to watch out for snipers or you will have some problems. | ||
#[[ | #The [[Noob combo]] is very useful in the map - many weapons can be dual wielded to good effect. If you are decent with the [[BR55 battle rifle|battle rifle]], you and your team can easily win the match. | ||
#It's possible to hang onto the windows of red base(the ones at the sides closest to teleporter). | #It's possible to hang onto the windows of red base (the ones at the sides closest to teleporter). On the side with the [[Okarda'phaa-pattern plasma rifle|plasma rifle]], jump onto the rock and jump while the whole time using crouch and steer into the window and you should stay on it. This allows a person to surprise anyone in the room allowing for a good field of fire and little protection for the people inside. Though it is possible to hang onto the adjacent window, it requires a grenade jump or second person and would be too awkward to get up there. | ||
==Trivia== | ==Trivia== | ||
===Easter | ===Easter eggs=== | ||
*If you push the rocks down on the sniper tower, there will be a message engraved on the wall that reads "[[Why Am I Here]]?" which is a reference to the [[ | *If you push the rocks down on the sniper tower, there will be a message engraved on the wall that reads "[[Why Am I Here]]?" which is a reference to the [[Red vs Blue]] machinima. | ||
*There is a face on the moon. | |||
===Miscellaneous=== | ===Miscellaneous=== | ||
*The model of Beaver Creek is the exact same one that was used for Battle Creek with the only difference being the team base colors and the removal of the ladders that led to the sniper spawn points. | *The model of Beaver Creek is the exact same one that was used for Battle Creek with the only difference being the team base colors and the removal of the ladders that led to the sniper spawn points. | ||
==Gallery== | ==Gallery== | ||
<gallery | {{Linkbox|gallery=yes}} | ||
File:Beaver Creek | <gallery> | ||
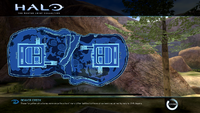
File: | File:HMCC H2 Beaver Creek Map.PNG|Beaver Creek Map. | ||
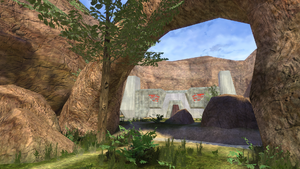
File:H2_BeaverCreek_RedBase.jpg|Red Base of Beaver Creek. | |||
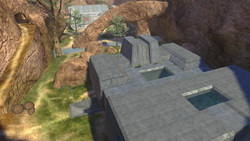
File:H2_BeaverCreek_BlueBase.jpg|Blue Base of Beaver Creek. | |||
</gallery> | </gallery> | ||
{{ | ==Sources== | ||
{{Ref/Sources}} | |||
{{Levels|H2|mode=yes}} | |||
Latest revision as of 09:42, November 10, 2024
| Beaver Creek | |
|---|---|

| |
| Map overview | |
|
Game: |
|
|
Map file name (?): |
|
| Lore information | |
|
Map designation (?): |
War Games Map_Set/: 250-5.[2] |
|
Location: |
|
| Gameplay overview | |
|
Terrain: |
Canyon |
|
Map layout: |
Semi-symmetrical |
|
Recommended number of players: |
2-8 |
|
Recommended gametype(s): |
|
| “ | These forgotten structures were once the site of many bitter battles but have since been reclaimed by nature. | ” |
Beaver Creek is a multiplayer map from Halo 2. It is set in a tiny canyon featuring two symmetrical bases that are separated by a small creek. Beaver Creek is a remake of the map Battle Creek from Halo: Combat Evolved, and was remade as Battle Canyon for Halo: Combat Evolved Anniversary.
Setting[edit]
During the Battle of Installation 05, the UNSC Coral Sea conducted extensive scans of the ring, collecting data on many locations of interest that would later be utilized for UNSC War Games simulations. Beaver Creek is one of many steep, narrow canyons used to bury the vast power generators used to power the dense web of telemetry conduits employed by Delta Halo to maintain its translocation grid.[2]
Description[edit]
Layout[edit]
Two bases lie on opposite sides of this small map, separated by a small stream. Above the stream a giant rock walkway leads to a rocket launcher.
On the left side of each base, a path leads to the upper portion of the map. On one side, the path leads to a small cave housing a Sniper Rifle (Blue side), on the other side this path leads to another small cave which houses a Magnum (Red side). Upon exiting the cave with the Magnum a small ledge is visible which gives you access to the Rocket Launcher. The bases on this map consist of multiple entrance points. Each has an underground entrance out front and on the left sides that connect underground and lead up to the hallway that is accessed by the main front entrance.
All hallways eventually lead to the main room which, depending on the game; will house either the bomb planting site or the flag. Both bases have two way teleporters at their rear. At both sides of the bases the roof can be accessed by either the rocks that are sitting there or by the stonewalls. Two glass windows are used to gain access to the base from the roof. One window is above a hallway near the lower entrance and the other is above the main room.
The Overshield has also been moved from near the teleporter to the middle of the map, in the river.
Differences from Battle Creek in Halo: Combat Evolved[edit]
Significant changes from Battle Creek include breakable glass roofs on the bases, and ramps instead of ladders leading to the sniper rifle and magnum, which replaces the second sniper rifle.
Weapons on map[edit]
Tactics[edit]
- The pathways up the hills next to the bases each lead up to a wonderful sniping position. Both also contain a sniper rifle in default games, and it's very difficult to be killed except for assassinations and other snipers. If your team can hold the sniper rifle spawns, and are halfway decent snipers, you will almost certainly get a victory.
- The space in between bases and the teleporters are definitely the hot spots for battles. Keep this in mind, and navigate around/above/into, depending on your situation.
- You can super bounce into the tree near the red base sniper spawn, but it's rarely worth it.
- You can get onto the roof to either hold a tactical defensive position or evade an enemy.
- There are boulders on the sniping points and on the big arch. Try to melee them off onto an unsuspecting enemy and see their reaction!
- The tight corridors of the bases make it almost impossible to sneak in there and get the flag and get out in one piece. The solution? Crouch walk! Although it may be slow but you'll be invisible on the motion tracker so enemies are quite likely to run right into you and you'll be ready!
- If you and/or your team can grab the rocket launcher you'll be unstoppable as long as you regularly grab more ammo. In CTF have one person grab the flag while the rocket man covers him. Or have the rocket man run a distraction while some one grabs the flag. But you have to watch out for snipers or you will have some problems.
- The Noob combo is very useful in the map - many weapons can be dual wielded to good effect. If you are decent with the battle rifle, you and your team can easily win the match.
- It's possible to hang onto the windows of red base (the ones at the sides closest to teleporter). On the side with the plasma rifle, jump onto the rock and jump while the whole time using crouch and steer into the window and you should stay on it. This allows a person to surprise anyone in the room allowing for a good field of fire and little protection for the people inside. Though it is possible to hang onto the adjacent window, it requires a grenade jump or second person and would be too awkward to get up there.
Trivia[edit]
Easter eggs[edit]
- If you push the rocks down on the sniper tower, there will be a message engraved on the wall that reads "Why Am I Here?" which is a reference to the Red vs Blue machinima.
- There is a face on the moon.
Miscellaneous[edit]
- The model of Beaver Creek is the exact same one that was used for Battle Creek with the only difference being the team base colors and the removal of the ladders that led to the sniper spawn points.
Gallery[edit]

|
Browse more images in this article's gallery page. |
Sources[edit]
| |||||||||||||||||||||||||||||||


