Burial Mounds: Difference between revisions
From Halopedia, the Halo wiki
m (→Gallery: Linkbox gallery) |
CMDR RileySV (talk | contribs) (Attempted to make the page more consistent + link fixes.) |
||
| Line 16: | Line 16: | ||
'''Burial Mounds''' is a ''[[Halo 2]]'' [[Multiplayer]] map established on [[Basis]]. After the destruction of [[Installation 04]], Sesa 'Refumee's heretic faction used it as a base. | '''Burial Mounds''' is a ''[[Halo 2]]'' [[Multiplayer]] map established on [[Basis]]. After the destruction of [[Installation 04]], Sesa 'Refumee's heretic faction used it as a base. | ||
== | ==Universe and lore== | ||
During the [[Battle of Installation 04]], [[Installation 04|Alpha Halo]] was destroyed by [[John-117]]. Following the ring's destruction, wreckage of the [[Forerunner]] installation would rain down on the moon of Basis. Chunks, varying in size from gigantic landscapes to small scraps of metal, of the installation are raining down on the surface of the moon Basis. Two huge chunks of twisted metal dominate the horizon already, and flaming fragments enter the atmosphere frequently | During the [[Battle of Installation 04]], [[Installation 04|Alpha Halo]] was destroyed by [[John-117]].{{Ref/Level|HCE|[[The Maw]]}} Following the ring's destruction, wreckage of the [[Forerunner]] installation would rain down on the moon of Basis. Chunks, varying in size from gigantic landscapes to small scraps of metal, of the installation are raining down on the surface of the moon Basis. Two huge chunks of twisted metal dominate the horizon already, and flaming fragments enter the atmosphere frequently. | ||
===The | ==Overview== | ||
The map is ideal for 4v4 and the most popular gametype is Team Snipers, though the map is also ideal for [[Capture the Flag|One Flag]] and [[Assault]]. | |||
===Layout=== | |||
<gallery> | |||
File:HMCC H2 Burial Mounds Map.png|Burial Mounds Map. | |||
</gallery> | |||
===Strategies=== | |||
*The tunnel near the bridge (over the gully) is useful as a sniper cover spot. Since it also spawns the rocket launcher, it's a good place to camp with a sniper/BR and rocket launcher, so that you can destroy any threatening vehicles and take out the enemy from a distance. In sniper exclusive games, however, this strategy fails. | |||
*The ribs are tremendously popular in sniper games- avoid them (or not, depending on your skill level) as often as possible. It's usually better to keep distance. | |||
*The earth ramps that go up near the gully are sometimes used as a lockdown for team battles. They will simply sit in the tunnel, gully, and hills, and wait for enemies to get within [[BR55 battle rifle|battle rifle]] range. This is incredibly painful for the other team in most cases, as snipers will take up defensive positions in the rocky knolls near the ribs, and simply snipe anyone that breaches the 'fort'. | |||
*The dark area near the ribs is a good sniper cover, as it's often ignored because of its lighting. | |||
*Burial Mounds is a large map. However, there is plenty of cover in the generators, rocks near the ribs, the rocks near the gully, the gully itself, and the back path near the defensive base. Use this variety of cover to be unpredictable. If you're predictable, you will usually be killed. | |||
==Callouts== | |||
====The Gully==== | |||
The gully runs along a side of the map with the offensive base at one end. Many boulders lie inside making for many hiding/cover areas. A bridge spans the gully in the middle and a [[M41 SPNKR|rocket launcher]] has a default spawn on top of the bridge. Towards the back of the gully near the base, chunks of the Halo form a shadowed area where a [[Type-50 particle beam rifle|beam rifle]] can be found. A [[M12 Warthog|Warthog]] spawns near the base. | The gully runs along a side of the map with the offensive base at one end. Many boulders lie inside making for many hiding/cover areas. A bridge spans the gully in the middle and a [[M41 SPNKR|rocket launcher]] has a default spawn on top of the bridge. Towards the back of the gully near the base, chunks of the Halo form a shadowed area where a [[Type-50 particle beam rifle|beam rifle]] can be found. A [[M12 Warthog|Warthog]] spawns near the base. | ||
<gallery> | |||
File:H2_BurialMounds_Gully.jpg|thumb|right|The gully on Burial Mounds. | |||
</gallery> | |||
====The Ribs==== | |||
Metal walls form over this area to what would look like a rib section of the map. It provides good cover from the turrets of the defensive base. | |||
= | ====The Cave==== | ||
This cave along the back of the map has two entrances on the back wall. An [[Type-1 Energy Sword|Energy Sword]] can be found in the middle of the cave. The cave provides a good hideout from the other players, and also serves as a camping spot. | This cave along the back of the map has two entrances on the back wall. An [[Type-1 Energy Sword|Energy Sword]] can be found in the middle of the cave. The cave provides a good hideout from the other players, and also serves as a camping spot. | ||
===The Center=== | ====The Center==== | ||
The center of this map is mostly bare, except for a pillar of burning metal. A [[ | The center of this map is mostly bare, except for a pillar of burning metal. A [[Ghost]] is usually found at the base of this pillar. | ||
===The Defensive Base=== | ====The Defensive Base==== | ||
This base has three walls and a bridge to the front of the map. There are two windows; one large window opens to the center, and the higher window overlooks the Gully. It has two [[M247 machine gun|Gun Turret]] placements on each window. A [[ | This base has three walls and a bridge to the front of the map. There are two windows; one large window opens to the center, and the higher window overlooks the Gully. It has two [[M247 machine gun|Gun Turret]] placements on each window. A [[sniper rifle]] is at the back of the bridge. | ||
<gallery> | |||
File:H2_BurialMounds BlueBaseView.jpg|The defending base. | |||
</gallery> | |||
==Production notes== | |||
[[File:H2 BurialMounds Perspective Concept.jpg|thumb|right|200px|Concept art of the map featuring [[Mongoose|ATV]]s.]] | |||
Originally Burial Mounds was to be the setting of the campaign level ''[[The Arbiter]]'', however this idea was later discarded for the final version set on the Forerunner [[Threshold gas mine|gas mine]] above [[Threshold]].{{Citation needed}} | |||
After the Halo 2 media blackout that occurred in 2003, Burial Mounds was the first Multiplayer level to be shown in the form of a screenshot on Bungie.net on January 30, 2004.<ref>[http://halo.bungie.net/News/content.aspx?type=news&cid=600 '''Bungie.net''': ''In Reach of Fall'']</ref> | |||
The first layout for Burial Mounds (see below) predates [[Zanzibar]], [[Standoff]] and [[Timberland]].<ref>[https://twitter.com/MaxHoberman/status/1073619878223978497 Max Hoberman's response on Twitter]</ref> The map design was ultimately scrapped due to its size,<ref>[https://twitter.com/MaxHoberman/status/1073640794450477062 Max Hoberman's response on Twitter]</ref> as [[Max Hoberman]] and [[Chris Carney]] were the only developers available to work on it, and the layout was redesigned.<ref>[https://twitter.com/MaxHoberman/status/1073641053570383874 Max Hoberman's Response on Twitter]</ref> | |||
{{Clear}} | |||
==Trivia== | |||
===Glitches=== | ===Glitches=== | ||
*There is a way to get out of Burial Mounds. You need two players. One needs to be wielding a weapon without a scope, the other needs to be driving a Warthog. Position the first player near the beam rifle spawn, where there is a small corner. Make the Warthog barrel towards the first player while he is walking backwards. This should send him flying up onto a platform. Jump on the rocks at the edge to get to the Largest rock. Out near the corner, there should be a point. Zoom in on an unscoped weapon and start to walk towards it. When you hear your feet stop, walk to the right to be out of the map. | *There is a way to get out of Burial Mounds. You need two players. One needs to be wielding a weapon without a scope, the other needs to be driving a Warthog. Position the first player near the beam rifle spawn, where there is a small corner. Make the Warthog barrel towards the first player while he is walking backwards. This should send him flying up onto a platform. Jump on the rocks at the edge to get to the Largest rock. Out near the corner, there should be a point. Zoom in on an unscoped weapon and start to walk towards it. When you hear your feet stop, walk to the right to be out of the map. | ||
| Line 55: | Line 66: | ||
===Miscellaneous=== | ===Miscellaneous=== | ||
*A different approach is taken on its appearance in the ''[[Red vs Blue]]'' series where, on the director's commentary, they call Burial Mounds a "melted version of [[Sidewinder]]." The general horseshoe shape of Sidewinder can be discerned in Burial Mounds. | *A different approach is taken on its appearance in the ''[[Red vs Blue]]'' series where, on the director's commentary, they call Burial Mounds a "melted version of [[Sidewinder]]." The general horseshoe shape of Sidewinder can be discerned in Burial Mounds. | ||
*One piece of debris in the map resembles the central structure in the level the Silent Cartographer in ''Halo: Combat Evolved'' where Master Chief encounters the first Hunter pair. | *One piece of debris in the map resembles the central structure in the level the Silent Cartographer in ''Halo: Combat Evolved'' where Master Chief encounters the first Hunter pair. | ||
| Line 61: | Line 71: | ||
{{Linkbox|gallery=yes}} | {{Linkbox|gallery=yes}} | ||
<gallery> | <gallery> | ||
File:H2 BurialMounds EarlyDesign.jpg|One of the first layouts of Burial Mounds, predating many other ''Halo'' maps. | File:H2 BurialMounds EarlyDesign.jpg|One of the first layouts of Burial Mounds, predating many other ''Halo'' maps. | ||
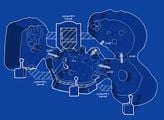
File:H2 BurialMounds Blueprint Concept.jpg|Layout concept art of Burial Mounds. | File:H2 BurialMounds Blueprint Concept.jpg|Layout concept art of Burial Mounds. | ||
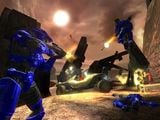
File:H2_BurialMounds_Warthog_Battle.jpg|The first Multiplayer image of ''Halo 2'', in its alpha state. | File:H2_BurialMounds_Warthog_Battle.jpg|The first Multiplayer image of ''Halo 2'', in its alpha state. | ||
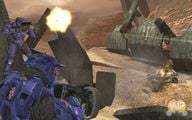
File:H2_BurialMounds_RedTeam.jpg|The third multiplayer image of ''Halo 2'', in its beta state. | File:H2_BurialMounds_RedTeam.jpg|The third multiplayer image of ''Halo 2'', in its beta state. | ||
Revision as of 21:15, July 8, 2021
| Burial Mounds | |
|---|---|

| |
| Map overview | |
|
Game: |
|
| Lore information | |
|
Location: |
|
| Gameplay overview | |
|
Terrain: |
Desert |
|
Recommended number of players: |
4-16 |
|
Recommended gametype(s): |
|
| “ | This makeshift Heretic camp on Basis is littered with wreckage from the destruction of Installation 04. | ” |
Burial Mounds is a Halo 2 Multiplayer map established on Basis. After the destruction of Installation 04, Sesa 'Refumee's heretic faction used it as a base.
Universe and lore
During the Battle of Installation 04, Alpha Halo was destroyed by John-117.[1] Following the ring's destruction, wreckage of the Forerunner installation would rain down on the moon of Basis. Chunks, varying in size from gigantic landscapes to small scraps of metal, of the installation are raining down on the surface of the moon Basis. Two huge chunks of twisted metal dominate the horizon already, and flaming fragments enter the atmosphere frequently.
Overview
The map is ideal for 4v4 and the most popular gametype is Team Snipers, though the map is also ideal for One Flag and Assault.
Layout
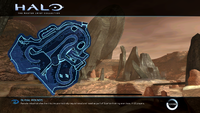
Burial Mounds Map.

Strategies
- The tunnel near the bridge (over the gully) is useful as a sniper cover spot. Since it also spawns the rocket launcher, it's a good place to camp with a sniper/BR and rocket launcher, so that you can destroy any threatening vehicles and take out the enemy from a distance. In sniper exclusive games, however, this strategy fails.
- The ribs are tremendously popular in sniper games- avoid them (or not, depending on your skill level) as often as possible. It's usually better to keep distance.
- The earth ramps that go up near the gully are sometimes used as a lockdown for team battles. They will simply sit in the tunnel, gully, and hills, and wait for enemies to get within battle rifle range. This is incredibly painful for the other team in most cases, as snipers will take up defensive positions in the rocky knolls near the ribs, and simply snipe anyone that breaches the 'fort'.
- The dark area near the ribs is a good sniper cover, as it's often ignored because of its lighting.
- Burial Mounds is a large map. However, there is plenty of cover in the generators, rocks near the ribs, the rocks near the gully, the gully itself, and the back path near the defensive base. Use this variety of cover to be unpredictable. If you're predictable, you will usually be killed.
Callouts
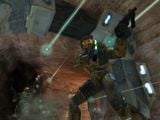
The Gully
The gully runs along a side of the map with the offensive base at one end. Many boulders lie inside making for many hiding/cover areas. A bridge spans the gully in the middle and a rocket launcher has a default spawn on top of the bridge. Towards the back of the gully near the base, chunks of the Halo form a shadowed area where a beam rifle can be found. A Warthog spawns near the base.
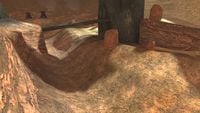
The gully on Burial Mounds.

The Ribs
Metal walls form over this area to what would look like a rib section of the map. It provides good cover from the turrets of the defensive base.
The Cave
This cave along the back of the map has two entrances on the back wall. An Energy Sword can be found in the middle of the cave. The cave provides a good hideout from the other players, and also serves as a camping spot.
The Center
The center of this map is mostly bare, except for a pillar of burning metal. A Ghost is usually found at the base of this pillar.
The Defensive Base
This base has three walls and a bridge to the front of the map. There are two windows; one large window opens to the center, and the higher window overlooks the Gully. It has two Gun Turret placements on each window. A sniper rifle is at the back of the bridge.
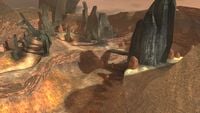
The defending base.

Production notes

Originally Burial Mounds was to be the setting of the campaign level The Arbiter, however this idea was later discarded for the final version set on the Forerunner gas mine above Threshold.[citation needed]
After the Halo 2 media blackout that occurred in 2003, Burial Mounds was the first Multiplayer level to be shown in the form of a screenshot on Bungie.net on January 30, 2004.[2]
The first layout for Burial Mounds (see below) predates Zanzibar, Standoff and Timberland.[3] The map design was ultimately scrapped due to its size,[4] as Max Hoberman and Chris Carney were the only developers available to work on it, and the layout was redesigned.[5]
Trivia
Glitches
- There is a way to get out of Burial Mounds. You need two players. One needs to be wielding a weapon without a scope, the other needs to be driving a Warthog. Position the first player near the beam rifle spawn, where there is a small corner. Make the Warthog barrel towards the first player while he is walking backwards. This should send him flying up onto a platform. Jump on the rocks at the edge to get to the Largest rock. Out near the corner, there should be a point. Zoom in on an unscoped weapon and start to walk towards it. When you hear your feet stop, walk to the right to be out of the map.
- This glitch is also known as the Hologram Glitch. To find this glitch in Burial Mounds, you must be equipped with a rocket launcher as the primary weapon, or it can be found on the bridge over the gully in the middle of the map. Wraiths must also be on the map, it also requires two players. One of the players must stand on the front side of the rock column by the ghost respawn point where the rock slants inward. There should also be a plasma pistol near the base move a little to the right and turn around so you are not facing the rock. The second player should get in a Wraith and drive towards the first player standing by the rock column. Right before you ram the first player boost using L with the wraith and you should push the first player through the rock and out of the map. While falling down the player should hit a beige sphere, this beige sphere is known as a skybox. Have the second player in the Wraith look up and the dead giant figure of the Master Chief should be lying on top of the map with his weapons.
Miscellaneous
- A different approach is taken on its appearance in the Red vs Blue series where, on the director's commentary, they call Burial Mounds a "melted version of Sidewinder." The general horseshoe shape of Sidewinder can be discerned in Burial Mounds.
- One piece of debris in the map resembles the central structure in the level the Silent Cartographer in Halo: Combat Evolved where Master Chief encounters the first Hunter pair.
Gallery

|
Browse more images in this article's gallery page. |
One of the first layouts of Burial Mounds, predating many other Halo maps.
Layout concept art of Burial Mounds.
The first Multiplayer image of Halo 2, in its alpha state.
The third multiplayer image of Halo 2, in its beta state.
A Multiplayer match on Burial Mounds.


Sources
| |||||||||||||||||||||||||||||||


