Halo 2 storyboards: Difference between revisions
From Halopedia, the Halo wiki
BaconShelf (talk | contribs) |
(→The Great Journey: Brought this section in line w/ the above edit; the "Scarab" here is a placeholder, and was never meant to reflect the final version) |
||
| (31 intermediate revisions by 5 users not shown) | |||
| Line 1: | Line 1: | ||
{{Title|''Halo 2'' storyboards}} | {{Title|''Halo 2'' storyboards}} | ||
{{ | {{Status|RealWorld}} | ||
{{Stub}} | {{Stub}} | ||
{{Series/Cut/H2}} | {{Series/Cut/H2}} | ||
The '''''Halo 2'' storyboards''' | |||
The '''''Halo 2'' storyboards''' consist of the early drafts and ideas produced for ''[[Halo 2]]'s'' story. The [[storyboard]]s were created by [[Lee Wilson]], with some additional work by [[Joseph Staten]]. | |||
==Overview== | ==Overview== | ||
{{Quote| I am Lee Wilson, and yes I did do the storyboards for Halo 1, 2, and 3. Halo 1 were all on paper like traditional movie shooting boards. Halo 2's story went through a lot of changes and so I ended up doing them in a comic panel style, since we weren't in a place to do shooting boards. Halo 3' boards I did in color to work out the lighting and inform my final cinematic lighting. By Halo: Reach, I was directing the story and cinematics, so they were mostly scribbles and notes in various notebooks. It's certainly a trip down memory lane, and I little tough to look at some of my old artwork.|Lee Wilson discussing his work on ''Halo 2'', in a comment on YouTube.{{Ref/YouTube|Id=WilsonCommentYT|KTYbSZ87Vzw|C3 SABERTOOTH - Halo Channel|HALO 1'S LOST STORY}}{{Ref/Generic|[[:File:REF YouTube Storyboards Comment.png|Lee Wilson discusses his storyboards]]|(screenshot)}}}} | |||
When Lee Wilson started the storyboards, it was clear to him that the script was not ready for shooting boards due to the numerous script revisions at [[Bungie]]. This lead to Lee boarding up the entire cinematic script two to three times. What he opted to do was present the boards in a hybrid storyboard/comic panel style, drawing them in pen to "remove the temptation of erasing and redrawing them until they looked good to me". These boards were for simple communication, not to be displayed on a wall.{{Ref/Site|Id=H2Storyboards|URL=https://www.artstation.com/artwork/68xkw5|Site=Artstation|Page=Halo 2 storyboards|Detail=|Quote=|D=28|M=12|Y=2020}} | When Lee Wilson started the storyboards, it was clear to him that the script was not ready for shooting boards due to the numerous script revisions at [[Bungie]]. This lead to Lee boarding up the entire cinematic script two to three times. What he opted to do was present the boards in a hybrid storyboard/comic panel style, drawing them in pen to "remove the temptation of erasing and redrawing them until they looked good to me". These boards were for simple communication, not to be displayed on a wall.{{Ref/Site|Id=H2Storyboards|URL=https://www.artstation.com/artwork/68xkw5|Site=Artstation|Page=Halo 2 storyboards|Detail=|Quote=|D=28|M=12|Y=2020}} | ||
==E3 2003 boards== | |||
These boards were also drawn by Lee R. Wilson. These were for the [[Halo 2 E3 demo|''Halo 2'' E3 Demo]]. | These boards were also drawn by Lee R. Wilson. These were for the [[Halo 2 E3 demo|''Halo 2'' E3 Demo]]. | ||
<gallery> | <gallery> | ||
| Line 31: | Line 32: | ||
</gallery> | </gallery> | ||
==First revision storyboards== | |||
These storyboards represent some of the oldest work done by Wilson on ''Halo 2'', and bear the least resemblance to the final product. These storyboards are characterised by simple linework and shading often done in pen, moreso resembling the [[Halo: Combat Evolved storyboards|storyboard work]] done for ''[[Halo: Combat Evolved]]''. Due to these boards being produced early in the development of ''Halo 2'', they take many cues from ''Combat Evolved'' such as Master Chief, Arbiter and UNSC Marines all using armour derived from their ''Combat Evolved''-era counterparts, as their ''Halo 2'' incarnations had not been designed in full yet. | These storyboards represent some of the oldest work done by Wilson on ''Halo 2'', and bear the least resemblance to the final product. These storyboards are characterised by simple linework and shading often done in pen, moreso resembling the [[Halo: Combat Evolved storyboards|storyboard work]] done for ''[[Halo: Combat Evolved]]''. Due to these boards being produced early in the development of ''Halo 2'', they take many cues from ''Combat Evolved'' such as Master Chief, Arbiter and UNSC Marines all using armour derived from their ''Combat Evolved''-era counterparts, as their ''Halo 2'' incarnations had not been designed in full yet. | ||
===The Heretic=== | |||
The early storyboards for the ''[[The Heretic]]'' cutscene differ little from those in the final game, though have some minor differences. The council chamber of ''[[High Charity]]'' bears a heavy resemblance to the [[wikipedia:House of Lords|House of Lords]], and the opening panning shot of the city is complete with an excerpt from the [[Writ of Union]]. Some camera angles are different, and the [[Sangheili Councilor|Councilors]] do not bear their distinctive headdresses seen in the final game. | The early storyboards for the ''[[The Heretic]]'' cutscene differ little from those in the final game, though have some minor differences. The council chamber of ''[[High Charity]]'' bears a heavy resemblance to the [[wikipedia:House of Lords|House of Lords]], and the opening panning shot of the city is complete with an excerpt from the [[Writ of Union]]. Some camera angles are different, and the [[Sangheili Councilor|Councilors]] do not bear their distinctive headdresses seen in the final game. | ||
<gallery> | <gallery> | ||
| Line 51: | Line 52: | ||
</gallery> | </gallery> | ||
===The Armory=== | |||
The storyboards for the ''[[The Armory]]'' cutscene display only minor changes from the final game, such as the arms master carting away the old battered [[MJOLNIR Powered Assault Armor/Mark V|Mark V]] suit from ''Combat Evolved'', and a very different design for [[Cairo Station]] - referred to here as ''Torres Vedras''. The [[Cut Halo 2 vehicles#Strike fighter|strike fighter]] is also present in these storyboards. | The storyboards for the ''[[The Armory]]'' cutscene display only minor changes from the final game, such as the arms master carting away the old battered [[MJOLNIR Powered Assault Armor/Mark V|Mark V]] suit from ''Combat Evolved'', and a very different design for [[Cairo Station]] - referred to here as ''Torres Vedras''. The [[Cut Halo 2 vehicles#Strike fighter|strike fighter]] is also present in these storyboards. | ||
<gallery> | <gallery> | ||
| Line 60: | Line 61: | ||
</gallery> | </gallery> | ||
===Cairo Station=== | |||
The level ''[[Cairo Station]]'' has an opening cinematic mostly similar to that found in the final game, though with one major difference - the {{Class|Moncton|orbital weapon platform}} has a vastly different design and bears the name ''Torres Vedras'', rather than the final game's [[Cairo Station (station)|Cairo]]. The opening cutscene opens by focusing on a tram on the station's exterior, and the rest of the cutscene proceeds mostly as in the final game. Notably, [[Terrence Hood|Lord Hood]] is shown wearing a cape, and [[Cortana]] is shown with short-cropped hair akin to her original ''Combat Evolved'' appearance. The cinematic ends with Hood departing the assembly hall and a fade to black for gameplay, and no focus on the UNSC fleet overhead. | The level ''[[Cairo Station]]'' has an opening cinematic mostly similar to that found in the final game, though with one major difference - the {{Class|Moncton|orbital weapon platform}} has a vastly different design and bears the name ''Torres Vedras'', rather than the final game's [[Cairo Station (station)|Cairo]]. The opening cutscene opens by focusing on a tram on the station's exterior, and the rest of the cutscene proceeds mostly as in the final game. Notably, [[Terrence Hood|Lord Hood]] is shown wearing a cape, and [[Cortana]] is shown with short-cropped hair akin to her original ''Combat Evolved'' appearance. The cinematic ends with Hood departing the assembly hall and a fade to black for gameplay, and no focus on the UNSC fleet overhead. | ||
<gallery> | |||
File:H2_CairoStation_V1_Storyboard_Intro_1.jpg | |||
File:H2_CairoStation_V1_Storyboard_Intro_2.jpg | |||
File:H2_CairoStation_V1_Storyboard_Intro_3.jpg | |||
File:H2_CairoStation_V1_Storyboard_Intro_4.jpg | |||
File:H2_CairoStation_V1_Storyboard_Intro_5.jpg | |||
File:H2_CairoStation_V1_Storyboard_Intro_6.jpg | |||
File:H2_CairoStation_V1_Storyboard_Intro_7.jpg | |||
File:H2_CairoStation_V1_Storyboard_Intro_8.jpg | |||
File:H2_CairoStation_V1_Storyboard_Intro_9.jpg | |||
File:H2_CairoStation_V1_Storyboard_Intro_10.jpg | |||
File:H2_CairoStation_V1_Storyboard_Intro_11.jpg | |||
File:H2_CairoStation_V1_Storyboard_Intro_12.jpg | |||
File:H2_CairoStation_V1_Storyboard_Intro_13.jpg | |||
File:H2_CairoStation_V1_Storyboard_Intro_14.jpg | |||
File:H2_CairoStation_V1_Storyboard_Intro_15.jpg | |||
File:H2_CairoStation_V1_Storyboard_Intro_16.jpg | |||
File:H2_CairoStation_V1_Storyboard_Intro_17.jpg | |||
File:H2_CairoStation_V1_Storyboard_Intro_18.jpg | |||
File:H2_CairoStation_V1_Storyboard_Intro_19.jpg | |||
File:H2_CairoStation_V1_Storyboard_Intro_20.jpg | |||
File:H2_CairoStation_V1_Storyboard_Intro_21.jpg | |||
File:H2_CairoStation_V1_Storyboard_Intro_22.jpg | |||
File:H2_CairoStation_V1_Storyboard_Intro_23.jpg | |||
File:H2_CairoStation_V1_Storyboard_Intro_24.jpg | |||
File:H2_CairoStation_V1_Storyboard_Intro_25.jpg | |||
</gallery> | |||
=== | ===covenantship=== | ||
<gallery> | |||
File:H2 CovenantShip V1 Storyboard Intro 1.jpg | |||
File:H2 CovenantShip V1 Storyboard Intro 2.jpg | |||
File:H2 CovenantShip V1 Storyboard Intro 3.jpg | |||
File:H2 CovenantShip V1 Storyboard Intro 4.jpg | |||
File:H2 CovenantShip V1 Storyboard Intro 5.jpg | |||
File:H2 CovenantShip V1 Storyboard Outro 1.jpg | |||
File:H2 CovenantShip V1 Storyboard Outro 2.jpg | |||
File:H2 CovenantShip V1 Storyboard Outro 3.jpg | |||
File:H2 CovenantShip V1 Storyboard Outro 4.jpg | |||
File:H2 CovenantShip V1 Storyboard Outro 5.jpg | |||
File:H2 CovenantShip V1 Storyboard Outro 6.jpg | |||
File:H2 CovenantShip V1 Storyboard Outro 7.jpg | |||
File:H2 CovenantShip V1 Storyboard Outro 8.jpg | |||
File:H2 CovenantShip V1 Storyboard Outro 9.jpg | |||
File:H2 CovenantShip V1 Storyboard Outro 10.jpg | |||
File:H2 CovenantShip V1 Storyboard Outro 11.jpg | |||
</gallery> | |||
====alphamoon==== | ===Earth city=== | ||
A set of storyboards for the cut [[alphamoon]] level can be found in Wilson's post, showcasing an encounter between the Arbiter and the Heretic leader [[Sesa 'Refumee]] similar to that of the gas mines, but instead taking place in the wreckage of the [[Control Room (Installation 04)|control room]] of Installation 04. The storyboards showcase a struggle between 'Refumee and the Arbiter, with both stopping their fighting as [[343 Guilty Spark]] enters the room. The two would begin listening to Spark, only for the crack of a [[ | Following on from the destruction of the Covenant ship in the prior level, the Master Chief is evacuated from New Mombasa via Pelican dropship. The Pelican ascends into space to dock with the {{UNSCShip|In Amber Clad}}, as the frigate begins to join a UNSC task force. Johnson and Master Chief enter the ship's drop pods as the human battlegroup engages the Covenant fleet, and the ''In Amber Clad'' begins to rocket ahead to try and catch up with the Prophet of Regret's ship, ''[[Solemn Penance]]''. The carrier creates a [[slipspace portal]], and the ''In Amber Clad'' is able to enter it before it closes - being teleported to places unknown. | ||
<gallery> | |||
File:H2 EarthCity Storyboard Outro 1.jpg | |||
File:H2 EarthCity Storyboard Outro 2.jpg | |||
File:H2 EarthCity Storyboard Outro 3.jpg | |||
File:H2 EarthCity Storyboard Outro 4.jpg | |||
File:H2 EarthCity Storyboard Outro 5.jpg | |||
File:H2 EarthCity Storyboard Outro 6.jpg | |||
File:H2 EarthCity Storyboard Outro 7.jpg | |||
File:H2 EarthCity Storyboard Outro 8.jpg | |||
File:H2 EarthCity Storyboard Outro 9.jpg | |||
File:H2 EarthCity Storyboard Outro 10.jpg | |||
File:H2 EarthCity Storyboard Outro 11.jpg | |||
File:H2 EarthCity Storyboard Outro 12.jpg | |||
File:H2 EarthCity Storyboard Outro 13.jpg | |||
File:H2 EarthCity Storyboard Outro 14.jpg | |||
File:H2 EarthCity Storyboard Outro 15.jpg | |||
File:H2 EarthCity Storyboard Outro 16.jpg | |||
File:H2 EarthCity Storyboard Outro 17.jpg | |||
File:H2 EarthCity Storyboard Outro 18.jpg | |||
File:H2 EarthCity Storyboard Outro 19.jpg | |||
File:H2 EarthCity Storyboard Outro 20.jpg | |||
File:H2 EarthCity Storyboard Outro 21.jpg | |||
File:H2 EarthCity Storyboard Outro 22.jpg | |||
File:H2 EarthCity Storyboard Outro 23.jpg | |||
File:H2 EarthCity Storyboard Outro 24.jpg | |||
File:H2 EarthCity Storyboard Outro 25.jpg | |||
</gallery> | |||
===The Arbiter=== | |||
During this stage of development, the level that would become known as The Arbiter was known as [[alphamoon]]. These early storyboards depict a cutscene presumably from that era which did make it into the final game, albeit in a very changed form. For the purposes of delineation, they have been separated here from the alphamoon storyboards below, though would have likely been intended for the same level. They depict the moment in which the Prophets grant [[Thel 'Vadam]]ee the title of [[Arbiter]], and present him with his [[Arbiter body armor|armour]]. Unlike in the final game, the Arbiter is not taken to the [[Mausoleum of the Arbiter]], and the Prophets instead come to his cell and talk to him through the bars. | |||
<gallery> | |||
File:H2 TheArbiter V1 Storyboard Intro 1.jpg | |||
File:H2 TheArbiter V1 Storyboard Intro 2.jpg | |||
File:H2 TheArbiter V1 Storyboard Intro 3.jpg | |||
File:H2 TheArbiter V1 Storyboard Intro 4.jpg | |||
File:H2 TheArbiter V1 Storyboard Intro 5.jpg | |||
File:H2 TheArbiter V1 Storyboard Intro 6.jpg | |||
File:H2 TheArbiter V1 Storyboard Intro 7.jpg | |||
File:H2 TheArbiter V1 Storyboard Intro 8.jpg | |||
</gallery> | |||
===alphamoon=== | |||
A set of storyboards for the cut [[alphamoon]] level can be found in Wilson's post, showcasing an encounter between the Arbiter and the Heretic leader [[Sesa 'Refumee]] similar to that of the gas mines, but instead taking place in the wreckage of the [[Control Room (Installation 04)|control room]] of Installation 04. The storyboards showcase a struggle between 'Refumee and the Arbiter, with both stopping their fighting as [[343 Guilty Spark]] enters the room. The two would begin listening to Spark, only for the crack of a [[Vostu-pattern carbine|carbine]] to interrupt Spark, and the camera pan down to showcase the Heretic lifting a blood-soaked hand from his chest. The shooter would then be revealed to be [[Tartarus]], who subsequently captures Guilty Spark and then executes the now-injured heretic leader before walking away. | |||
<gallery> | <gallery> | ||
File:H2 AlphaMoon Storyboard Outro 1.jpg|Alphamoon outro storyboard 1. | File:H2 AlphaMoon Storyboard Outro 1.jpg|Alphamoon outro storyboard 1. | ||
| Line 81: | Line 170: | ||
</gallery> | </gallery> | ||
===Delta Halo=== | |||
The early sequencing for the ''[[Delta Halo]]'' opening cutscene showcases a small [[space warfare|space battle]] between ''In Amber Clad'' and two CCS-class battlecruisers. | |||
<gallery> | |||
File:H2 DeltaHalo V1 Storyboard Intro 1.jpg | |||
File:H2 DeltaHalo V1 Storyboard Intro 2.jpg | |||
File:H2 DeltaHalo V1 Storyboard Intro 3.jpg | |||
File:H2 DeltaHalo V1 Storyboard Intro 4.jpg | |||
File:H2 DeltaHalo V1 Storyboard Intro 5.jpg | |||
File:H2 DeltaHalo V1 Storyboard Intro 6.jpg | |||
File:H2 DeltaHalo V1 Storyboard Intro 7.jpg | |||
File:H2 DeltaHalo V1 Storyboard Intro 8.jpg | |||
File:H2 DeltaHalo V1 Storyboard Intro 9.jpg | |||
File:H2 DeltaHalo V1 Storyboard Intro 10.jpg | |||
File:H2 DeltaHalo V1 Storyboard Intro 11.jpg | |||
File:H2 DeltaHalo V1 Storyboard Intro 12.jpg | |||
File:H2 DeltaHalo V1 Storyboard Intro 13.jpg | |||
File:H2 DeltaHalo V1 Storyboard Intro 14.jpg | |||
File:H2 DeltaHalo V1 Storyboard Intro 15.jpg | |||
File:H2 DeltaHalo V1 Storyboard Intro 16.jpg | |||
File:H2 DeltaHalo V1 Storyboard Intro 17.jpg | |||
File:H2 DeltaHalo V1 Storyboard Intro 18.jpg | |||
File:H2 DeltaHalo V1 Storyboard Intro 19.jpg | |||
File:H2 DeltaHalo V1 Storyboard Intro 20.jpg | |||
File:H2 DeltaHalo V1 Storyboard Intro 21.jpg | |||
File:H2 DeltaHalo V1 Storyboard Intro 22.jpg | |||
File:H2 DeltaHalo V1 Storyboard Intro 23.jpg | |||
File:H2 DeltaHalo V1 Storyboard Intro 24.jpg | |||
File:H2 DeltaHalo V1 Storyboard Intro 25.jpg | |||
File:H2 DeltaHalo V1 Storyboard Intro 26.jpg | |||
File:H2 DeltaHalo V1 Storyboard Intro 27.jpg | |||
File:H2 DeltaHalo V1 Storyboard Intro 28.jpg | |||
File:H2 DeltaHalo V1 Storyboard Intro 29.jpg | |||
</gallery> | |||
===Quarantine Zone=== | |||
An outro cutscene for what appears to be a heavily altered [[Quarantine Zone]] can be found in the earliest revisions. The outro cutscene begins at one of Installation 05's "thermal outtake platforms", near the site of a crashed [[D77-TC Pelican|Pelican]] dropship. Around the crash site are Miranda, Johnson, Master Chief and a small handful of Marines seemingly trying to repair a damaged [[radio]], to little success. The group are ambushed by the Arbiter, who proceeds to engage Chief in hand-to-hand combat though the scuffle is soon interrupted by the arrival of a Phantom and several Brute troops led by Tartarus. The Brutes encircle the group, and are themselves interrupted by the arrival of a "Flood hulk" - bearing a design very close to the known concept designs of the [[Sharquoi]] from ''Halo 2''. The hulk begins to smash through the group and swat aside one of the Phantoms, before falling to sustained fire and crashing through the thermal vent - bringing the Chief, Arbiter and several Brutes with it. This encounter would have presumably resulted in Miranda and Johnson being captured by the Brutes, as in the final ''Halo 2''. | An outro cutscene for what appears to be a heavily altered [[Quarantine Zone]] can be found in the earliest revisions. The outro cutscene begins at one of Installation 05's "thermal outtake platforms", near the site of a crashed [[D77-TC Pelican|Pelican]] dropship. Around the crash site are Miranda, Johnson, Master Chief and a small handful of Marines seemingly trying to repair a damaged [[radio]], to little success. The group are ambushed by the Arbiter, who proceeds to engage Chief in hand-to-hand combat though the scuffle is soon interrupted by the arrival of a Phantom and several Brute troops led by Tartarus. The Brutes encircle the group, and are themselves interrupted by the arrival of a "Flood hulk" - bearing a design very close to the known concept designs of the [[Sharquoi]] from ''Halo 2''. The hulk begins to smash through the group and swat aside one of the Phantoms, before falling to sustained fire and crashing through the thermal vent - bringing the Chief, Arbiter and several Brutes with it. This encounter would have presumably resulted in Miranda and Johnson being captured by the Brutes, as in the final ''Halo 2''. | ||
<gallery> | <gallery> | ||
| Line 103: | Line 224: | ||
</gallery> | </gallery> | ||
===forerunnertank=== | |||
A set of storyboards publish coincide heavily with the few details known of the cut [[Cut Halo 2 levels#forerunnertank|forerunnertank]] level also cut from the game. Following on from the radically altered Quarantine Zone cutscene above, the Brutes die from their falls though the Spartan and Elite survive and are now stranded in the underbelly of the ringworld. Master Chief picks up a [[Type-25 Brute Shot|Brute Shot]] and the cutscene fades to gameplay - presumably lining up with the details of Forerunner Tank recalled by Joseph Staten in the ''Halo 2'' developer commentary. | A set of storyboards publish coincide heavily with the few details known of the cut [[Cut Halo 2 levels#forerunnertank|forerunnertank]] level also cut from the game. Following on from the radically altered Quarantine Zone cutscene above, the Brutes die from their falls though the Spartan and Elite survive and are now stranded in the underbelly of the ringworld. Master Chief picks up a [[Type-25 Brute Shot|Brute Shot]] and the cutscene fades to gameplay - presumably lining up with the details of Forerunner Tank recalled by Joseph Staten in the ''Halo 2'' developer commentary. | ||
<gallery> | <gallery> | ||
| Line 118: | Line 239: | ||
File:H2 ForerunnerTank Midbreak Storyboard 3.jpg| | File:H2 ForerunnerTank Midbreak Storyboard 3.jpg| | ||
File:H2 ForerunnerTank Midbreak Storyboard 4.jpg| | File:H2 ForerunnerTank Midbreak Storyboard 4.jpg| | ||
File:H2 ForerunnerTank Midbreak Storyboard 5.jpg| | |||
</gallery> | </gallery> | ||
| Line 140: | Line 262: | ||
</gallery> | </gallery> | ||
===High Charity=== | |||
Original plans for the level ''[[High Charity (level)|High Charity]]'' showcase a vastly different sequence of events than the final game. The Forerunner keyship has a horizontal layout and is docked as such, rather than the tower-like structure found in the final game. As the Prophets escape onto the Keyship, Truth reaches the docking hatch first and closes the airlock before Mercy can reach him - leaving him to the mercy of the pursuing Master Chief. Mercy then turns and raises an "energy sceptre", protecting himself in an energy field and cutting to a boss battle for the player. | |||
<gallery> | |||
File:H2 HighCharity V1 Storyboard Intra 1.jpg | |||
File:H2 HighCharity V1 Storyboard Intra 2.jpg | |||
File:H2 HighCharity V1 Storyboard Intra 3.jpg | |||
File:H2 HighCharity V1 Storyboard Intra 4.jpg | |||
File:H2 HighCharity V1 Storyboard Intra 5.jpg | |||
File:H2 HighCharity V1 Storyboard Intra 6.jpg | |||
</gallery> | |||
Once Mercy is defeated, the Chief grabs him and begins to interrogate him but is interrupted by the launch of the ship and the retraction of the gangway. The Spartan (still holding Mercy) jumps onto the Keyship and grabs onto a ledge, but Mercy undoes the clasp on his rope allowing him to fall to his death. Meanwhile, Cortana is still stuck in High Charity's systems, and Chief begins climbing his way along the ship's exterior to try and get back onto the ledge where Cortana's holo-pedestal is located. As he is about to reach Cortana, plasma weapon fire emerges from a group of Brute soldiers above, hitting the pedestal and blowing it to pieces - and Cortana along with it. The Spartan takes cover in a recess and pulls himself into an access hatch, before looking out of the viewport as the ship takes off and enters into slipspace. | |||
<gallery> | |||
File:H2 HighCharity V1 Storyboard Outro 1.jpg | |||
File:H2 HighCharity V1 Storyboard Outro 2.jpg | |||
File:H2 HighCharity V1 Storyboard Outro 3.jpg | |||
File:H2 HighCharity V1 Storyboard Outro 4.jpg | |||
File:H2 HighCharity V1 Storyboard Outro 5.jpg | |||
File:H2 HighCharity V1 Storyboard Outro 6.jpg | |||
File:H2 HighCharity V1 Storyboard Outro 7.jpg | |||
File:H2 HighCharity V1 Storyboard Outro 8.jpg | |||
File:H2 HighCharity V1 Storyboard Outro 9.jpg | |||
File:H2 HighCharity V1 Storyboard Outro 10.jpg | |||
File:H2 HighCharity V1 Storyboard Outro 11.jpg | |||
File:H2 HighCharity V1 Storyboard Outro 12.jpg | |||
File:H2 HighCharity V1 Storyboard Outro 13.jpg | |||
File:H2 HighCharity V1 Storyboard Outro 14.jpg | |||
File:H2 HighCharity V1 Storyboard Outro 15.jpg | |||
File:H2 HighCharity V1 Storyboard Outro 16.jpg | |||
</gallery> | |||
===The Great Journey=== | |||
Early storyboards released for ''[[The Great Journey]]'' showcase a slightly different series of events for the Tartarus boss battle at the end of this mission. With Johnson and Miranda having been captured by the Brutes, Arbiter enters the control room with only his Sangheili allies and no Johnson aid. The control room's layout in these early storyboards matches that of the design used in ''Combat Evolved'' and ''Halo 3''. | Early storyboards released for ''[[The Great Journey]]'' showcase a slightly different series of events for the Tartarus boss battle at the end of this mission. With Johnson and Miranda having been captured by the Brutes, Arbiter enters the control room with only his Sangheili allies and no Johnson aid. The control room's layout in these early storyboards matches that of the design used in ''Combat Evolved'' and ''Halo 3''. | ||
<gallery> | <gallery> | ||
| Line 166: | Line 317: | ||
</gallery> | </gallery> | ||
===Original ending=== | |||
====The Great Journey==== | |||
<gallery> | |||
File:H2 GreatJourney Storyboard Outro 1.jpg | |||
File:H2 GreatJourney Storyboard Outro 2.jpg | |||
File:H2 GreatJourney Storyboard Outro 3.jpg | |||
File:H2 GreatJourney Storyboard Outro 4.jpg | |||
File:H2 GreatJourney Storyboard Outro 5.jpg | |||
File:H2 GreatJourney Storyboard Outro 6.jpg | |||
File:H2 GreatJourney Storyboard Outro 7.jpg | |||
File:H2 GreatJourney Storyboard Outro 8.jpg | |||
File:H2 GreatJourney Storyboard Outro 9.jpg | |||
File:H2 GreatJourney Storyboard Outro 10.jpg | |||
File:H2 GreatJourney Storyboard Outro 11.jpg | |||
File:H2 GreatJourney Storyboard Outro 12.jpg | |||
File:H2 GreatJourney Storyboard Outro 13.jpg | |||
File:H2 GreatJourney Storyboard Outro 14.jpg | |||
File:H2 GreatJourney Storyboard Outro 15.jpg | |||
</gallery> | |||
====Battle on Earth==== | |||
<!-- | |||
Battle on Earth | |||
Forerunnership rockets overhead | |||
Chief appears | |||
Reinforcements appear | |||
staten comments -> https://www.vice.com/en/article/xwqjg3/the-complete-untold-history-of-halo-an-oral-history | |||
Marty @ 58:00 https://www.youtube.com/watch?v=xwugLKltVqo | |||
--> | |||
<gallery> | |||
File:H2 EarthBattle Storyboard Intro 1.jpg | |||
File:H2 EarthBattle Storyboard Intro 2.jpg | |||
File:H2 EarthBattle Storyboard Intro 3.jpg | |||
File:H2 EarthBattle Storyboard Intro 4.jpg | |||
File:H2 EarthBattle Storyboard Intro 5.jpg | |||
File:H2 EarthBattle Storyboard Intra 1.jpg | |||
File:H2 EarthBattle Storyboard Intra 2.jpg | |||
File:H2 EarthBattle Storyboard Intra 3.jpg | |||
File:H2 EarthBattle Storyboard Intra 4.jpg | |||
File:H2 EarthBattle Storyboard Intra 5.jpg | |||
File:H2 EarthBattle Storyboard Intra 6.jpg | |||
File:H2 EarthBattle Storyboard Intra 7.jpg | |||
File:H2 EarthBattle Storyboard Intra 8.jpg | |||
File:H2 EarthBattle Storyboard Intra 9.jpg | |||
File:H2 EarthBattle Storyboard Intra 10.jpg | |||
File:H2 EarthBattle Storyboard Intra 11.jpg | |||
File:H2 EarthBattle Storyboard Intra 12.jpg | |||
File:H2 EarthBattle Storyboard Intra 13.jpg | |||
File:H2 EarthBattle Storyboard Intra 14.jpg | |||
File:H2 EarthBattle Storyboard Intra 15.jpg | |||
</gallery> | |||
;Take Two | |||
<!-- | |||
X10 | |||
Master Chief jumps out of ship | |||
--> | |||
<gallery> | |||
File:H2 ForerunnerShip Jump Storyboard 1.jpg | |||
File:H2 ForerunnerShip Jump Storyboard 2.jpg | |||
File:H2 ForerunnerShip Jump Storyboard 3.jpg | |||
File:H2 ForerunnerShip Jump Storyboard 4.jpg | |||
File:H2 ForerunnerShip Jump Storyboard 5.jpg | |||
File:H2 ForerunnerShip Jump Storyboard 6.jpg | |||
File:H2 ForerunnerShip Jump Storyboard 7.jpg | |||
File:H2 ForerunnerShip Jump Storyboard 8.jpg | |||
File:H2 ForerunnerShip Jump Storyboard 9.jpg | |||
File:H2 ForerunnerShip Jump Storyboard 10.jpg | |||
File:H2 ForerunnerShip Jump Storyboard 11.jpg | |||
</gallery> | |||
===Second revision | ====Inside the Ark==== | ||
<!-- | |||
Arbiter enters the Ark | |||
Confronts Truth | |||
Boss battle | |||
Master chief activates the Ark | |||
ring blows up | |||
Structure collapse | |||
X11-X12 | |||
--> | |||
<gallery> | |||
File:H2 Ark Storyboard Intro 1.jpg | |||
File:H2 Ark Storyboard Intro 2.jpg | |||
File:H2 Ark Storyboard Intro 3.jpg | |||
File:H2 Ark Storyboard Intro 4.jpg | |||
File:H2 Ark Storyboard Intro 5.jpg | |||
File:H2 Ark Storyboard Intro 6.jpg | |||
</gallery> | |||
====Ending cutscenes==== | |||
;Master Chief's ending | |||
<!-- | |||
X13 | |||
--> | |||
<gallery> | |||
File:H2 Ending MasterChief Storyboard 1.jpg | |||
File:H2 Ending MasterChief Storyboard 2.jpg | |||
File:H2 Ending MasterChief Storyboard 3.jpg | |||
File:H2 Ending MasterChief Storyboard 4.jpg | |||
File:H2 Ending MasterChief Storyboard 5.jpg | |||
File:H2 Ending MasterChief Storyboard 6.jpg | |||
File:H2 Ending MasterChief Storyboard 7.jpg | |||
</gallery> | |||
;Arbiter's ending | |||
<!-- | |||
X14 | |||
--> | |||
<gallery> | |||
File:H2 Ending Arbiter Storyboard 1.jpg | |||
File:H2 Ending Arbiter Storyboard 2.jpg | |||
File:H2 Ending Arbiter Storyboard 3.jpg | |||
File:H2 Ending Arbiter Storyboard 4.jpg | |||
File:H2 Ending Arbiter Storyboard 5.jpg | |||
File:H2 Ending Arbiter Storyboard 6.jpg | |||
File:H2 Ending Arbiter Storyboard 7.jpg | |||
File:H2 Ending Arbiter Storyboard 8.jpg | |||
File:H2 Ending Arbiter Storyboard 9.jpg | |||
File:H2 Ending Arbiter Storyboard 10.jpg | |||
File:H2 Ending Arbiter Storyboard 11.jpg | |||
</gallery> | |||
====Epilogue==== | |||
<!-- | |||
X15 | |||
--> | |||
<gallery> | |||
File:H2 Epilogue Storyboard 1.jpg | |||
File:H2 Epilogue Storyboard 2.jpg | |||
File:H2 Epilogue Storyboard 3.jpg | |||
File:H2 Epilogue Storyboard 4.jpg | |||
</gallery> | |||
==Second revision== | |||
The second revision storyboards resemble the final game more closely, featuring designs mostly similar to those found in the final game and a drastic reduction of scope compared to the original outline, including the cutting of the majority of the third act to be replaced with the game ending found in the final product. The design of ''[[Anodyne Spirit]]'' in these storyboards has evolved from the frigate-like entity shown prior to a large tower, though would later evolve again to resemble the [[Keyship]] design familiar to fans now. | The second revision storyboards resemble the final game more closely, featuring designs mostly similar to those found in the final game and a drastic reduction of scope compared to the original outline, including the cutting of the majority of the third act to be replaced with the game ending found in the final product. The design of ''[[Anodyne Spirit]]'' in these storyboards has evolved from the frigate-like entity shown prior to a large tower, though would later evolve again to resemble the [[Keyship]] design familiar to fans now. | ||
====The Heretic==== | ====The Heretic==== | ||
| Line 176: | Line 459: | ||
</gallery> | </gallery> | ||
===Final revision=== | ===covenantship=== | ||
<gallery> | |||
File:H2 CovenantShip V2 Storyboard Intro 1.jpg | |||
File:H2 CovenantShip V2 Storyboard Intro 2.jpg | |||
File:H2 CovenantShip V2 Storyboard Intro 3.jpg | |||
File:H2 CovenantShip V2 Storyboard Intro 4.jpg | |||
File:H2 CovenantShip V2 Storyboard Intro 5.jpg | |||
File:H2 CovenantShip V2 Storyboard Intro 6.jpg | |||
File:H2 CovenantShip V2 Storyboard Intro 7.jpg | |||
File:H2 CovenantShip V2 Storyboard Intro 8.jpg | |||
File:H2 CovenantShip V2 Storyboard Intro 9.jpg | |||
File:H2 CovenantShip V2 Storyboard Intro 10.jpg | |||
File:H2 CovenantShip V2 Storyboard Intro 11.jpg | |||
File:H2 CovenantShip V2 Storyboard Intro 12.jpg | |||
</gallery> | |||
===Metropolis=== | |||
These storyboards for the [[Metropolis]] level outro mostly resemble the final game with one obvious difference - the design of the {{Pattern|Protos|Scarab}} had not yet been established, and the R3000 Spider Tank from Mamoru Oshii's 1995 version of ''Ghost in the Shell'' is used as placeholder, a substitution also seen in [[The Great Journey]]. | |||
<gallery> | |||
File:H2 Metropolis V1 Storyboard Outro 1.jpg | |||
File:H2 Metropolis V1 Storyboard Outro 2.jpg | |||
File:H2 Metropolis V1 Storyboard Outro 3.jpg | |||
File:H2 Metropolis V1 Storyboard Outro 4.jpg | |||
File:H2 Metropolis V1 Storyboard Outro 5.jpg | |||
File:H2 Metropolis V1 Storyboard Outro 6.jpg | |||
File:H2 Metropolis V1 Storyboard Outro 7.jpg | |||
File:H2 Metropolis V1 Storyboard Outro 8.jpg | |||
File:H2 Metropolis V1 Storyboard Outro 9.jpg | |||
File:H2 Metropolis V1 Storyboard Outro 10.jpg | |||
File:H2 Metropolis V1 Storyboard Outro 11.jpg | |||
File:H2 Metropolis V1 Storyboard Outro 12.jpg | |||
File:H2 Metropolis V1 Storyboard Outro 13.jpg | |||
File:H2 Metropolis V1 Storyboard Outro 14.jpg | |||
</gallery> | |||
===The Arbiter=== | |||
These mid-era storyboards for the Arbiter level demonstrate general similarities with the final game. However, rather than deploying via Phantom dropship, the Elite strike team is instead deployed to the gas mines via a [[Cut Halo 2 vehicles#Command shuttle|command shuttle]]. | |||
<gallery> | |||
File:H2 TheArbiter V2 Storyboard Intro 1.jpg | |||
File:H2 TheArbiter V2 Storyboard Intro 2.jpg | |||
File:H2 TheArbiter V2 Storyboard Intro 3.jpg | |||
File:H2 TheArbiter V2 Storyboard Intro 4.jpg | |||
File:H2 TheArbiter V2 Storyboard Intro 5.jpg | |||
File:H2 TheArbiter V2 Storyboard Intro 6.jpg | |||
File:H2 TheArbiter V2 Storyboard Intro 7.jpg | |||
</gallery> | |||
===Sacred Icon=== | |||
These storyboards for the level ''[[Sacred Icon]]'' are generally the same as those found in the game, though the artwork for the various characters is rough and exhibits more subtle changes compared to the final game designs. The largest differences are the presence of the [[Covenant murals]], previously discussed in the ''Halo 2'' Limited Collector's Edition documentary. | |||
;Take 1 | |||
The storyboards presented here showcase a slightly different order of events, with both [[Sangheili High Councilor|Sangheili]] and [[San'Shyuum High Councilor|San'Shyuum]] councilors shown leaving the [[Sanctum of the Hierarchs]]. Notably, the Arbiter's armour is slightly more primitively-designed. | |||
<gallery> | |||
File:H2 SacredIcon V1 Storyboard Intro 1.jpg | |||
File:H2 SacredIcon V1 Storyboard Intro 2.jpg | |||
File:H2 SacredIcon V1 Storyboard Intro 3.jpg | |||
File:H2 SacredIcon V1 Storyboard Intro 4.jpg | |||
</gallery> | |||
;Take 2 | |||
The storyboards presented here showcase an order of events more reminiscent of the final game. Notably, those shown here showcase the aforementioned Murals. | |||
<gallery> | |||
File:H2 SacredIcon V2 Storyboard Intro 1.jpg | |||
File:H2 SacredIcon V2 Storyboard Intro 2.jpg | |||
File:H2 SacredIcon V2 Storyboard Intro 3.jpg | |||
File:H2 SacredIcon V2 Storyboard Intro 4.jpg | |||
File:H2 SacredIcon V2 Storyboard Intro 5.jpg | |||
File:H2 SacredIcon V2 Storyboard Intro 6.jpg | |||
File:H2 SacredIcon V2 Storyboard Intro 7.jpg | |||
File:H2 SacredIcon V2 Storyboard Intro 8.jpg | |||
File:H2 SacredIcon V2 Storyboard Intro 9.jpg | |||
File:H2 SacredIcon V2 Storyboard Intro 10.jpg | |||
File:H2 SacredIcon V2 Storyboard Intro 11.jpg | |||
File:H2 SacredIcon V2 Storyboard Intro 12.jpg | |||
File:H2 SacredIcon V2 Storyboard Intro 13.jpg | |||
File:H2 SacredIcon V2 Storyboard Intro 14.jpg | |||
File:H2 SacredIcon V2 Storyboard Intro 15.jpg | |||
File:H2 SacredIcon V2 Storyboard Intro 16.jpg | |||
File:H2 SacredIcon V2 Storyboard Intro 17.jpg | |||
File:H2 SacredIcon V2 Storyboard Intro 18.jpg | |||
File:H2 SacredIcon V2 Storyboard Intro 19.jpg | |||
File:H2 SacredIcon V2 Storyboard Intro 20.jpg | |||
File:H2 SacredIcon V2 Storyboard Intro 21.jpg | |||
File:H2 SacredIcon V2 Storyboard Intro 22.jpg | |||
File:H2 SacredIcon V2 Storyboard Intro 23.jpg | |||
</gallery> | |||
===Quarantine Zone=== | |||
Early storyboards for a more finalised end to [[Quarantine Zone]] showcase the same general ideas as the final game. However, Miranda does not use the Flood tendril as a rope to retrieve the [[activation index]], and the Arbiter is shown to land at the bottom of the shaft after his betrayal by Tartarus. In this revision, the Arbiter is shown to land in a pit of Flood biomass, scattering the [[pod infector]]s away - before being grabbed and pulled away by the (unseen) Gravemind. | |||
<gallery> | |||
File:H2 QuarantineZone V1 Storyboard Outro 1.jpg | |||
File:H2 QuarantineZone V1 Storyboard Outro 2.jpg | |||
File:H2 QuarantineZone V1 Storyboard Outro 3.jpg | |||
File:H2 QuarantineZone V1 Storyboard Outro 4.jpg | |||
File:H2 QuarantineZone V1 Storyboard Outro 5.jpg | |||
File:H2 QuarantineZone V1 Storyboard Outro 6.jpg | |||
File:H2 QuarantineZone V1 Storyboard Outro 7.jpg | |||
File:H2 QuarantineZone V1 Storyboard Outro 8.jpg | |||
File:H2 QuarantineZone V1 Storyboard Outro 9.jpg | |||
File:H2 QuarantineZone V1 Storyboard Outro 10.jpg | |||
File:H2 QuarantineZone V1 Storyboard Outro 11.jpg | |||
File:H2 QuarantineZone V1 Storyboard Outro 12.jpg | |||
File:H2 QuarantineZone V1 Storyboard Outro 13.jpg | |||
File:H2 QuarantineZone V1 Storyboard Outro 14.jpg | |||
File:H2 QuarantineZone V1 Storyboard Outro 15.jpg | |||
File:H2 QuarantineZone V1 Storyboard Outro 16.jpg | |||
File:H2 QuarantineZone V1 Storyboard Outro 17.jpg | |||
File:H2 QuarantineZone V1 Storyboard Outro 18.jpg | |||
File:H2 QuarantineZone V1 Storyboard Outro 19.jpg | |||
</gallery> | |||
===High Charity=== | |||
Early storyboards for the opening cutscene of the level ''[[High Charity (level)|High Charity]]'' showcase a sequence of events essentially the same as that found in the final game. Major differences include a differing design for the Keyship (the same as those found in the Heretic storyboard above), and Cortana now resembles her final in-game counterpart. | |||
<gallery> | |||
File:H2 HighCharity Storyboard Intra 1.jpg | |||
File:H2 HighCharity Storyboard Intra 2.jpg | |||
File:H2 HighCharity Storyboard Intra 3.jpg | |||
File:H2 HighCharity Storyboard Intra 4.jpg | |||
File:H2 HighCharity Storyboard Intra 5.jpg | |||
File:H2 HighCharity Storyboard Intra 6.jpg | |||
File:H2 HighCharity Storyboard Intra 7.jpg | |||
File:H2 HighCharity Storyboard Intra 8.jpg | |||
File:H2 HighCharity Storyboard Intra 9.jpg | |||
File:H2 HighCharity Storyboard Intra 10.jpg | |||
File:H2 HighCharity Storyboard Intra 11.jpg | |||
File:H2 HighCharity Storyboard Intra 12.jpg | |||
File:H2 HighCharity Storyboard Intra 13.jpg | |||
File:H2 HighCharity Storyboard Intra 14.jpg | |||
File:H2 HighCharity Storyboard Intra 15.jpg | |||
File:H2 HighCharity Storyboard Intra 16.jpg | |||
File:H2 HighCharity Storyboard Intra 17.jpg | |||
File:H2 HighCharity Storyboard Intra 18.jpg | |||
File:H2 HighCharity Storyboard Intra 19.jpg | |||
</gallery> | |||
===The Great Journey=== | |||
These early storyboards for The Great Journey showcase the ending, having been reworked from the original plot. The control room still resembles Installation 04, but the alliance with Johnson is now one of the key parts of the storyboard. In these early revisions, an additional cutscene is shown in the [[Bastion of the Brutes]], depicting the Arbiter having a fist fight with a Brute guard assigned to watch Johnson and his Marines. The Arbiter fights the Brute but is ultimately saved by Johnson, who uses his [[CH252 helmet|helmet]] to smash the Brute's head in. Johnson then passes the guard's Brute Shot to the Arbiter, who then looms over Johnson and looks to prepare a killing strike - only to cut Johnson's bonds. They then turn to the docked "Scarab" (once again, a placeholder ''Ghost in the Shell'' R3000), and the level proceeds as normal. | |||
<gallery> | |||
File:H2 GreatJourney V2 Storyboard Intra 1 1.jpg | |||
File:H2 GreatJourney V2 Storyboard Intra 1 2.jpg | |||
File:H2 GreatJourney V2 Storyboard Intra 1 3.jpg | |||
File:H2 GreatJourney V2 Storyboard Intra 1 4.jpg | |||
File:H2 GreatJourney V2 Storyboard Intra 1 5.jpg | |||
File:H2 GreatJourney V2 Storyboard Intra 1 6.jpg | |||
File:H2 GreatJourney V2 Storyboard Intra 1 7.jpg | |||
File:H2 GreatJourney V2 Storyboard Intra 1 8.jpg | |||
File:H2 GreatJourney V2 Storyboard Intra 1 9.jpg | |||
File:H2 GreatJourney V2 Storyboard Intra 1 10.jpg | |||
File:H2 GreatJourney V2 Storyboard Intra 1 11.jpg | |||
File:H2 GreatJourney V2 Storyboard Intra 1 12.jpg | |||
File:H2 GreatJourney V2 Storyboard Intra 1 13.jpg | |||
File:H2 GreatJourney V2 Storyboard Intra 1 14.jpg | |||
File:H2 GreatJourney V2 Storyboard Intra 1 15.jpg | |||
File:H2 GreatJourney V2 Storyboard Intra 1 16.jpg | |||
File:H2 GreatJourney V2 Storyboard Intra 1 17.jpg | |||
File:H2 GreatJourney V2 Storyboard Intra 1 18.jpg | |||
File:H2 GreatJourney V2 Storyboard Intra 1 19.jpg | |||
File:H2 GreatJourney V2 Storyboard Intra 1 20.jpg | |||
File:H2 GreatJourney V2 Storyboard Intra 2 1.jpg | |||
File:H2 GreatJourney V2 Storyboard Intra 2 2.jpg | |||
File:H2 GreatJourney V2 Storyboard Intra 2 3.jpg | |||
File:H2 GreatJourney V2 Storyboard Intra 2 4.jpg | |||
File:H2 GreatJourney V2 Storyboard Intra 2 5.jpg | |||
File:H2 GreatJourney V2 Storyboard Intra 2 6.jpg | |||
File:H2 GreatJourney V2 Storyboard Intra 2 7.jpg | |||
File:H2 GreatJourney V2 Storyboard Intra 2 8.jpg | |||
File:H2 GreatJourney V2 Storyboard Intra 2 9.jpg | |||
File:H2 GreatJourney V2 Storyboard Intra 2 10.jpg | |||
File:H2 GreatJourney V2 Storyboard Intra 2 11.jpg | |||
File:H2 GreatJourney V2 Storyboard Intra 2 12.jpg | |||
</gallery> | |||
==Final revision== | |||
===Cairo Station=== | |||
These storyboards for the revision of the level Cairo Station exhibit almost no changes from the final game, except minor differences such as the direction in which the UNSC fleet heads. However, the outro storyboards for this level do appear to exhibit a slightly different art style and filenaming structure, suggesting that the intro sequence shown here was finalised much earlier in production than the outro - likely due to the cutting of the covenantship level. | |||
;Intro | |||
<gallery> | |||
File:H2 CairoStation V2 Storyboard Intro 1.jpg | |||
File:H2 CairoStation V2 Storyboard Intro 2.jpg | |||
File:H2 CairoStation V2 Storyboard Intro 3.jpg | |||
File:H2 CairoStation V2 Storyboard Intro 4.jpg | |||
File:H2 CairoStation V2 Storyboard Intro 5.jpg | |||
File:H2 CairoStation V2 Storyboard Intro 6.jpg | |||
File:H2 CairoStation V2 Storyboard Intro 7.jpg | |||
File:H2 CairoStation V2 Storyboard Intro 8.jpg | |||
</gallery> | |||
;Outro | |||
<gallery> | |||
File:H2 CairoStation V2 Storyboard Outro 1.jpg | |||
File:H2 CairoStation V2 Storyboard Outro 2.jpg | |||
File:H2 CairoStation V2 Storyboard Outro 3.jpg | |||
File:H2 CairoStation V2 Storyboard Outro 4.jpg | |||
File:H2 CairoStation V2 Storyboard Outro 5.jpg | |||
File:H2 CairoStation V2 Storyboard Outro 6.jpg | |||
File:H2 CairoStation V2 Storyboard Outro 7.jpg | |||
File:H2 CairoStation V2 Storyboard Outro 8.jpg | |||
File:H2 CairoStation V2 Storyboard Outro 9.jpg | |||
File:H2 CairoStation V2 Storyboard Outro 10.jpg | |||
File:H2 CairoStation V2 Storyboard Outro 11.jpg | |||
File:H2 CairoStation V2 Storyboard Outro 12.jpg | |||
File:H2 CairoStation V2 Storyboard Outro 13.jpg | |||
File:H2 CairoStation V2 Storyboard Outro 14.jpg | |||
File:H2 CairoStation V2 Storyboard Outro 15.jpg | |||
File:H2 CairoStation V2 Storyboard Outro 16.jpg | |||
File:H2 CairoStation V2 Storyboard Outro 17.jpg | |||
</gallery> | |||
===Outskirts=== | ===Outskirts=== | ||
<gallery> | <gallery> | ||
| Line 195: | Line 684: | ||
File:H2 Outskirts Storyboard Intro 15.jpg | File:H2 Outskirts Storyboard Intro 15.jpg | ||
File:H2 Outskirts Storyboard Intro 16.jpg | File:H2 Outskirts Storyboard Intro 16.jpg | ||
</gallery> | |||
===Metropolis=== | |||
The finalised Metropolis storyboards here have almost no differences from the final game, and notably feature the finalised design for the {{Pattern|Protos|Scarab}} rather than the six-legged version seen prior. | |||
<gallery> | |||
File:H2 Metropolis V2 Storyboard Intro 1.jpg | |||
File:H2 Metropolis V2 Storyboard Intro 2.jpg | |||
File:H2 Metropolis V2 Storyboard Intro 3.jpg | |||
File:H2 Metropolis V2 Storyboard Intro 4.jpg | |||
File:H2 Metropolis V2 Storyboard Intro 5.jpg | |||
File:H2 Metropolis V2 Storyboard Intro 6.jpg | |||
File:H2 Metropolis V2 Storyboard Intro 7.jpg | |||
File:H2 Metropolis V2 Storyboard Intro 8.jpg | |||
File:H2 Metropolis V2 Storyboard Intro 9.jpg | |||
File:H2 Metropolis V2 Storyboard Intro 10.jpg | |||
File:H2 Metropolis V2 Storyboard Intro 11.jpg | |||
File:H2 Metropolis V2 Storyboard Intro 12.jpg | |||
File:H2 Metropolis V2 Storyboard Intro 13.jpg | |||
</gallery> | |||
===The Arbiter=== | |||
<gallery> | |||
File:H2 TheArbiter V3 Storyboard Intro 1.jpg | |||
File:H2 TheArbiter V3 Storyboard Intro 2.jpg | |||
File:H2 TheArbiter V3 Storyboard Intro 3.jpg | |||
File:H2 TheArbiter V3 Storyboard Intro 4.jpg | |||
File:H2 TheArbiter V3 Storyboard Intro 5.jpg | |||
File:H2 TheArbiter V3 Storyboard Intro 6.jpg | |||
File:H2 TheArbiter V3 Storyboard Intro 7.jpg | |||
File:H2 TheArbiter V3 Storyboard Intro 8.jpg | |||
File:H2 TheArbiter V3 Storyboard Intro 9.jpg | |||
File:H2 TheArbiter V3 Storyboard Intro 10.jpg | |||
File:H2 TheArbiter V3 Storyboard Intro 11.jpg | |||
File:H2 TheArbiter V3 Storyboard Intro 12.jpg | |||
File:H2 TheArbiter V3 Storyboard Intro 13.jpg | |||
File:H2 TheArbiter V3 Storyboard Intro 14.jpg | |||
File:H2 TheArbiter V3 Storyboard Intro 15.jpg | |||
File:H2 TheArbiter V3 Storyboard Intro 16.jpg | |||
File:H2 TheArbiter V3 Storyboard Intro 17.jpg | |||
File:H2 TheArbiter V3 Storyboard Intro 18.jpg | |||
File:H2 TheArbiter V3 Storyboard Intro 19.jpg | |||
File:H2 TheArbiter V3 Storyboard Intro 20.jpg | |||
File:H2 TheArbiter V3 Storyboard Intro 21.jpg | |||
File:H2 TheArbiter V3 Storyboard Intro 22.jpg | |||
File:H2 TheArbiter V3 Storyboard Intro 23.jpg | |||
File:H2 TheArbiter V3 Storyboard Intro 24.jpg | |||
File:H2 TheArbiter V3 Storyboard Intro 25.jpg | |||
File:H2 TheArbiter V3 Storyboard Intro 26.jpg | |||
File:H2 TheArbiter V3 Storyboard Intro 27.jpg | |||
File:H2 TheArbiter V3 Storyboard Intro 28.jpg | |||
File:H2 TheArbiter V3 Storyboard Intro 29.jpg | |||
File:H2 TheArbiter V3 Storyboard Intro 30.jpg | |||
File:H2 TheArbiter V3 Storyboard Intro 31.jpg | |||
File:H2 TheArbiter V3 Storyboard Intro 32.jpg | |||
File:H2 TheArbiter V3 Storyboard Intro 33.jpg | |||
File:H2 TheArbiter V3 Storyboard Intro 34.jpg | |||
File:H2 TheArbiter V3 Storyboard Intra 1.jpg | |||
File:H2 TheArbiter V3 Storyboard Intra 2.jpg | |||
File:H2 TheArbiter V3 Storyboard Intra 3.jpg | |||
File:H2 TheArbiter V3 Storyboard Intra 4.jpg | |||
File:H2 TheArbiter V3 Storyboard Intra 5.jpg | |||
File:H2 TheArbiter V3 Storyboard Intra 6.jpg | |||
File:H2 TheArbiter V3 Storyboard Intra 7.jpg | |||
</gallery> | |||
===The Oracle=== | |||
<gallery> | |||
File:H2 TheOracle Storyboard Intro 1.jpg | |||
File:H2 TheOracle Storyboard Intro 2.jpg | |||
File:H2 TheOracle Storyboard Intro 3.jpg | |||
File:H2 TheOracle Storyboard Intro 4.jpg | |||
File:H2 TheOracle Storyboard Intro 5.jpg | |||
File:H2 TheOracle Storyboard Intro 6.jpg | |||
File:H2 TheOracle Storyboard Outro 1.jpg | |||
File:H2 TheOracle Storyboard Outro 2.jpg | |||
File:H2 TheOracle Storyboard Outro 3.jpg | |||
File:H2 TheOracle Storyboard Outro 4.jpg | |||
File:H2 TheOracle Storyboard Outro 5.jpg | |||
File:H2 TheOracle Storyboard Outro 6.jpg | |||
File:H2 TheOracle Storyboard Outro 7.jpg | |||
File:H2 TheOracle Storyboard Outro 8.jpg | |||
File:H2 TheOracle Storyboard Outro 9.jpg | |||
File:H2 TheOracle Storyboard Outro 10.jpg | |||
File:H2 TheOracle Storyboard Outro 11.jpg | |||
File:H2 TheOracle Storyboard Outro 12.jpg | |||
File:H2 TheOracle Storyboard Outro 13.jpg | |||
</gallery> | |||
===Delta Halo=== | |||
<gallery> | |||
File:H2 DeltaHalo V2 Storyboard Intro 1.jpg | |||
File:H2 DeltaHalo V2 Storyboard Intro 2.jpg | |||
File:H2 DeltaHalo V2 Storyboard Intro 3.jpg | |||
File:H2 DeltaHalo V2 Storyboard Intro 4.jpg | |||
File:H2 DeltaHalo V2 Storyboard Intro 5.jpg | |||
File:H2 DeltaHalo V2 Storyboard Intro 6.jpg | |||
File:H2 DeltaHalo V2 Storyboard Intro 7.jpg | |||
</gallery> | |||
===Regret=== | |||
<gallery> | |||
File:H2 Regret Storyboard Intro 1.jpg | |||
File:H2 Regret Storyboard Intro 2.jpg | |||
File:H2 Regret Storyboard Intro 3.jpg | |||
File:H2 Regret Storyboard Intro 4.jpg | |||
File:H2 Regret Storyboard Intro 5.jpg | |||
File:H2 Regret Storyboard Intro 6.jpg | |||
File:H2 Regret Storyboard Intro 7.jpg | |||
File:H2 Regret Storyboard Intra 1.jpg | |||
File:H2 Regret Storyboard Intra 2.jpg | |||
File:H2 Regret Storyboard Outro 1.jpg | |||
File:H2 Regret Storyboard Outro 2.jpg | |||
File:H2 Regret Storyboard Outro 3.jpg | |||
File:H2 Regret Storyboard Outro 4.jpg | |||
File:H2 Regret Storyboard Outro 5.jpg | |||
File:H2 Regret Storyboard Outro 6.jpg | |||
File:H2 Regret Storyboard Outro 7.jpg | |||
File:H2 Regret Storyboard Outro 8.jpg | |||
File:H2 Regret Storyboard Outro 9.jpg | |||
</gallery> | |||
===Sacred Icon=== | |||
Unlike prior Sacred Icon storyboards, the ones shown here feature designs for the Arbiter, Phantoms and Brutes with almost no discernable changes from the final game, suggesting they were completed fairly late in production. | |||
<gallery> | |||
File:H2 SacredIcon V2 Storyboard Intro 24.jpg | |||
File:H2 SacredIcon V2 Storyboard Intro 25.jpg | |||
File:H2 SacredIcon V2 Storyboard Intro 26.jpg | |||
File:H2 SacredIcon V2 Storyboard Intro 27.jpg | |||
File:H2 SacredIcon V2 Storyboard Intro 28.jpg | |||
File:H2 SacredIcon V2 Storyboard Intro 29.jpg | |||
File:H2 SacredIcon V2 Storyboard Intro 30.jpg | |||
</gallery> | |||
===Uprising=== | |||
<gallery> | |||
File:H2 Uprising Storyboard Intro 1.jpg | |||
File:H2 Uprising Storyboard Intro 2.jpg | |||
</gallery> | |||
===High Charity=== | |||
The near-final storyboards for the outro of High Charity show relatively few differences with the final game, and depict a Keyship very close in design to the final one seen in-game. This design is nonetheless different to the final, having more elegant curvilinear forms than the pyramidal shape of the keyship in final release. Interestingly, this early design did make it into early builds of the game and can be seen in some early screenshots of the High Charity skybox, including the final in-game mission select preview icons. | |||
The largest difference, however, can be seen in the inclusion of the end of the planned [[Warthog run]] intended for the game. | |||
<gallery> | |||
File:H2 HighCharity Storyboard Outro 1.jpg | |||
File:H2 HighCharity Storyboard Outro 2.jpg | |||
File:H2 HighCharity Storyboard Outro 3.jpg | |||
File:H2 HighCharity Storyboard Outro 4.jpg | |||
File:H2 HighCharity Storyboard Outro 5.jpg | |||
File:H2 HighCharity Storyboard Outro 6.jpg | |||
File:H2 HighCharity Storyboard Outro 7.jpg | |||
File:H2 HighCharity Storyboard Outro 8.jpg | |||
File:H2 HighCharity Storyboard Outro 9.jpg | |||
File:H2 HighCharity Storyboard Outro 10.jpg | |||
File:H2 HighCharity Storyboard Outro 11.jpg | |||
File:H2 HighCharity Storyboard Outro 12.jpg | |||
</gallery> | |||
===The Great Journey=== | |||
<gallery> | |||
File:H2 GreatJourney V3 Storyboard Intro 1.jpg | |||
File:H2 GreatJourney V3 Storyboard Intro 2.jpg | |||
File:H2 GreatJourney V3 Storyboard Intro 3.jpg | |||
File:H2 GreatJourney V3 Storyboard Intro 4.jpg | |||
File:H2 GreatJourney V3 Storyboard Intro 5.jpg | |||
File:H2 GreatJourney V3 Storyboard Intro 6.jpg | |||
File:H2 GreatJourney V3 Storyboard Intro 7.jpg | |||
File:H2 GreatJourney V3 Storyboard Intro 8.jpg | |||
File:H2 GreatJourney V3 Storyboard Intro 9.jpg | |||
File:H2 GreatJourney V3 Storyboard Intra 1.jpg | |||
File:H2 GreatJourney V3 Storyboard Intra 2.jpg | |||
File:H2 GreatJourney V3 Storyboard Intra 3.jpg | |||
File:H2 GreatJourney V3 Storyboard Intra 4.jpg | |||
File:H2 GreatJourney V3 Storyboard Outro 1.jpg | |||
File:H2 GreatJourney V3 Storyboard Outro 2.jpg | |||
File:H2 GreatJourney V3 Storyboard Outro 3.jpg | |||
File:H2 GreatJourney V3 Storyboard Outro 4.jpg | |||
File:H2 GreatJourney V3 Storyboard Outro 5.jpg | |||
File:H2 GreatJourney V3 Storyboard Outro 6.jpg | |||
File:H2 GreatJourney V3 Storyboard Outro 7.jpg | |||
File:H2 GreatJourney V3 Storyboard Outro 8.jpg | |||
File:H2 GreatJourney V3 Storyboard Outro 9.jpg | |||
File:H2 GreatJourney V3 Storyboard Outro 10.jpg | |||
File:H2 GreatJourney V3 Storyboard Outro 11.jpg | |||
File:H2 GreatJourney V3 Storyboard Outro 12.jpg | |||
File:H2 GreatJourney V3 Storyboard Outro 13.jpg | |||
File:H2 GreatJourney V3 Storyboard Outro 14.jpg | |||
File:H2 GreatJourney V3 Storyboard Outro 15.jpg | |||
</gallery> | </gallery> | ||
==Sources== | ==Sources== | ||
{{Ref/Sources}} | {{Ref/Sources}} | ||
[[Category:Halo 2|Storyboards]] | |||
[[Category:Halo 2 storyboards| ]] | [[Category:Halo 2 storyboards| ]] | ||
Latest revision as of 15:35, November 21, 2022
 This article is a stub. You can help Halopedia by expanding it.
This article is part of a series on
Halo 2 cut content
- Cut content
Early script
Cut dialogue
Cut enemies and ambient life
Cut equipment
Cut gamemodes
Cut levels
Cut vehicles
Cut weapons
- Development
Halo 2 development
Concept art
Design documentation
Storyboards
Title updates
E3 campaign demo
E3 multiplayer demo
To check out cut content for other Halo games, see here!
The Halo 2 storyboards consist of the early drafts and ideas produced for Halo 2's story. The storyboards were created by Lee Wilson, with some additional work by Joseph Staten.
Overview[edit]
- " I am Lee Wilson, and yes I did do the storyboards for Halo 1, 2, and 3. Halo 1 were all on paper like traditional movie shooting boards. Halo 2's story went through a lot of changes and so I ended up doing them in a comic panel style, since we weren't in a place to do shooting boards. Halo 3' boards I did in color to work out the lighting and inform my final cinematic lighting. By Halo: Reach, I was directing the story and cinematics, so they were mostly scribbles and notes in various notebooks. It's certainly a trip down memory lane, and I little tough to look at some of my old artwork."
- — Lee Wilson discussing his work on Halo 2, in a comment on YouTube.[1][2]
When Lee Wilson started the storyboards, it was clear to him that the script was not ready for shooting boards due to the numerous script revisions at Bungie. This lead to Lee boarding up the entire cinematic script two to three times. What he opted to do was present the boards in a hybrid storyboard/comic panel style, drawing them in pen to "remove the temptation of erasing and redrawing them until they looked good to me". These boards were for simple communication, not to be displayed on a wall.[3]
E3 2003 boards[edit]
These boards were also drawn by Lee R. Wilson. These were for the Halo 2 E3 Demo.
Intro 1
Intro 2
Intro 3

Intro 4

Intro 5
Intro 6
Intro 7.1
Intro 7.2
Outro 1.1
Outro 1.2
Outro 1.3
Outro 1.4
Outro 1.5
Outro 1.6
Outro 2.1

Outro 2.2
Outro 2.3


First revision storyboards[edit]
These storyboards represent some of the oldest work done by Wilson on Halo 2, and bear the least resemblance to the final product. These storyboards are characterised by simple linework and shading often done in pen, moreso resembling the storyboard work done for Halo: Combat Evolved. Due to these boards being produced early in the development of Halo 2, they take many cues from Combat Evolved such as Master Chief, Arbiter and UNSC Marines all using armour derived from their Combat Evolved-era counterparts, as their Halo 2 incarnations had not been designed in full yet.
The Heretic[edit]
The early storyboards for the The Heretic cutscene differ little from those in the final game, though have some minor differences. The council chamber of High Charity bears a heavy resemblance to the House of Lords, and the opening panning shot of the city is complete with an excerpt from the Writ of Union. Some camera angles are different, and the Councilors do not bear their distinctive headdresses seen in the final game.


The Armory[edit]
The storyboards for the The Armory cutscene display only minor changes from the final game, such as the arms master carting away the old battered Mark V suit from Combat Evolved, and a very different design for Cairo Station - referred to here as Torres Vedras. The strike fighter is also present in these storyboards.


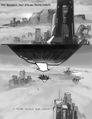
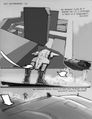
Cairo Station[edit]
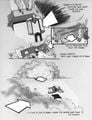
The level Cairo Station has an opening cinematic mostly similar to that found in the final game, though with one major difference - the Moncton-class orbital weapon platform has a vastly different design and bears the name Torres Vedras, rather than the final game's Cairo. The opening cutscene opens by focusing on a tram on the station's exterior, and the rest of the cutscene proceeds mostly as in the final game. Notably, Lord Hood is shown wearing a cape, and Cortana is shown with short-cropped hair akin to her original Combat Evolved appearance. The cinematic ends with Hood departing the assembly hall and a fade to black for gameplay, and no focus on the UNSC fleet overhead.


covenantship[edit]


Earth city[edit]
Following on from the destruction of the Covenant ship in the prior level, the Master Chief is evacuated from New Mombasa via Pelican dropship. The Pelican ascends into space to dock with the UNSC In Amber Clad, as the frigate begins to join a UNSC task force. Johnson and Master Chief enter the ship's drop pods as the human battlegroup engages the Covenant fleet, and the In Amber Clad begins to rocket ahead to try and catch up with the Prophet of Regret's ship, Solemn Penance. The carrier creates a slipspace portal, and the In Amber Clad is able to enter it before it closes - being teleported to places unknown.


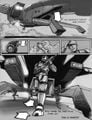
The Arbiter[edit]
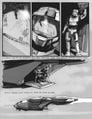
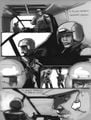
During this stage of development, the level that would become known as The Arbiter was known as alphamoon. These early storyboards depict a cutscene presumably from that era which did make it into the final game, albeit in a very changed form. For the purposes of delineation, they have been separated here from the alphamoon storyboards below, though would have likely been intended for the same level. They depict the moment in which the Prophets grant Thel 'Vadamee the title of Arbiter, and present him with his armour. Unlike in the final game, the Arbiter is not taken to the Mausoleum of the Arbiter, and the Prophets instead come to his cell and talk to him through the bars.


alphamoon[edit]
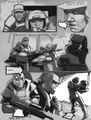
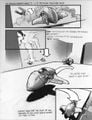
A set of storyboards for the cut alphamoon level can be found in Wilson's post, showcasing an encounter between the Arbiter and the Heretic leader Sesa 'Refumee similar to that of the gas mines, but instead taking place in the wreckage of the control room of Installation 04. The storyboards showcase a struggle between 'Refumee and the Arbiter, with both stopping their fighting as 343 Guilty Spark enters the room. The two would begin listening to Spark, only for the crack of a carbine to interrupt Spark, and the camera pan down to showcase the Heretic lifting a blood-soaked hand from his chest. The shooter would then be revealed to be Tartarus, who subsequently captures Guilty Spark and then executes the now-injured heretic leader before walking away.
Alphamoon outro storyboard 1.
Alphamoon outro storyboard 2.
Alphamoon outro storyboard 3.
Alphamoon outro storyboard 4.
Alphamoon outro storyboard 5.
Alphamoon outro storyboard 6.

Alphamoon outro storyboard 7.
Alphamoon outro storyboard 8.
Alphamoon outro storyboard 9.
Alphamoon outro storyboard 10.
Alphamoon outro storyboard 11.


Delta Halo[edit]
The early sequencing for the Delta Halo opening cutscene showcases a small space battle between In Amber Clad and two CCS-class battlecruisers.


Quarantine Zone[edit]
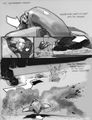
An outro cutscene for what appears to be a heavily altered Quarantine Zone can be found in the earliest revisions. The outro cutscene begins at one of Installation 05's "thermal outtake platforms", near the site of a crashed Pelican dropship. Around the crash site are Miranda, Johnson, Master Chief and a small handful of Marines seemingly trying to repair a damaged radio, to little success. The group are ambushed by the Arbiter, who proceeds to engage Chief in hand-to-hand combat though the scuffle is soon interrupted by the arrival of a Phantom and several Brute troops led by Tartarus. The Brutes encircle the group, and are themselves interrupted by the arrival of a "Flood hulk" - bearing a design very close to the known concept designs of the Sharquoi from Halo 2. The hulk begins to smash through the group and swat aside one of the Phantoms, before falling to sustained fire and crashing through the thermal vent - bringing the Chief, Arbiter and several Brutes with it. This encounter would have presumably resulted in Miranda and Johnson being captured by the Brutes, as in the final Halo 2.


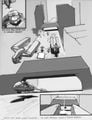
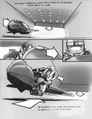
forerunnertank[edit]
A set of storyboards publish coincide heavily with the few details known of the cut forerunnertank level also cut from the game. Following on from the radically altered Quarantine Zone cutscene above, the Brutes die from their falls though the Spartan and Elite survive and are now stranded in the underbelly of the ringworld. Master Chief picks up a Brute Shot and the cutscene fades to gameplay - presumably lining up with the details of Forerunner Tank recalled by Joseph Staten in the Halo 2 developer commentary.


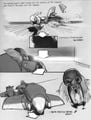
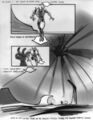
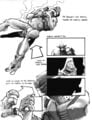
A further series of storyboards show two introductions to the Gravemind cutscene, with differing variations, one showcasing the Master Chief's capture by the Gravemind and one showcasing that of the Arbiter's. In the first, the Master Chief is shown stepping over a handful of recently-dispatched Flood forms before entering into a huge chamber full of Flood biomass - revealed to be the Gravemind. These storyboards are labelled "intra", indicating that the cutscene may have been intended to play as a bridge between two parts of the forerunnnertank level (similarly to the tank cutscene at the start of Metropolis), with the first part of forerunnertank focusing on Master Chief and the second on the Arbiter.


The second showcases a similar introduction for the Arbiter, with the Elite attempting to dodge from pillar to pillar to avoid being seen, while observing the Gravemind talking to the Master Chief. The pillars are revealed to be tentacles and the Arbiter is picked up by the Gravemind, with the ensuing conversation proceeding to play out as in the final game. The cutscene in this revision displays increased scope, with the Gravemind having captured several vehicles such as Phantoms subsumed into its mass, and a horde of Flood forms (including Juggernauts) throwing corpses into the pit to become part of the compound entity.


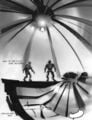
High Charity[edit]
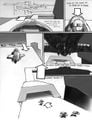
Original plans for the level High Charity showcase a vastly different sequence of events than the final game. The Forerunner keyship has a horizontal layout and is docked as such, rather than the tower-like structure found in the final game. As the Prophets escape onto the Keyship, Truth reaches the docking hatch first and closes the airlock before Mercy can reach him - leaving him to the mercy of the pursuing Master Chief. Mercy then turns and raises an "energy sceptre", protecting himself in an energy field and cutting to a boss battle for the player.


Once Mercy is defeated, the Chief grabs him and begins to interrogate him but is interrupted by the launch of the ship and the retraction of the gangway. The Spartan (still holding Mercy) jumps onto the Keyship and grabs onto a ledge, but Mercy undoes the clasp on his rope allowing him to fall to his death. Meanwhile, Cortana is still stuck in High Charity's systems, and Chief begins climbing his way along the ship's exterior to try and get back onto the ledge where Cortana's holo-pedestal is located. As he is about to reach Cortana, plasma weapon fire emerges from a group of Brute soldiers above, hitting the pedestal and blowing it to pieces - and Cortana along with it. The Spartan takes cover in a recess and pulls himself into an access hatch, before looking out of the viewport as the ship takes off and enters into slipspace.


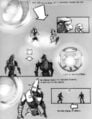
The Great Journey[edit]
Early storyboards released for The Great Journey showcase a slightly different series of events for the Tartarus boss battle at the end of this mission. With Johnson and Miranda having been captured by the Brutes, Arbiter enters the control room with only his Sangheili allies and no Johnson aid. The control room's layout in these early storyboards matches that of the design used in Combat Evolved and Halo 3.


At the fight's conclusion, Miranda and Johnson are still tied up from their previous capture, while Arbiter executes Tartarus. The Arbiter and Rtas then walk up to the humans, with Rtas holding Johnson back while the Arbiter looks at Miranda and narrows his eyes - followed by a fade to gameplay. It is unknown what gameplay would have taken place following this cutscene.


Original ending[edit]
The Great Journey[edit]
- H2 GreatJourney Storyboard Outro 1.jpg
- H2 GreatJourney Storyboard Outro 2.jpg
- H2 GreatJourney Storyboard Outro 3.jpg
- H2 GreatJourney Storyboard Outro 4.jpg
- H2 GreatJourney Storyboard Outro 5.jpg
- H2 GreatJourney Storyboard Outro 6.jpg
- H2 GreatJourney Storyboard Outro 7.jpg
- H2 GreatJourney Storyboard Outro 8.jpg
- H2 GreatJourney Storyboard Outro 9.jpg
- H2 GreatJourney Storyboard Outro 10.jpg
- H2 GreatJourney Storyboard Outro 11.jpg
- H2 GreatJourney Storyboard Outro 12.jpg
- H2 GreatJourney Storyboard Outro 13.jpg
- H2 GreatJourney Storyboard Outro 14.jpg
- H2 GreatJourney Storyboard Outro 15.jpg
Battle on Earth[edit]
- H2 EarthBattle Storyboard Intro 1.jpg
- H2 EarthBattle Storyboard Intro 2.jpg
- H2 EarthBattle Storyboard Intro 3.jpg
- H2 EarthBattle Storyboard Intro 4.jpg
- H2 EarthBattle Storyboard Intro 5.jpg
- H2 EarthBattle Storyboard Intra 1.jpg
- H2 EarthBattle Storyboard Intra 2.jpg
- H2 EarthBattle Storyboard Intra 3.jpg
- H2 EarthBattle Storyboard Intra 4.jpg
- H2 EarthBattle Storyboard Intra 5.jpg
- H2 EarthBattle Storyboard Intra 6.jpg
- H2 EarthBattle Storyboard Intra 7.jpg
- H2 EarthBattle Storyboard Intra 8.jpg
- H2 EarthBattle Storyboard Intra 9.jpg
- H2 EarthBattle Storyboard Intra 10.jpg
- H2 EarthBattle Storyboard Intra 11.jpg
- H2 EarthBattle Storyboard Intra 12.jpg
- H2 EarthBattle Storyboard Intra 13.jpg
- H2 EarthBattle Storyboard Intra 14.jpg
- H2 EarthBattle Storyboard Intra 15.jpg
- Take Two
- H2 ForerunnerShip Jump Storyboard 1.jpg
- H2 ForerunnerShip Jump Storyboard 2.jpg
- H2 ForerunnerShip Jump Storyboard 3.jpg
- H2 ForerunnerShip Jump Storyboard 4.jpg
- H2 ForerunnerShip Jump Storyboard 5.jpg
- H2 ForerunnerShip Jump Storyboard 6.jpg
- H2 ForerunnerShip Jump Storyboard 7.jpg
- H2 ForerunnerShip Jump Storyboard 8.jpg
- H2 ForerunnerShip Jump Storyboard 9.jpg
- H2 ForerunnerShip Jump Storyboard 10.jpg
- H2 ForerunnerShip Jump Storyboard 11.jpg
Inside the Ark[edit]
- H2 Ark Storyboard Intro 1.jpg
- H2 Ark Storyboard Intro 2.jpg
- H2 Ark Storyboard Intro 3.jpg
- H2 Ark Storyboard Intro 4.jpg
- H2 Ark Storyboard Intro 5.jpg
- H2 Ark Storyboard Intro 6.jpg
Ending cutscenes[edit]
- Master Chief's ending
- H2 Ending MasterChief Storyboard 1.jpg
- H2 Ending MasterChief Storyboard 2.jpg
- H2 Ending MasterChief Storyboard 3.jpg
- H2 Ending MasterChief Storyboard 4.jpg
- H2 Ending MasterChief Storyboard 5.jpg
- H2 Ending MasterChief Storyboard 6.jpg
- H2 Ending MasterChief Storyboard 7.jpg
- Arbiter's ending
- H2 Ending Arbiter Storyboard 1.jpg
- H2 Ending Arbiter Storyboard 2.jpg
- H2 Ending Arbiter Storyboard 3.jpg
- H2 Ending Arbiter Storyboard 4.jpg
- H2 Ending Arbiter Storyboard 5.jpg
- H2 Ending Arbiter Storyboard 6.jpg
- H2 Ending Arbiter Storyboard 7.jpg
- H2 Ending Arbiter Storyboard 8.jpg
- H2 Ending Arbiter Storyboard 9.jpg
- H2 Ending Arbiter Storyboard 10.jpg
- H2 Ending Arbiter Storyboard 11.jpg
Epilogue[edit]


Second revision[edit]
The second revision storyboards resemble the final game more closely, featuring designs mostly similar to those found in the final game and a drastic reduction of scope compared to the original outline, including the cutting of the majority of the third act to be replaced with the game ending found in the final product. The design of Anodyne Spirit in these storyboards has evolved from the frigate-like entity shown prior to a large tower, though would later evolve again to resemble the Keyship design familiar to fans now.
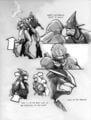
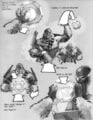
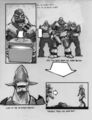
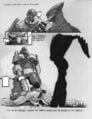
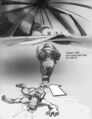
The Heretic[edit]
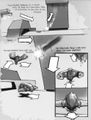
- "Cleaning out basement closets, found some of my #Halo 2 storyboards tucked into a random box. Setting aside embarrassment at my "art" skills:
Interesting to note elements that didn't make it into the final version. For example, we decided not to build a 3D model of the broken ring, opting for simpler matte elements instead--which meant we couldn't pull of the rotation reveal of the broken section. Indeed, Halo 2 had so many complex cinematics that matte paintings were essential in many places. I think our brains would have exploded (in a good way) had we known that, someday, all our work would be remastered in full 3D glory." - — Joseph Staten, regarding the Heretic storyboard featured here.[4]
Storyboard sketches for a revised The Heretic, by Joseph Staten.

covenantship[edit]


Metropolis[edit]
These storyboards for the Metropolis level outro mostly resemble the final game with one obvious difference - the design of the Protos-pattern Scarab had not yet been established, and the R3000 Spider Tank from Mamoru Oshii's 1995 version of Ghost in the Shell is used as placeholder, a substitution also seen in The Great Journey.


The Arbiter[edit]
These mid-era storyboards for the Arbiter level demonstrate general similarities with the final game. However, rather than deploying via Phantom dropship, the Elite strike team is instead deployed to the gas mines via a command shuttle.


Sacred Icon[edit]
These storyboards for the level Sacred Icon are generally the same as those found in the game, though the artwork for the various characters is rough and exhibits more subtle changes compared to the final game designs. The largest differences are the presence of the Covenant murals, previously discussed in the Halo 2 Limited Collector's Edition documentary.
- Take 1
The storyboards presented here showcase a slightly different order of events, with both Sangheili and San'Shyuum councilors shown leaving the Sanctum of the Hierarchs. Notably, the Arbiter's armour is slightly more primitively-designed.


- Take 2
The storyboards presented here showcase an order of events more reminiscent of the final game. Notably, those shown here showcase the aforementioned Murals.


Quarantine Zone[edit]
Early storyboards for a more finalised end to Quarantine Zone showcase the same general ideas as the final game. However, Miranda does not use the Flood tendril as a rope to retrieve the activation index, and the Arbiter is shown to land at the bottom of the shaft after his betrayal by Tartarus. In this revision, the Arbiter is shown to land in a pit of Flood biomass, scattering the pod infectors away - before being grabbed and pulled away by the (unseen) Gravemind.


High Charity[edit]
Early storyboards for the opening cutscene of the level High Charity showcase a sequence of events essentially the same as that found in the final game. Major differences include a differing design for the Keyship (the same as those found in the Heretic storyboard above), and Cortana now resembles her final in-game counterpart.


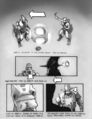
The Great Journey[edit]
These early storyboards for The Great Journey showcase the ending, having been reworked from the original plot. The control room still resembles Installation 04, but the alliance with Johnson is now one of the key parts of the storyboard. In these early revisions, an additional cutscene is shown in the Bastion of the Brutes, depicting the Arbiter having a fist fight with a Brute guard assigned to watch Johnson and his Marines. The Arbiter fights the Brute but is ultimately saved by Johnson, who uses his helmet to smash the Brute's head in. Johnson then passes the guard's Brute Shot to the Arbiter, who then looms over Johnson and looks to prepare a killing strike - only to cut Johnson's bonds. They then turn to the docked "Scarab" (once again, a placeholder Ghost in the Shell R3000), and the level proceeds as normal.


Final revision[edit]
Cairo Station[edit]
These storyboards for the revision of the level Cairo Station exhibit almost no changes from the final game, except minor differences such as the direction in which the UNSC fleet heads. However, the outro storyboards for this level do appear to exhibit a slightly different art style and filenaming structure, suggesting that the intro sequence shown here was finalised much earlier in production than the outro - likely due to the cutting of the covenantship level.
- Intro


- Outro


Outskirts[edit]


Metropolis[edit]
The finalised Metropolis storyboards here have almost no differences from the final game, and notably feature the finalised design for the Protos-pattern Scarab rather than the six-legged version seen prior.


The Arbiter[edit]


The Oracle[edit]


Delta Halo[edit]


Regret[edit]


Sacred Icon[edit]
Unlike prior Sacred Icon storyboards, the ones shown here feature designs for the Arbiter, Phantoms and Brutes with almost no discernable changes from the final game, suggesting they were completed fairly late in production.


Uprising[edit]


High Charity[edit]
The near-final storyboards for the outro of High Charity show relatively few differences with the final game, and depict a Keyship very close in design to the final one seen in-game. This design is nonetheless different to the final, having more elegant curvilinear forms than the pyramidal shape of the keyship in final release. Interestingly, this early design did make it into early builds of the game and can be seen in some early screenshots of the High Charity skybox, including the final in-game mission select preview icons.
The largest difference, however, can be seen in the inclusion of the end of the planned Warthog run intended for the game.


The Great Journey[edit]


Sources[edit]
- ^ YouTube - C3 SABERTOOTH - Halo Channel, HALO 1'S LOST STORY
- ^ Lee Wilson discusses his storyboards, (screenshot)
- ^ Artstation, Halo 2 storyboards (Retrieved on Dec 28, 2020) [archive]
- ^ Twitter, Joseph Staten (@joestaten) (Retrieved on Oct 4, 2021) [archive]


