Mausoleum of the Arbiter: Difference between revisions
From Halopedia, the Halo wiki
m (→Appearances) |
m (Bot: Automated text replacement (-{{[Ee]ra\|(Forerunner|Covenant|Human|UNSC|HCW|Post)[^}\n]*}} +{{Status|Canon}})) |
||
| (136 intermediate revisions by 81 users not shown) | |||
| Line 1: | Line 1: | ||
{{ | {{Status|Canon}} | ||
{{Quote|Here rests the vanguard of the [[Great Journey]]. Every [[Arbiter]], from first to last. Each one created and consumed in times of extraordinary crisis.|[[Prophet of Truth]] | {{disambig header|the room in High Charity|other articles including "Arbiter"|Arbiter (disambiguation)}} | ||
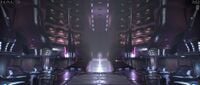
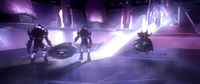
[[File:H2A Terminals - Mausoleum of the Arbiter.jpg|thumb|300px|The interior of the Mausoleum of the Arbiter.]] | |||
{{Quote|Here rests the vanguard of the [[Great Journey]]. Every [[Arbiter]], from first to last. Each one created and consumed in times of extraordinary crisis.|[[Prophet of Truth]]<ref name="h2arbiter">'''[[Halo 2]]''', campaign level, ''[[The Arbiter]]''</ref>}} | |||
The '''Mausoleum of the Arbiter''' was a massive chamber within the [[Covenant]] holy city of ''[[High Charity]]'' which housed the remains of the previous [[Arbiter]]s. | |||
The Mausoleum of the Arbiter | ==Description== | ||
The Mausoleum of the Arbiter contained the recoverable remains of every [[Sangheili]] that has ever been designated as the Arbiter. A total of one hundred eighty-two caskets are present, spreading far up into the ceiling. In the center of the chamber is a large suspended sarcophagus that held the [[Arbiter body armor|armor of the Arbiter]].{{Ref/Reuse|h2arbiter}} | |||
== | ==History== | ||
===Human-Covenant War=== | |||
After Thel 'Vadam was branded with the [[Mark of Shame]], he was taken to the mausoleum by Tartarus and his two [[Jiralhanae]] ushers. The [[Prophet of Truth]] and the [[Prophet of Mercy]] ordered Tartarus to release 'Vadamee and leave. After this, they started to converse with him about [[Sesa 'Refumee|a heretic leader]] and the past Arbiters, ultimately appointing him the new Arbiter and giving him the ornate armor of the Arbiter there.{{Ref/Reuse|h2arbiter}} | |||
With the outbreak of the [[Great Schism]], and open conflict within ''High Charity'', the mausoleum was used as a final defensive position by the Sangheili, who were under attack by the Jiralhanae-led Covenant. Bolstering their forces with several [[Mgalekgolo]], the Sangheili furiously fought against their attackers. Ultimately all Covenant forces were wiped out when [[SPARTAN-II program|SPARTAN]] [[John-117]] attacked during his rampage through the city with the goal of retrieving [[Installation 05|Installation 05's]] [[activation index]] from the Prophet of Truth.<ref>'''Halo 2''', campaign level, ''[[Gravemind (level)|Gravemind]]''</ref> Too late to stop Truth, [[Tartarus]] and their prisoners [[Miranda Keyes]] and [[Avery Junior Johnson|Sergeant Johnson]] from leaving the city, the Chief was forced to once again pass through the Mausoleum tower ahead of the newly-arrived [[Flood]] to reach a [[High Charity conduit|conduit]] leading to the city's [[Forerunner Dreadnought]].<ref>'''Halo 2''', campaign level, ''[[High Charity (level)|High Charity]]''</ref> | |||
After ''High Charity'' was infested by the Flood and crashed into [[Installation 00]] during the [[Battle of Installation 00]], the mausoleum was severely damaged. By the time of John-117's [[Raid on High Charity|raid on ''High Charity'']], the tower was in a tilted angle, with energy cascades across the surface leaning dangerously over to the side and cables hanging from the shattered [[bridge (structure)|bridges]] around the tower. It can be assumed that the Mausoleum and the Vanguards of the Great Journey entombed within were destroyed when ''High Charity's'' reactor went critical, as spurred by Spartan-117 in the previous raid, and destroyed the Flood-infected city.<ref>'''[[Halo 3]]''', campaign level, ''[[Cortana (level)|Cortana]]''</ref> | |||
==Trivia== | |||
In an early version of the level ''[[Cortana (level)|Cortana]]'', John-117 would have passed through the Mausoleum, encountering a large number of Flood-infected Arbiters.{{Ref/Site|Id=GDC1|URL=https://www.bungie.net/en/aboutus#page=publications&publication=12662|Site=Bungie Publications|Page=Halo 3 Flood Alien Level Autopsy|D=10|M=10|Y=2021}}{{Ref/Site|Id=GDC2|URL=http://halo.bungie.net/images/Inside/publications/presentations/Bungie_EnvDesign_GDC.pptx|Site=Bungie.net|Page=Halo 3 Flood Alien Level Autopsy|Detail=Original presentation download link|D=18|M=1|Y=2021}} | |||
==Gallery== | |||
<gallery> | |||
File:MausoleumConcept.jpg|Early ''[[Halo 3]]'' concept art of the Mausoleum and [[John-117]]. | |||
File:H2A Render - Mausoleum.jpg|A render of the Mausoleum for ''[[Halo 2: Anniversary]]''. | |||
File:Homeofarbiter.jpg|Exterior view of the Mausoleum. | |||
File:Mausoleum Interior.jpg|An interior shot as seen in ''Halo 2''. | |||
File:H3 Cortana Mausoleum of the Arbiter.jpg|The Mausoleum of the Arbiter in ruins as seen in ''Halo 3''. | |||
File:H2A MausoleumConcept.jpg|Concept art of the Mausoleum in ''Halo 2: Anniversary'''s [[Terminal (Halo 2: Anniversary)|terminals]]. | |||
File:H2A Terminals - Dead Arbiter.jpg|Sangheili adding a dead Arbiter to the crypt. | |||
File:H2A - Mausoleum of the Arbiter.jpg|An exterior view of the Mausoleum as it is seen in ''Halo 2: Anniversary''. | |||
</gallery> | |||
== | ==List of appearances== | ||
*''[[Halo 2]]'' {{1st}} | |||
*''[[Halo 3]]'' | |||
*''[[Halo 2: Anniversary]]'' | |||
**''[[Terminal (Halo 2: Anniversary)|Terminals]]'' | |||
{{ | ==Sources== | ||
{{Ref/Sources}} | |||
{{High Charity Locations}} | |||
Latest revision as of 15:18, March 18, 2022

- "Here rests the vanguard of the Great Journey. Every Arbiter, from first to last. Each one created and consumed in times of extraordinary crisis."
- — Prophet of Truth[1]
The Mausoleum of the Arbiter was a massive chamber within the Covenant holy city of High Charity which housed the remains of the previous Arbiters.
Description[edit]
The Mausoleum of the Arbiter contained the recoverable remains of every Sangheili that has ever been designated as the Arbiter. A total of one hundred eighty-two caskets are present, spreading far up into the ceiling. In the center of the chamber is a large suspended sarcophagus that held the armor of the Arbiter.[1]
History[edit]
Human-Covenant War[edit]
After Thel 'Vadam was branded with the Mark of Shame, he was taken to the mausoleum by Tartarus and his two Jiralhanae ushers. The Prophet of Truth and the Prophet of Mercy ordered Tartarus to release 'Vadamee and leave. After this, they started to converse with him about a heretic leader and the past Arbiters, ultimately appointing him the new Arbiter and giving him the ornate armor of the Arbiter there.[1]
With the outbreak of the Great Schism, and open conflict within High Charity, the mausoleum was used as a final defensive position by the Sangheili, who were under attack by the Jiralhanae-led Covenant. Bolstering their forces with several Mgalekgolo, the Sangheili furiously fought against their attackers. Ultimately all Covenant forces were wiped out when SPARTAN John-117 attacked during his rampage through the city with the goal of retrieving Installation 05's activation index from the Prophet of Truth.[2] Too late to stop Truth, Tartarus and their prisoners Miranda Keyes and Sergeant Johnson from leaving the city, the Chief was forced to once again pass through the Mausoleum tower ahead of the newly-arrived Flood to reach a conduit leading to the city's Forerunner Dreadnought.[3]
After High Charity was infested by the Flood and crashed into Installation 00 during the Battle of Installation 00, the mausoleum was severely damaged. By the time of John-117's raid on High Charity, the tower was in a tilted angle, with energy cascades across the surface leaning dangerously over to the side and cables hanging from the shattered bridges around the tower. It can be assumed that the Mausoleum and the Vanguards of the Great Journey entombed within were destroyed when High Charity's reactor went critical, as spurred by Spartan-117 in the previous raid, and destroyed the Flood-infected city.[4]
Trivia[edit]
In an early version of the level Cortana, John-117 would have passed through the Mausoleum, encountering a large number of Flood-infected Arbiters.[5][6]
Gallery[edit]
A render of the Mausoleum for Halo 2: Anniversary.

Exterior view of the Mausoleum.
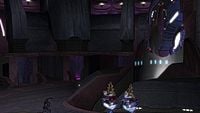
An interior shot as seen in Halo 2.
The Mausoleum of the Arbiter in ruins as seen in Halo 3.
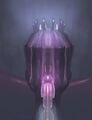
Concept art of the Mausoleum in Halo 2: Anniversary's terminals.
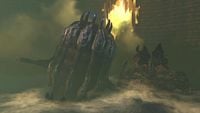
Sangheili adding a dead Arbiter to the crypt.

An exterior view of the Mausoleum as it is seen in Halo 2: Anniversary.


List of appearances[edit]
- Halo 2 (First appearance)
- Halo 3
- Halo 2: Anniversary
Sources[edit]
- ^ a b c Halo 2, campaign level, The Arbiter
- ^ Halo 2, campaign level, Gravemind
- ^ Halo 2, campaign level, High Charity
- ^ Halo 3, campaign level, Cortana
- ^ Bungie Publications, Halo 3 Flood Alien Level Autopsy (Retrieved on Oct 10, 2021) [archive]
- ^ Bungie.net, Halo 3 Flood Alien Level Autopsy: Original presentation download link (Retrieved on Jan 18, 2021) [archive]


