Damnation: Difference between revisions
From Halopedia, the Halo wiki
(→Trivia) |
m (clean up, replaced: {{Article Quote → {{Article quote, typos fixed: highly- → highly , ,, → ,) |
||
| Line 12: | Line 12: | ||
*[[Oddball]] | *[[Oddball]] | ||
}} | }} | ||
{{Article | {{Article quote|Covenant [[Hydro-Processing Center]].}} | ||
'''''Damnation''''' is a [[multiplayer]] map in ''[[Halo: Combat Evolved]]''. It is one of the few non-symmetrical maps and incorporates both a high and low flag base, providing heavily vertical gameplay. It is highly popular on the [[Oddball]] and [[Team Slayer]] gametypes. The map was remade as [[Penance]] for ''[[Halo: Combat Evolved Anniversary]]''. | '''''Damnation''''' is a [[multiplayer]] map in ''[[Halo: Combat Evolved]]''. It is one of the few non-symmetrical maps and incorporates both a high and low flag base, providing heavily vertical gameplay. It is highly popular on the [[Oddball]] and [[Team Slayer]] gametypes. The map was remade as [[Penance]] for ''[[Halo: Combat Evolved Anniversary]]''. | ||
| Line 23: | Line 23: | ||
The waterfall area consists of three isolated platforms that you must jump across, long, thin planks connected to those platforms that eventually lead back to rockets, the plasma rifle room (PR), and 'back red', where the plasma pistol spawns. This whole section is on the far side of the map from where the action usually takes place, and as such it's rarely used, especially in team slayer games. That said, it can be a very useful flanking route, since other players tend to pay little attention to it by default. PR room in particular is dangerous, as it's surprisingly easy to get spawn trapped in here, and getting out once that happens is almost impossible. 'Everything else' refers to the overshield, rockets, shotguns (or shotties), and bottom snipe. Overshield and rockets are adjacent to each other, and control of one usually means control of the other. Shotties refers to the entire main balcony on the lower level, two shotguns spawn near the windows. Bottom snipe is a conduit of sorts, as it leads both to and from shotties, PR, and bottom green. You can jump to overshield from the small platform outside, and players can fall into bottom snipe from top green, as well. | The waterfall area consists of three isolated platforms that you must jump across, long, thin planks connected to those platforms that eventually lead back to rockets, the plasma rifle room (PR), and 'back red', where the plasma pistol spawns. This whole section is on the far side of the map from where the action usually takes place, and as such it's rarely used, especially in team slayer games. That said, it can be a very useful flanking route, since other players tend to pay little attention to it by default. PR room in particular is dangerous, as it's surprisingly easy to get spawn trapped in here, and getting out once that happens is almost impossible. 'Everything else' refers to the overshield, rockets, shotguns (or shotties), and bottom snipe. Overshield and rockets are adjacent to each other, and control of one usually means control of the other. Shotties refers to the entire main balcony on the lower level, two shotguns spawn near the windows. Bottom snipe is a conduit of sorts, as it leads both to and from shotties, PR, and bottom green. You can jump to overshield from the small platform outside, and players can fall into bottom snipe from top green, as well. | ||
==Bungie.net Hints | ==Bungie.net Hints== | ||
[[File:Damnation.jpg|thumb|250px|right|Map of ''Damnation'']] | [[File:Damnation.jpg|thumb|250px|right|Map of ''Damnation'']] | ||
*During [[Capture the Flag|CTF]] events, stay close to the flag locations and snipe across the high teleport road and the low dam crossing. Communicate well and the flag is yours as it is easy to attack the flag bases from multiple sides at once. | *During [[Capture the Flag|CTF]] events, stay close to the flag locations and snipe across the high teleport road and the low dam crossing. Communicate well and the flag is yours as it is easy to attack the flag bases from multiple sides at once. | ||
*Use the two [[SRS99C-S2 AM sniper rifle|sniper rifles]] to surprise and effectively suppress opponents. There is a good hiding place near the uplink crate. | *Use the two [[SRS99C-S2 AM sniper rifle|sniper rifles]] to surprise and effectively suppress opponents. There is a good hiding place near the uplink crate. | ||
*Watch your step! There are a lot of areas in ''Damnation'' where you can walk off a ledge and die. Pipes, on the other hand, can be fun places to hang out and get the drop on someone. | *Watch your step! There are a lot of areas in ''Damnation'' where you can walk off a ledge and die. Pipes, on the other hand, can be fun places to hang out and get the drop on someone. | ||
*It was thought that to hop to the pit area from the falls bridge area was impossible, though you can do it the other way. This is actually incorrect - a fairly seasoned ''Halo: CE'' player can achieve this jump from the middle fall bridge to the pit area that contains the coveted rocket launcher. This is done by simultaneously performing two tasks: Walking over the [[overshield]] power-up and bouncing a [[grenade]] at the wall so that it blows up directly beneath your feet. If timed properly, the grenade will propel the player over the ledge as the overshield is powers up | *It was thought that to hop to the pit area from the falls bridge area was impossible, though you can do it the other way. This is actually incorrect - a fairly seasoned ''Halo: CE'' player can achieve this jump from the middle fall bridge to the pit area that contains the coveted rocket launcher. This is done by simultaneously performing two tasks: Walking over the [[overshield]] power-up and bouncing a [[grenade]] at the wall so that it blows up directly beneath your feet. If timed properly, the grenade will propel the player over the ledge as the overshield is powers up, therefore causing no damage to the player's health and keeping the overshield intact. Some things to remember: 1) The fuse times of [[Type-1 plasma grenade|plasma grenades]] and [[M9 fragmentation grenade|frag grenades]] are different (a frag grenade will blow up almost immediately when it settles on the ground; a plasma grenade will take approximately two seconds after settling to detonate); 2) If timed perfectly, you can throw the grenade at the wall as you are running full-speed at the wall while powering-up the overshield just as the grenade detonates (again, WHEN you throw the grenade at the wall depends on whether you are using a plasma or fragmentation grenade) - this is most efficient and helps to decrease the chance that you will be killed by an opponent noticing you prepping for the jump; and 3) getting INTO the pit area does not necessarily mean you are going to GET OUT, as this is one of the most highly contested spots on the map, with constant grenade detonations going on and players monitoring the re-spawn of the [[M41 SPNKR|rocket launcher]]. | ||
==Trivia== | ==Trivia== | ||
Revision as of 08:05, August 14, 2019
Template:Multiplayer Map Infobox
| “ | Covenant Hydro-Processing Center. | ” |
Damnation is a multiplayer map in Halo: Combat Evolved. It is one of the few non-symmetrical maps and incorporates both a high and low flag base, providing heavily vertical gameplay. It is highly popular on the Oddball and Team Slayer gametypes. The map was remade as Penance for Halo: Combat Evolved Anniversary.
Summary
Damnation takes place in a Covenant facility devoted to the controlling of water flow on terrestrial surfaces. There are three separate streams of water flow down, into an abyss in the main chamber, with many interconnecting platforms, bridges and walkways hanging dangerously close to the pit. Other rooms are mostly empty, with the exception of Covenant comm nodes and supply cases.
Layout
Damnation can be broken down into four general sections; red, green, waterfall, and everything else. Red refers to the area on the bottom side of the map's two-way teleporter, and if you position yourself well, you'll have a good view of the rocket launcher and the overshield (although not simultaneously) without putting yourself in harm's way. You don't have many useful sightlines to green, however. Green is the top area of the map, and can be further broken down into bottom green, top green, top shotties, and top snipe. There are only two ways to access green; the teleporter, and a short tunnel that feeds from bottom snipe into bottom green. Neither should be attempted while the other team is in green, unless distractions are in place or you have a powerup, as a disciplined team will make quick work of anyone rushing through teleporter or tunnel. Complicating matters for whatever team doesn't have control of green is the fact that the very important active camo spawns up there, on a thin plank outside of green room. It can be grenaded down to the lower level, but that can be difficult to pull off unless you're a seasoned player. Active camo is so important here because it allows free movement (as long you're careful) on a map with fairly restricted flow, and a chance for you to sneak behind enemy lines to start breaking up their control. Controlling green, and the strategy of taking it back when you lose it, is the central premise of Damnation.
The waterfall area consists of three isolated platforms that you must jump across, long, thin planks connected to those platforms that eventually lead back to rockets, the plasma rifle room (PR), and 'back red', where the plasma pistol spawns. This whole section is on the far side of the map from where the action usually takes place, and as such it's rarely used, especially in team slayer games. That said, it can be a very useful flanking route, since other players tend to pay little attention to it by default. PR room in particular is dangerous, as it's surprisingly easy to get spawn trapped in here, and getting out once that happens is almost impossible. 'Everything else' refers to the overshield, rockets, shotguns (or shotties), and bottom snipe. Overshield and rockets are adjacent to each other, and control of one usually means control of the other. Shotties refers to the entire main balcony on the lower level, two shotguns spawn near the windows. Bottom snipe is a conduit of sorts, as it leads both to and from shotties, PR, and bottom green. You can jump to overshield from the small platform outside, and players can fall into bottom snipe from top green, as well.
Bungie.net Hints

- During CTF events, stay close to the flag locations and snipe across the high teleport road and the low dam crossing. Communicate well and the flag is yours as it is easy to attack the flag bases from multiple sides at once.
- Use the two sniper rifles to surprise and effectively suppress opponents. There is a good hiding place near the uplink crate.
- Watch your step! There are a lot of areas in Damnation where you can walk off a ledge and die. Pipes, on the other hand, can be fun places to hang out and get the drop on someone.
- It was thought that to hop to the pit area from the falls bridge area was impossible, though you can do it the other way. This is actually incorrect - a fairly seasoned Halo: CE player can achieve this jump from the middle fall bridge to the pit area that contains the coveted rocket launcher. This is done by simultaneously performing two tasks: Walking over the overshield power-up and bouncing a grenade at the wall so that it blows up directly beneath your feet. If timed properly, the grenade will propel the player over the ledge as the overshield is powers up, therefore causing no damage to the player's health and keeping the overshield intact. Some things to remember: 1) The fuse times of plasma grenades and frag grenades are different (a frag grenade will blow up almost immediately when it settles on the ground; a plasma grenade will take approximately two seconds after settling to detonate); 2) If timed perfectly, you can throw the grenade at the wall as you are running full-speed at the wall while powering-up the overshield just as the grenade detonates (again, WHEN you throw the grenade at the wall depends on whether you are using a plasma or fragmentation grenade) - this is most efficient and helps to decrease the chance that you will be killed by an opponent noticing you prepping for the jump; and 3) getting INTO the pit area does not necessarily mean you are going to GET OUT, as this is one of the most highly contested spots on the map, with constant grenade detonations going on and players monitoring the re-spawn of the rocket launcher.
Trivia
• When playing Oddball, if a player throws the skull outside the map via a window, it will keep going down infinitely until it respawns.
• This map is stated to be on Installation 04. Even though the Halo ring may not be visible in the skybox, it actually is there, but very translucent; zooming in with your pistol or looking out the windows by the Shotguns’ spawn will allow you to see it.
Gallery
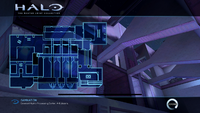
Damnation Map.
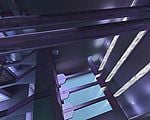
Damnation.


Sources
| |||||||||||||||||||||||


