Boarding Action: Difference between revisions
From Halopedia, the Halo wiki
No edit summary |
No edit summary |
||
| (88 intermediate revisions by 62 users not shown) | |||
| Line 1: | Line 1: | ||
{{ | {{Status|Gameplay}} | ||
{{Multiplayer map infobox | |||
{{Multiplayer | |||
|name=Boarding Action | |name=Boarding Action | ||
|image=[[ | |image=[[File:HCE BoardingAction Overview.png|300px]] | ||
|game=''[[Halo: Combat Evolved]]'' and ''[[Halo: PC]]'' | |game=''[[Halo: Combat Evolved]]'' and ''[[Halo: Combat Evolved (PC port)|Halo: PC]]'' | ||
| | |devname=<code>boardingaction</code>{{Ref/File|Id=HCEEK|HCEEK|HCEEK\tags\levels\test\boardingaction\boardingaction.scenario}} | ||
| | |map= | ||
| | |location=2 unidentified [[UNSC]] ships in orbit over [[Threshold]], [[Soell System]]{{Ref/Map|Id=Boarding|HCE|Boarding Action|Detail=Map skybox}} | ||
|terrain=Space, UNSC warships | |||
|symmetry=Symmetrical | |||
|playernumber=4-16 | |||
| | |||
| | |||
|gametypes=*[[Slayer]] | |gametypes=*[[Slayer]] | ||
| | *[[Capture the Flag]] | ||
|pagegamelabel=CE | |||
}} | }} | ||
{{Article quote|Ship-to-Ship Combat.}} | |||
'''Boarding Action''' is a [[multiplayer]] map in ''[[Halo: Combat Evolved]]''. It is set in | '''Boarding Action''' is a [[multiplayer]] map in ''[[Halo: Combat Evolved]]''. It is set in orbit near [[Threshold]] in the [[Soell system]].{{Ref/Reuse|Boarding}} | ||
==Layout== | ==Layout== | ||
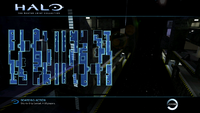
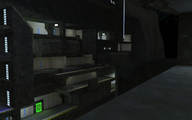
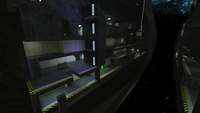
There are two parallel [[human]] | There are two parallel [[human]] warships, which have had the exterior bulkhead removed and a good portion of the interior exposed to space. There are four [[teleporter]]s on both ships, two on the first level and two on the fifth level, which are the only means of transportation between the two ships. This map is usually picked by hosts for its extremely exciting [[SRS99C-S2 AM sniper rifle|sniper]] and rocket battles. Other hosts may turn off sniping to force players to board the other ship. This usually results in a frenzy of explosions and gunfire near each teleporter as each team frantically tries to stop the other team on their ship. The ships are in fact not that far apart, in truth it is simple to throw a grenade to the other ship. | ||
There are | There are five symmetrical floors on each side, and are exact mirror copies of each other. Teleporters are found on the 1st and 5th floor, each leading into the exact same place on the other side. In the top right corner of each base (looking out), there is a small indent with a [[power-up]]. | ||
Learning the layout of this level is more important than most other maps, as the level can be very confusing to inexperienced players, similar to [[ | Learning the layout of this level is more important than most other maps, as the level can be very confusing to inexperienced players, similar to [[Chiron TL-34]]. | ||
==Tactics== | ==Tactics== | ||
===General=== | ===General=== | ||
*An interesting way to simulate ship-to-ship combat is to have 16 players, eight per team, loaded with all [[ | *An interesting way to simulate ship-to-ship combat is to have 16 players, eight per team, loaded with all [[M41 SPNKR|rocket launchers]]. | ||
*It is not at all uncommon in any game type to find yourself standing directly above or below an enemy as the ships have several floors, with each floor number marked on the wall. | *It is not at all uncommon in any game type to find yourself standing directly above or below an enemy, as the ships have several floors, with each floor number marked on the wall. Oftentimes, one player will come through a teleporter and run right into another player without warning. | ||
*Another popular game type on Boarding Action is all | *Another popular game type on Boarding Action is all Snipers, in either [[Team Slayer]] or [[Capture the Flag|CTF]], because of how many parts of the map are remote to each other, the fact that you can see half of the map from almost any area, and that close range weapons can't reach to most parts of the map. It is possible, however, to headshot an enemy player using the [[M6D magnum|pistol]] when the shooter and the target are on opposite sides of the map, but this is rare due to the massive distance. | ||
*There is an ideal sniper location to the left of the sniper rifle, where it is arduous to locate someone unless you already know of the place. After sniping, though, to avoid giving up your hiding place, back into the corridor and out of | *There is an ideal sniper location to the left of the sniper rifle, where it is arduous to locate someone unless you already know of the place. After sniping, though, to avoid giving up your hiding place, back into the corridor and out of sight. If you've been spotted, then you can simply jump between the pillars to land on an [[overshield]]. | ||
===Capture the Flag=== | ===Capture the Flag=== | ||
*If you wish to be the flag carrier, the most direct method is to go through the teleporter on Level 5 and then proceed down to the enemy base. First, you should spawn | *If you wish to be the flag carrier, the most direct method is to go through the teleporter on Level 5 and then proceed down to the enemy base. First, you should spawn close to the flag. Then, go to the left of the flag and go up the first ladder you reach. You should grab the flag, as it will deter any pursuing enemies and offer a quick getaway. If it is vacant, though, don't panic. There is also the [[Unidentified fuel rod gun|fuel rod gun]] for similar purposes (in Halo PC only). Note: do ''not'' grab the flag if you intend to score; eventually, the enemies will simply overwhelm you, grenade you or fire from a relative distance. Run the moment you come within contact of the flag and then ''scram''. However, don't follow this unless you have set up a plan. Position snipers and escort for the getaway. Usually, the first scoring will be the simplest, as the opponents are usually composed of disorganized hassles, unless you are facing a large group of players. However, when you are past the wall and almost at the wall, don't celebrate yet, as you are in an exposed area and are prone to enemy sniper fire. | ||
*If you have the sniper rifle, a good idea is to try and take out opponents on the | *If you have the sniper rifle, a good idea is to try and take out opponents on the enemy ship while the flag carrier of your team tries to capture the flag or escape back to your base. | ||
*You can use close- | *You can use close-quarters weapons, such as the [[M90 shotgun|shotgun]], or [[M7057 flamethrower|flamethrower]] (in Halo PC) to defend you base, or keep your flag from being captured by the enemy team. | ||
==Pro-Strategies== | |||
*Boarding Action is one of the best, if not the best, overall classic team-slayer maps in Halo Combat Evolved. This is primarily because it allows almost every player a view of the majority of the map at any given time. It emphasizes long-range weapons; such as the sniper rifle, pistol, fuel rod, and rocket launcher. However, it provides many opportunities for close quarters combat with weapons such as the shotgun or assault rifle. The map is fairly easily navigated to an experienced player, allowing power-ups and power weapons to be controlled quickly. The teleporters allow for almost complete map control to the team who has secured the upper decks, but can also prove to be a weapon for the opposition, as they can be used to insert forces directly behind enemy lines. | |||
*One of the best strategies for team-slayer, and one that has been utilized successfully in many high-level games, is to control the entire upper floor. Once done, one person should be able to control the entire map by teleporting back and forth to his/her sniper and fuel rod spawn points. Since there are two of each, a second person can do the same for the other half of the map. In skilled hands, the sniper can kill in 1-3 shots. It is especially powerful if the target is going up ladders, since this makes it almost impossible for them to evade. The only way to counter this is to climb up backwards, and fire at the sniper as you go. And, if ever an enemy should take cover behind a wall, utilizing the fuel rod's blast radius should kill them if their shields are already down. Remember, the fuel rod has a much greater range and blast radius in Combat Evolved than in later installments to the Halo series. Make sure to collect ammo as needed. If necessary, it is possible to retreat by jumping directly into the overshield or cloaking spawn (respective to which side of the map you're on), and from there to collect whatever weapons you need to reclaim the sniper's nest. Rocket launchers, however, should be avoided in most circumstances, as their projectiles are easily spotted, and generally take too long to arrive at their destination. | |||
*In conclusion, Boarding Action is an incredibly fast-paced and dynamic map, which allows for all styles of infantry based play. Though, CTF might be a little broken, as the majority of the spawn points are out in the open and easily targeted by snipers. | |||
==Trivia== | ==Trivia== | ||
===Miscellaneous=== | ===Miscellaneous=== | ||
*This map is one of the few multiplayer maps which includes all the weapons and power ups. | |||
*This map is one of the few | *If the levels model is extracted, it can be noted that both sides of the maps are actually of the exact same model ship but on opposite faces of the ships (from above, one side red and one side blue). In addition, the model used in the level was actually copied right next to the original facing the opposite way. This can only be seen if the levels model is extracted from the file. | ||
*If | *By spawning a Banshee, the player can explore the top of the ships. They are completely flat, and the opposite sides do not have anything on them. | ||
*The map was originally designed with jetpacks in mind. | |||
===Easter egg=== | |||
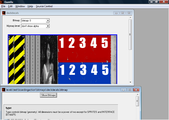
When examining '''levels\test\boardingaction\bitmaps\deckdecals.bitmap''', one will find a photograph of a woman hidden inside the mesh. According to level designer Hardy Lebel, this was added by a freelance artist: "What that freelance artist had done was... he made some polies across the bottom of the Boarding Action map no-collide so that the player could walk right through them. And if you happened to walk through that secret section of the map, he'd built a little tiny room that had pictures of his girlfriend on every wall, and it was like this little shrine to this crazy freelancer guy's girlfriend." Multiplayer artist Derrick Moore came forth and said that the woman in the picture is his wife.<ref>[https://www.youtube.com/watch?v=v-Jtv9t6r_g '''Oddheader:''' Top 10 Video Game Mysteries & Discoveries of 2020]</ref> | |||
==Gallery== | |||
{{Linkbox|gallery=yes}} | |||
<gallery> | |||
File:HMCC HCE Boarding Action Map.png|Boarding Action map. | |||
File:HCE BoardingAction EasterEgg.png|The woman in the mesh | |||
File:HCE BoardingAction Screenshot.png|A screenshot of Boarding Action. | |||
File:HCE BoardingAction Space.png|The space skybox on the outside of Boarding Action. | |||
File:HCE BoardingAction BlueSide.png|Blue side. | |||
File:HCE BoardingAction RedSide.png|Red side. | |||
File:HCE BoardingAction Afar.png|Boarding action as viewed from further outside the map. | |||
</gallery> | |||
== | ==Sources== | ||
{{Ref/Sources}} | |||
{{Levels}} | {{Levels|H1|mode=yes}} | ||
Latest revision as of 16:48, October 5, 2024
| Boarding Action | |
|---|---|
| |
| Map overview | |
|
Game: |
|
|
Map file name (?): |
|
| Lore information | |
|
Location: |
2 unidentified UNSC ships in orbit over Threshold, Soell System[2] |
| Gameplay overview | |
|
Terrain: |
Space, UNSC warships |
|
Map layout: |
Symmetrical |
|
Recommended number of players: |
4-16 |
|
Recommended gametype(s): |
|
| “ | Ship-to-Ship Combat. | ” |
Boarding Action is a multiplayer map in Halo: Combat Evolved. It is set in orbit near Threshold in the Soell system.[2]
Layout[edit]
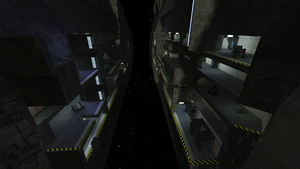
There are two parallel human warships, which have had the exterior bulkhead removed and a good portion of the interior exposed to space. There are four teleporters on both ships, two on the first level and two on the fifth level, which are the only means of transportation between the two ships. This map is usually picked by hosts for its extremely exciting sniper and rocket battles. Other hosts may turn off sniping to force players to board the other ship. This usually results in a frenzy of explosions and gunfire near each teleporter as each team frantically tries to stop the other team on their ship. The ships are in fact not that far apart, in truth it is simple to throw a grenade to the other ship.
There are five symmetrical floors on each side, and are exact mirror copies of each other. Teleporters are found on the 1st and 5th floor, each leading into the exact same place on the other side. In the top right corner of each base (looking out), there is a small indent with a power-up.
Learning the layout of this level is more important than most other maps, as the level can be very confusing to inexperienced players, similar to Chiron TL-34.
Tactics[edit]
General[edit]
- An interesting way to simulate ship-to-ship combat is to have 16 players, eight per team, loaded with all rocket launchers.
- It is not at all uncommon in any game type to find yourself standing directly above or below an enemy, as the ships have several floors, with each floor number marked on the wall. Oftentimes, one player will come through a teleporter and run right into another player without warning.
- Another popular game type on Boarding Action is all Snipers, in either Team Slayer or CTF, because of how many parts of the map are remote to each other, the fact that you can see half of the map from almost any area, and that close range weapons can't reach to most parts of the map. It is possible, however, to headshot an enemy player using the pistol when the shooter and the target are on opposite sides of the map, but this is rare due to the massive distance.
- There is an ideal sniper location to the left of the sniper rifle, where it is arduous to locate someone unless you already know of the place. After sniping, though, to avoid giving up your hiding place, back into the corridor and out of sight. If you've been spotted, then you can simply jump between the pillars to land on an overshield.
Capture the Flag[edit]
- If you wish to be the flag carrier, the most direct method is to go through the teleporter on Level 5 and then proceed down to the enemy base. First, you should spawn close to the flag. Then, go to the left of the flag and go up the first ladder you reach. You should grab the flag, as it will deter any pursuing enemies and offer a quick getaway. If it is vacant, though, don't panic. There is also the fuel rod gun for similar purposes (in Halo PC only). Note: do not grab the flag if you intend to score; eventually, the enemies will simply overwhelm you, grenade you or fire from a relative distance. Run the moment you come within contact of the flag and then scram. However, don't follow this unless you have set up a plan. Position snipers and escort for the getaway. Usually, the first scoring will be the simplest, as the opponents are usually composed of disorganized hassles, unless you are facing a large group of players. However, when you are past the wall and almost at the wall, don't celebrate yet, as you are in an exposed area and are prone to enemy sniper fire.
- If you have the sniper rifle, a good idea is to try and take out opponents on the enemy ship while the flag carrier of your team tries to capture the flag or escape back to your base.
- You can use close-quarters weapons, such as the shotgun, or flamethrower (in Halo PC) to defend you base, or keep your flag from being captured by the enemy team.
Pro-Strategies[edit]
- Boarding Action is one of the best, if not the best, overall classic team-slayer maps in Halo Combat Evolved. This is primarily because it allows almost every player a view of the majority of the map at any given time. It emphasizes long-range weapons; such as the sniper rifle, pistol, fuel rod, and rocket launcher. However, it provides many opportunities for close quarters combat with weapons such as the shotgun or assault rifle. The map is fairly easily navigated to an experienced player, allowing power-ups and power weapons to be controlled quickly. The teleporters allow for almost complete map control to the team who has secured the upper decks, but can also prove to be a weapon for the opposition, as they can be used to insert forces directly behind enemy lines.
- One of the best strategies for team-slayer, and one that has been utilized successfully in many high-level games, is to control the entire upper floor. Once done, one person should be able to control the entire map by teleporting back and forth to his/her sniper and fuel rod spawn points. Since there are two of each, a second person can do the same for the other half of the map. In skilled hands, the sniper can kill in 1-3 shots. It is especially powerful if the target is going up ladders, since this makes it almost impossible for them to evade. The only way to counter this is to climb up backwards, and fire at the sniper as you go. And, if ever an enemy should take cover behind a wall, utilizing the fuel rod's blast radius should kill them if their shields are already down. Remember, the fuel rod has a much greater range and blast radius in Combat Evolved than in later installments to the Halo series. Make sure to collect ammo as needed. If necessary, it is possible to retreat by jumping directly into the overshield or cloaking spawn (respective to which side of the map you're on), and from there to collect whatever weapons you need to reclaim the sniper's nest. Rocket launchers, however, should be avoided in most circumstances, as their projectiles are easily spotted, and generally take too long to arrive at their destination.
- In conclusion, Boarding Action is an incredibly fast-paced and dynamic map, which allows for all styles of infantry based play. Though, CTF might be a little broken, as the majority of the spawn points are out in the open and easily targeted by snipers.
Trivia[edit]
Miscellaneous[edit]
- This map is one of the few multiplayer maps which includes all the weapons and power ups.
- If the levels model is extracted, it can be noted that both sides of the maps are actually of the exact same model ship but on opposite faces of the ships (from above, one side red and one side blue). In addition, the model used in the level was actually copied right next to the original facing the opposite way. This can only be seen if the levels model is extracted from the file.
- By spawning a Banshee, the player can explore the top of the ships. They are completely flat, and the opposite sides do not have anything on them.
- The map was originally designed with jetpacks in mind.
Easter egg[edit]
When examining levels\test\boardingaction\bitmaps\deckdecals.bitmap, one will find a photograph of a woman hidden inside the mesh. According to level designer Hardy Lebel, this was added by a freelance artist: "What that freelance artist had done was... he made some polies across the bottom of the Boarding Action map no-collide so that the player could walk right through them. And if you happened to walk through that secret section of the map, he'd built a little tiny room that had pictures of his girlfriend on every wall, and it was like this little shrine to this crazy freelancer guy's girlfriend." Multiplayer artist Derrick Moore came forth and said that the woman in the picture is his wife.[3]
Gallery[edit]

|
Browse more images in this article's gallery page. |
Sources[edit]
- ^ Halo: Combat Evolved Editing Kit, game file
HCEEK\tags\levels\test\boardingaction\boardingaction.scenario - ^ a b Halo: Combat Evolved, multiplayer map Boarding Action: Map skybox
- ^ Oddheader: Top 10 Video Game Mysteries & Discoveries of 2020
| |||||||||||||||||||||||
