Battle Creek: Difference between revisions
From Halopedia, the Halo wiki
(small edit, i just killed a typo) |
mNo edit summary |
||
| (126 intermediate revisions by 76 users not shown) | |||
| Line 1: | Line 1: | ||
{{ | {{Status|Gameplay}} | ||
{{Multiplayer map infobox | |||
{{Multiplayer | |||
|name=Battle Creek | |name=Battle Creek | ||
|image=[[ | |image=[[File:Battle CreekPC.JPG|300px]] | ||
|game=''[[Halo: Combat Evolved]]'' | |game=''[[Halo: Combat Evolved]]'' | ||
|devname=<code>beavercreek</code>{{Ref/File|Id=HCEEK|HCEEK|HCEEK\tags\levels\test\beavercreek\beavercreek.scenario}} | |||
|map= | |||
|location=[[Installation 04]] | |location=[[Installation 04]] | ||
|terrain=Canyon with two [[Forerunner]] bases | |terrain=Canyon with two [[Forerunner]] bases | ||
| | |symmetry=Semi-symmetrical | ||
|playernumber=2-8 | |||
|gametypes=*[[Slayer]] | |||
| | |||
|gametypes= | |||
*[[Slayer]] | |||
*[[Capture the Flag]] | *[[Capture the Flag]] | ||
| | |pagegamelabel=CE | ||
}} | }} | ||
{{Center|{{Article quote|Splash Splash, Bang Bang.}}}} | |||
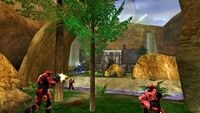
'''Battle Creek''' is a [[multiplayer]] | '''''Battle Creek''''' is a [[multiplayer]] map in ''[[Halo: Combat Evolved]]''. It is an outdoors map set in a tiny canyon featuring two symmetrical bases that are separated by a small creek. Being one of the smallest multiplayer maps in the game, Battle Creek is well suited for small, usually team-based, games between two and eight players. | ||
''Battle Creek'' was remade as ''[[Beaver Creek]]'' for ''[[Halo 2]]'' and ''[[Battle Canyon]]'' in ''[[Halo: Combat Evolved Anniversary]]''. | |||
== | ==Universe and lore== | ||
[[ | Similar canyons on other [[Halo Array|Halo]] installations{{Ref/Map|H2|Beaver Creek}}{{Ref/Map|HR|Battle Canyon}} serve their functions as rocky canyons housing two Forerunner telemetry spire structures which serve as the bases. The spires are key components of their ring's translocation grid. The rocky warrens of these parts of Halo installations provide the ideal environment for an array of impressive telemetry clusters. These spires’ synchronization conduits ensure that the ring's translocation grid is always fully operational, part of a remarkably powerful system, which allows near-instant transportation across the full ten thousand kilometers that span the installation.{{Ref/Site|Id=info|D=10|M=10|Y=2014|URL=http://blogs.halowaypoint.com/Headlines/post/2011/11/09/The-Halo-Bulletin-11911-.aspx|Site=Halo Waypoint|Page=The Halo Bulletin: 11/9/11|Detail=(defunct, [https://web.archive.org/web/20130430191758/http://blogs.halowaypoint.com/Headlines/post/2011/11/09/The-Halo-Bulletin-11911-.aspx Archive])}}{{Ref/Site|D=10|M=10|Y=2014|URL=https://www.halowaypoint.com/en-us/games/haloreach/maps|Site=Halo Waypoint|Page=Halo: Reach maps - Battle Canyon|Detail=(defunct, [https://web.archive.org/web/20141012163535/https://www.halowaypoint.com/en-us/games/haloreach/maps Archive])}} | ||
Battle Creek | While not confirmed as such, it is likely that Battle Creek serves a similar purpose for Installation 04, as these other almost identical canyons on other installations. | ||
==Overview== | |||
===Layout=== | |||
Battle Creek's basic layout is very simplistic; it consists of two identical bases separated by a small creek. Outside, there are plenty of rock formations that can be used for cover, an arch spanning the river, and two raised outcroppings on the canyon walls. In addition, there are two-way [[teleporter]]s located behind each base; each transports players to the teleporter at the opposite base. | |||
== | The interior of the bases consists of a main room which houses the flag in CTF, a pair of hallways that lead outdoors, and a series of tunnels connected to the hallways by a ramp that leads to the other entrances. The entryways consist of the main door in the front, a side door leading to the tunnels underneath, stairs leading to a tunnel located in front of each base, and a hole in the roof above the flag room. | ||
*To access the roofs of either base, a player can jump onto small ledges located | <gallery> | ||
File:Battlecreek Map1.jpg|An annotated overview of the map. | |||
* | File:Battlecreek Map2.jpg|An interior view of the bases. | ||
</gallery> | |||
*If you pick up the Active Camouflage, go to the other side, crouch, and walk in. You will be in a small cave under the water. Players will barely be able to see you, so you can throw grenades and give them a nasty surprise. When it wears off, they can see you only a little bit, but they | ===Strategies=== | ||
*To access the roofs of either base, a player can jump onto small ledges located at the right of each base, a boulder at red base, and a wedge of concrete debris at blue base. Once there, a player will have a commanding view of the map, but is exposed to enemy fire. | |||
*If you are being chased, run into one of the | *Camping in the little [[M41 SPNKR|rocket launcher]] alcove is not a good idea on this map because of the multitude of [[Type-33 Needler|needlers]] and [[M6D magnum|pistols]]. Grab the rocket launcher then jump down. | ||
*If you pick up the [[Active Camouflage]] by the river, go to the other side, crouch, and walk in. You will be in a small cave under the water. Players will barely be able to see you, so you can throw grenades and give them a nasty surprise. When it wears off, they can see you only a little bit, but they have to be looking straight down into the cave. | |||
*If you are being chased, run into one of the base's entrances and lob a [[grenade]] at the walls. The enemy will lose their shields and give you a chance to finish them off or run away. | |||
*On the farther back sides of the bases high up, there are little holes (one on each side) that go to the main flag room. If shields are not in the game, simply throwing grenades through these holes can lead to several kills, especially if friendly fire is off and a teammate is getting the flag in [[Capture the Flag|CTF]]. | |||
*In CTF, if one manages to take possession of the enemy flag, that player can then run to the back of the enemy base and use the teleporter to quickly access the friendly base. | |||
*Do not walk through a teleporter and then back up. You will not go through the teleporter you backed into and possibly be [[Telefragging|telefragged]] if someone else enters the teleporter and you do not move in time before your screen turns completely white. However, if someone else is trying to enter the teleporter, you can maneuver into the corner of the teleporter, and by jumping, the enemy will go through. At this time, you can take them by surprise, throw a grenade or melee them. | |||
*During CTF, with teams of four or more, beware of opponents throwing grenades through the small windows at the sides of the base. They can make short work of defenders, and give their teammates an easier chance of stealing the flag. | |||
*Try to stay away from the natural bridge formation in the middle because you are an easy target from all angles once you're up there. | |||
*On the farther back sides of the bases high up there are little holes (one on each side) | |||
*Do not walk through a teleporter and then back up. You will not go through the teleporter you backed into | |||
*During | |||
==Trivia== | ==Trivia== | ||
* | *In the game data, this map is called "Beaver Creek" indicating that this was the map's name during development. The remake in ''Halo 2'' later used this name. | ||
== | ==Gallery== | ||
{{Linkbox|gallery=yes}} | |||
<gallery> | |||
File:Battle_creek_loading_screen.png|Loading screen in the Master Chief Collection. | |||
File:HCE BattleCreek Skybox.png|Battle Creek's skybox. | |||
File:HCE BattleCreek Skybox 2.png|Battle Creek's skybox. | |||
File:HCE_BattleCreek_RedBase.png|Red base. | |||
File:HCE_BattleCreek_BlueBase.png|Blue base. | |||
File:HCE_BattleCreek_Sniper.png|The sniper spawn overlooking red base. | |||
File:HCE-BattleCreekBattle.jpg|A Slayer match in Battle Creek. | |||
</gallery> | |||
{{ | ==Sources== | ||
{{Ref/Sources}} | |||
{{Levels|H1|mode=yes}} | |||
Latest revision as of 09:48, June 30, 2024
| Battle Creek | |
|---|---|

| |
| Map overview | |
|
Game: |
|
|
Map file name (?): |
|
| Lore information | |
|
Location: |
|
| Gameplay overview | |
|
Terrain: |
Canyon with two Forerunner bases |
|
Map layout: |
Semi-symmetrical |
|
Recommended number of players: |
2-8 |
|
Recommended gametype(s): |
|
| “ | Splash Splash, Bang Bang. | ” |
Battle Creek is a multiplayer map in Halo: Combat Evolved. It is an outdoors map set in a tiny canyon featuring two symmetrical bases that are separated by a small creek. Being one of the smallest multiplayer maps in the game, Battle Creek is well suited for small, usually team-based, games between two and eight players.
Battle Creek was remade as Beaver Creek for Halo 2 and Battle Canyon in Halo: Combat Evolved Anniversary.
Universe and lore[edit]
Similar canyons on other Halo installations[2][3] serve their functions as rocky canyons housing two Forerunner telemetry spire structures which serve as the bases. The spires are key components of their ring's translocation grid. The rocky warrens of these parts of Halo installations provide the ideal environment for an array of impressive telemetry clusters. These spires’ synchronization conduits ensure that the ring's translocation grid is always fully operational, part of a remarkably powerful system, which allows near-instant transportation across the full ten thousand kilometers that span the installation.[4][5]
While not confirmed as such, it is likely that Battle Creek serves a similar purpose for Installation 04, as these other almost identical canyons on other installations.
Overview[edit]
Layout[edit]
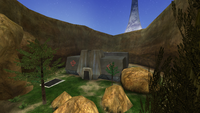
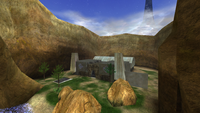
Battle Creek's basic layout is very simplistic; it consists of two identical bases separated by a small creek. Outside, there are plenty of rock formations that can be used for cover, an arch spanning the river, and two raised outcroppings on the canyon walls. In addition, there are two-way teleporters located behind each base; each transports players to the teleporter at the opposite base.
The interior of the bases consists of a main room which houses the flag in CTF, a pair of hallways that lead outdoors, and a series of tunnels connected to the hallways by a ramp that leads to the other entrances. The entryways consist of the main door in the front, a side door leading to the tunnels underneath, stairs leading to a tunnel located in front of each base, and a hole in the roof above the flag room.
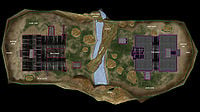
An annotated overview of the map.
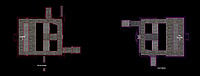
An interior view of the bases.


Strategies[edit]
- To access the roofs of either base, a player can jump onto small ledges located at the right of each base, a boulder at red base, and a wedge of concrete debris at blue base. Once there, a player will have a commanding view of the map, but is exposed to enemy fire.
- Camping in the little rocket launcher alcove is not a good idea on this map because of the multitude of needlers and pistols. Grab the rocket launcher then jump down.
- If you pick up the Active Camouflage by the river, go to the other side, crouch, and walk in. You will be in a small cave under the water. Players will barely be able to see you, so you can throw grenades and give them a nasty surprise. When it wears off, they can see you only a little bit, but they have to be looking straight down into the cave.
- If you are being chased, run into one of the base's entrances and lob a grenade at the walls. The enemy will lose their shields and give you a chance to finish them off or run away.
- On the farther back sides of the bases high up, there are little holes (one on each side) that go to the main flag room. If shields are not in the game, simply throwing grenades through these holes can lead to several kills, especially if friendly fire is off and a teammate is getting the flag in CTF.
- In CTF, if one manages to take possession of the enemy flag, that player can then run to the back of the enemy base and use the teleporter to quickly access the friendly base.
- Do not walk through a teleporter and then back up. You will not go through the teleporter you backed into and possibly be telefragged if someone else enters the teleporter and you do not move in time before your screen turns completely white. However, if someone else is trying to enter the teleporter, you can maneuver into the corner of the teleporter, and by jumping, the enemy will go through. At this time, you can take them by surprise, throw a grenade or melee them.
- During CTF, with teams of four or more, beware of opponents throwing grenades through the small windows at the sides of the base. They can make short work of defenders, and give their teammates an easier chance of stealing the flag.
- Try to stay away from the natural bridge formation in the middle because you are an easy target from all angles once you're up there.
Trivia[edit]
- In the game data, this map is called "Beaver Creek" indicating that this was the map's name during development. The remake in Halo 2 later used this name.
Gallery[edit]

|
Browse more images in this article's gallery page. |
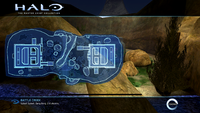
Loading screen in the Master Chief Collection.
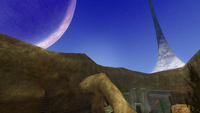
Battle Creek's skybox.
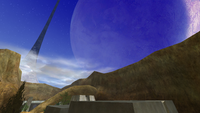
Battle Creek's skybox.
Red base.
Blue base.
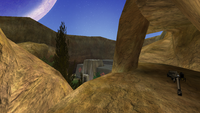
The sniper spawn overlooking red base.
A Slayer match in Battle Creek.


Sources[edit]
- ^ Halo: Combat Evolved Editing Kit, game file
HCEEK\tags\levels\test\beavercreek\beavercreek.scenario - ^ Halo 2, multiplayer map Beaver Creek
- ^ Halo: Reach, multiplayer map Battle Canyon
- ^ Halo Waypoint, The Halo Bulletin: 11/9/11: (defunct, Archive) (Retrieved on Oct 10, 2014) [archive]
- ^ Halo Waypoint, Halo: Reach maps - Battle Canyon: (defunct, Archive) (Retrieved on Oct 10, 2014) [archive]
| |||||||||||||||||||||||


