Mission 2: On Top of the World: Difference between revisions
From Halopedia, the Halo wiki
m (Text replacement - "==Easter Egg" to "==Easter egg") |
m (Bot: Automated text replacement (-{{[Ee]ra\|(RW|BS|343)[^}\n]*}} +{{Status|Gameplay}})) |
||
| Line 1: | Line 1: | ||
{{Title|On Top of the World}} | {{Title|On Top of the World}} | ||
{{ | {{Status|Gameplay}} | ||
{{Level infobox | {{Level infobox | ||
Revision as of 15:44, March 18, 2022
|
Prev: |
|
|
Next: |
|
| On Top of the World | |
|---|---|

| |
|
Game: |
|
|
Player: |
|
|
Date: |
October 20, 2552(Actual events) |
|
Location: |
|
|
Objective(s): |
Retrieve the Covenant data pad |
 |
Halopedia doesn't currently have a walkthrough for this level; could you write one? |
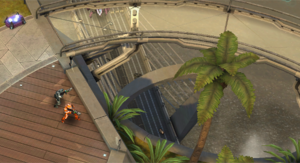
On Top of the World is the second mission of Halo: Spartan Strike. The mission takes place on a highrise in New Mombasa where a Spartan-IV has been sent to retrieve a Covenant data pad.
Introduction
The downed Covenant Spirit is on the far side of the high-rise roof. Covenant forces have dug in, awaiting extraction. Retrieve the data pad from the Covenant Commander.
Transcript
The Spartan-IV stands outside the elevator at the top of a high-rise. Two ODSTs stand guard among several dead Unggoy.
- Lieutenant Kwon (COM): "Ready up, Spartan. The data pad is near a downed Spirit at the other side of the roof."
⚠ Navigate acrros the rooftops
Several Banshees chase Sparrowhawks around the building. A Pelican dropship carrying a Scorpion tank flies nearby, headed towards a large bridge in the distance. A Scarab is seen crossing the same bridge.
The Spartan-IV moves into a Covenant outpost. An Unggoy squad opens fire, but are killed moments later. A second Unggoy squad arrives from inside the building and are also defeated by the Spartan.
Upon reaching the next area, the Spartan is met by several Unggoy Minors.
- Lieutenant Kwon (COM): "You are about to run into heavy resistance! Use your armor ability to stay alive."
The Spartan-IV eliminates every Unggoy in the area, and reaches a large gap between the two towers.
- Lieutenant Kwon (COM): "Call the elevator so you can cross to the other tower."
⚠ Call the elevator
The Spartan does as told, and is attacked by Yanme'e right after.
- Lieutenant Kwon (COM): "Hold on, Spartan. The elevator's on its way."
⚠ Hold out
More Yanme'e start flying up to the rooftop.
- Lieutenant Kwon (COM): "Covenant counter-attack! Hold them off until the elevator arrives."
Spirit dropships approach to the rooftop and begin dropping off Unggoy squads. More Yanme'e continue to arrive.
The elevator reaches the top of the tower while the Spartan is under fire.
- Lieutenant Kwon (COM): "There's the elevator. Move, Spartan!"
⚠ Reach the crashed Spirit
The Spartan crosses to the next tower. Several Unggoy and a Sangheili Minor attack the Spartan-IV.
Two Scorpion tanks come into view, down below on the bridge. A Phantom flies next to the bridge, firing at the tanks, while many Ghosts are blown up by the Scorpions in a frontal assault.
After killing the Covenant opposition, the Spartan reaches a barricade,
- Lieutenant Kwon (COM): "No go! You'll need a satchel charge to take that barrier out. I've got a Hornet nearby with a satchel. Clear hostiles from the area so he can land!"
⚠ Clear the area
A Yanme'e squad arrives to the rooftop and are quickly dispatched by the Spartan.
- Lieutenant Kwon (COM): "Get the satchel charge from the Hornet. It's more than enough to blow that enemy barricade."
⚠ Retrieve the satchel
The Hornet lands, and the Spartan takes the explosive charge.
- Lieutenant Kwon (COM): "Great! Plant the satchel and get to cover!"
⚠ Plant the satchel charge
The Spartan-IV plants the satchel charge on the barricade. A few seconds later, the explosion destroys it.
- Lieutenant Kwon (COM): "All clear! An Elite Commander is about to recover the module. Take him out!"
⚠ Take out the Elite Commander
The Spartan reaches the farthest structure and is imediately fired upon by an Unggoy on a Shade turret. The Unggoy is killed, and the Spartan arrives at the crash site. An Unggoy and a Sangheili Commander attack the Spartan, and are killed. The data pad is dropped by the dead Sangheili.
- Lieutenant Kwon (COM): "He's down! Secure that data pad, Spartan."
⚠ Retrieve the data pad
Two Yanme'e arrive to the area and open fire. The Spartan kills them, and recovers the data pad from the dead Sangheili.
- Lieutenant Kwon (COM): "Return to the Hornet for extraction!"
⚠ Return to the Hornet
The Spartan-IV quickly departs the area and finds several Spirit dropships dropping off Unggoy squads and even more reinforcements already on the roof-top. More Covenant exit the building's interior.
The Spartan manages to reach the Hornet after dealing with the Covenant troops. The Hornet takes off.
- Lieutenant Kwon (COM): "We're extracting the Conduit's location from the data pad as we speak. Great work, Spartan!"
MISSION ACCOMPLISHED
Level ends
Assault Ops
Assault Op 1
Kill 10 Drones with a Magnum
Assault Op 2
Destroy 4 Shade Turrets with grenades
Assault Op 3
Kill 6 Elite Minors with an Assault Rifle
Trivia
Miscellaneous
- This missions takes place simultaneously with the beginning of the Halo 2 level Metropolis.
Easter eggs
- The Pelican dropship seen at the start of the mission is intended to be the same dropship Sergeant Major Avery Johnson uses to deliver the Scorpion tank to John-117 and the remaining Marine forces on the bridge in Halo 2.
| ||||||||