
High Ground
From Halopedia, the Halo wiki
Template:Multiplayer Map Infobox
High Ground is a multiplayer level in Halo 3. It is an old UNSC base in New Mombasa that was reactivated after the Slipspace cataclysm that destroyed Mombasa. One of the few asymmetric maps in the game, High Ground is great for One-Sided objective games such as One-Bomb, One-Flag, and Territories.
Layout
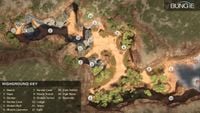
High Ground is an asymmetric map featuring an elevated, but crumbling, UNSC base surrounded by low and eroded cliffs on 3 sides and a beachfront on the fourth. There are multiple ways to approach and enter the base; through the main gate that is closed only in asymmetric gametypes, otherwise it is open by default, or side passages which offer more protection and discretion.
Beach
Attacking players spawn at the far side of the map, aptly named "the beach". If the main gate is open, it can be used as a quick entrance or escape from the base.
A variety of weaponry and equipment has been placed near the beach, and outside the base walls to aid attackers in storming the base. Perhaps the two most valuable weapons include the Sniper Rifle and the M41 Rocket Launcher, and the shotgun but this can be reached by the players who spawn in the base by using vehicles, so in most games a battle over control of the Rockets ensues at the start of the game and accordingly with the power weapons' respawn rates. Players can also find a Portable Gravity Lift, Bubble Shield, and Overshield to aid in their attack. In addition to the weapons and equipment, players can choose from a Mongoose or Ghost to get to the base wall faster.
Fortress
This large, but crumbling base is where defending players spawn. In the back of the base, to the left, players can find a large mortar or a SAM (Surface-to-Air-Missile) site; it is unusable and is merely a piece of scenery for the level. Several vehicles, including Mongooses and a Ghost spawn in the back of the base, allowing defenders to quickly catch fleeing attackers, or for attackers to make a quick getaway. A broken down control room is located in the center of the base, complete with computers and a radio set. This control room is the objective area for CTF and Assault gametypes, in which attackers must steal the flag, or arm the bomb in this room. It is also possible to jump above the control room by first jumping on the crumbling wall, then to the top. This position offers no protection though, and a good sniper can take you down from the beach. To the far left of the base is the "Pipe Room," where attackers can enter the base via a small pipe that connects to the front of the base.
The right of the base is mostly indoors, and offers 2 levels of play. The lower-most level can be accessed several ways; by attackers coming through the bunker or multiple entry points from above or ground level by the base defenders. The upper level is used as a choke point to keep attackers from reaching the gate controls on the catwalk. If a player is able to access the gate controls, the base wall gate will be permanently opened, just as the gate in Zanzibar or Last Resort would be. The base is designed to promote dual wielding, and as such, a number of dual-weldable weaponry can be found behind the base wall.
The base wall is an important area for defenders as it gives them a line of site to incoming attackers. It also leaves them open to Battle Rifle or Sniper fire from the beach as well. The Spartan Laser can be found on the tower on the right side of the base wall. This tower is somewhat vulnerable however, as there are some fusion coils stacked on one side of it. In addition, a Machine Gun Turret is mounted above the main gate, which is useful for beating back approaching rushes and vehicles. The Rocket Launcher can be accessed by defenders as well, if they quickly rush up and over the base wall, beating the attackers.

Strategies
- A good place to hide is behind the Laser Tower; there is a small opening in the wall where there is a stone ledge where players can simply jump over and camp there with the Spartan Laser, Sniper Rifle, or Rocket Launcher.
- The portable grav. lift can be used to drive vehicles and jump people over the gatehouse.
- In SWAT the defending team should take control of the sniper tower. It is a good position to see the entire field of play. Duck every so often as to not provide opponents with easy headshots.
- On the beach, there are several trees one can jump on and hide among the branches. Several of these overlook the base and other parts of the map, so this is a pretty good sniper position. The one problem is that you cannot see the ground under you very well, but the advantage to this is your opponents have the same view of you, so it's generally easy to go unnoticed.
- If someone is in the tower with the Spartan Laser, and you have a Rocket Launcher, if you fire with good aim your rocket can destroy the fusion coils and kill the person with the laser.
- On top of the tower where the Spartan Laser spawns there is a ceiling made of some sort of fence. This place is accessible by either crouch jumping from the wall through a large hole in the ceiling, which can be quite difficult. Or by placing a grav-lift on top of the bridge and then launching towards the roof. This can be a good sniper-spot.
- On Shotty-Snipers, it is sometimes a good idea to wait in the middle of the pipe with your sniper out and watch your radar. When you see someone coming close to you, snipe him or her, as they will most likely have their shotgun out.
- Using the Machine Gun Turret on the gate wall while it's mounted is not always a good idea, because you are very vulnerable to Sniper or Battle Rifle fire. Unless the sniper is uncontested or is under control of your team, rip off the turret and walk with it among the base.
- The Hatch on the bunker can be opened by melee or by gunfire, but the people inside will most likely notice and be ready to attack. An easy and quiet way to open this is get on top of the laser tower with a bubble shield. Jump down towards the bunker and throw the shield on the hatch. It will break open instantly.
- A great sniping place is on top of the small base with the computer in it. You can get on top of here by getting on the bridge and walk towards the pipe area. You can then run and crouch jump on to it.
- From on top of the base with the computer, you can slightly crouch walk under the rock behind you. Walk toward the pipe room. You can stand on a small pipe above this room. You are very open to gunfire, but many people will not notice you.
Trivia
- High Ground is not only the first multiplayer map to be revealed back in December of 2006, but was the first map to be played by the public.
- In the Halo 3 Multiplayer Vidoc, there were originally going to be several towers with machine gun turrets being manned by AI gunners. These artificial intelligences would shoot at whatever came up the hill. The idea was subsequently dropped as it became way too hard for teams to assault the base. At another point the SAM launcher located at the base was to launch bombs at the beach at certain times.
- High Ground was originally thought to be the successor to Zanzibar until Bungie revealed Last Resort. However, due to its general appearance, namely the beachhead assault layout, it has several familiarities to Zanzibar. The layout of the map is such that defenders spawn in the war-torn base, with attackers spawning on the beach.
- During the Halo 3 Beta Cortana's face appeared every 117 seconds, a reference to Master Chief. The face also appears in the full game of Halo 3 every 117 seconds on the computers, on the screen which shows what looks like the hangar from crows nest.
- "Red vs. Blue" as well as "This Spartan Life" held "transition" episodes on this map, or at least made a reference to the map. These references are used in order to make a smooth transition from Halo 2 to Halo 3.
- The radio inside the fort where the flag spawns transmits three different Morse Code messages. When translated they are "frogblast the ventcore" a reference to Bungie's classic FPS Marathon, "SABABWL" an acronym found on the Halo Soundtrack which was a quote from Bungie's Martin O'Donnell back when the original Halo was about to be released, the acronym stands for "Shiny and Bumpy and Bursting With Love!" and "Don't Make us Kick Your Ass!" a classic Bungie saying.
- The Radio inside the fort where the flag spawns also transmits a musical piece from Halo: Combat Evolved, entitled "Under Cover of Night".
- There are small fish that can be seen and killed and will wash up on the shore. The beachfront appears to be leading out into the ocean, but if you manage to get past the barriers you can see land a few miles away, hinting that this might be a wide river or a large lake.
- It is possible to go deep into the water on this map by overloading it with Trip Mines then sticking a respawn point out side. Or by using teleporters and having one player go through the sender and the other holds the receiver. If one player does not hold the receiver it will fly back into the map or disappear.
- Based on the scenery in the distance, this map appears to be in the same general area as Standoff and Voi; both located in Africa.
- It is likely that the base was under the control of NATO in the past, as seven NATO symbols can be seen throughout the map.
- On some of the computers in the Control Center, there are readouts of Pelican Dropships with large weapons mounted onto the front of the craft.
- In the Alpha screenshots taken on High Ground, there is a Halo 2-era turret in place of the Halo 3-era machine gun.
Gallery
- HighGroundLevelScreenShot.jpg
The Base Wall.
- Calm before the storm.bmp.jpg
The calm before the storm.
- Base above.jpg
The base from above.
- High ground concept art.png
Concept art
- Highgroundterritorycapture.jpg
Territories.
- Mongoose chaos on high ground.jpg
Battle in the base.
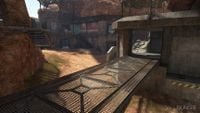
Flag bridge.
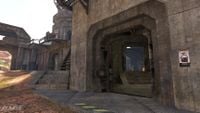
To the bunker.
Overview of High Ground.
- High Ground3.jpg
Inside fort on High Ground
- HighGround01.jpg
High Ground front view.
- HighGround02.jpg
Inside the base.


