Deployable cover: Difference between revisions
From Halopedia, the Halo wiki
No edit summary |
ZodiacReborn (talk | contribs) m (minor info edit) |
||
| Line 13: | Line 13: | ||
== Overview == | == Overview == | ||
This piece of Equipment is similar to the [[Stationary Shield Generator]] seen in [[Halo: Combat Evolved]] and [[Halo 2]], except now it is mobile. Additionally, the shield operates as a "one-way" shield, ie; the user is able to fire through the shield from behind it with projectile [[weapons]], but any bullets and other solid projectiles (except [[Carbine]] rounds and [[Needler]]) coming from the front will be deflected, however [[plasma]] fire and [[Spartan Laser]] weapons fire are stopped by the shield from either side. However, the [[Spartan Laser]] goes through the bases of five deployable covers{{Fact}}, assuming they are lined up close together. The user is given an enormous tactical advantage in exchange for being exposed from behind and to the left and right, whereas the similar [[Bubble Shield]] provides complete 360 degree cover, but cannot be fired into or out of. | This piece of Equipment is similar to the [[Stationary Shield Generator]] seen in [[Halo: Combat Evolved]] and [[Halo 2]], except now it is mobile. Additionally, the shield operates as a "one-way" shield, ie; the user is able to fire through the shield from behind it with projectile [[weapons]], but any bullets and other solid projectiles (except [[Carbine]] rounds and [[Needler]]) coming from the front will be deflected, however [[plasma]] fire and [[Spartan Laser]] weapons fire are stopped by the shield from either side. However, the [[Spartan Laser]] goes through the bases of five deployable covers{{Fact}}, assuming they are lined up close together. The user is given an enormous tactical advantage in exchange for being exposed from behind and to the left and right, so its wise to deploy it towards your main threat, whereas the similar [[Bubble Shield]] provides complete 360 degree cover, but cannot be fired into or out of. | ||
The shield is deployed in the same manner as all other equipment in the game, and it will stay activated until it takes enough damage or if left untouched for too long. The shield's health is represented by its color: it is normally blue, turns red/orange as it is damaged, and finally deactivates. If left alone, the shield will regenerate to full health. To deactivate the shield permanently, the base must be destroyed. This only works in campaign. In [[Multiplayer]], the deployable cover will self destruct after 30 Seconds. It is also possible to make a "bubble" from two of these shields. | The shield is deployed in the same manner as all other equipment in the game, and it will stay activated until it takes enough damage or if left untouched for too long. The shield's health is represented by its color: it is normally blue, turns red/orange as it is damaged, and finally deactivates. If left alone, the shield will regenerate to full health. To deactivate the shield permanently, the base must be destroyed. This only works in campaign. In [[Multiplayer]], the deployable cover will self destruct after 30 Seconds. It is also possible to make a "bubble" from two of these shields. | ||
Revision as of 10:40, November 24, 2008
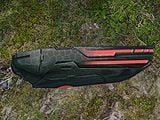
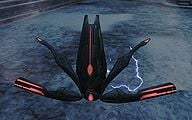
Template:Weapon The Deployable Cover is a new piece of Covenant Equipment in Halo 3.[1]
Overview
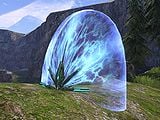
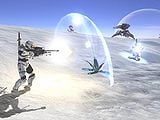
This piece of Equipment is similar to the Stationary Shield Generator seen in Halo: Combat Evolved and Halo 2, except now it is mobile. Additionally, the shield operates as a "one-way" shield, ie; the user is able to fire through the shield from behind it with projectile weapons, but any bullets and other solid projectiles (except Carbine rounds and Needler) coming from the front will be deflected, however plasma fire and Spartan Laser weapons fire are stopped by the shield from either side. However, the Spartan Laser goes through the bases of five deployable coversTemplate:Fact, assuming they are lined up close together. The user is given an enormous tactical advantage in exchange for being exposed from behind and to the left and right, so its wise to deploy it towards your main threat, whereas the similar Bubble Shield provides complete 360 degree cover, but cannot be fired into or out of.
The shield is deployed in the same manner as all other equipment in the game, and it will stay activated until it takes enough damage or if left untouched for too long. The shield's health is represented by its color: it is normally blue, turns red/orange as it is damaged, and finally deactivates. If left alone, the shield will regenerate to full health. To deactivate the shield permanently, the base must be destroyed. This only works in campaign. In Multiplayer, the deployable cover will self destruct after 30 Seconds. It is also possible to make a "bubble" from two of these shields.
Like the Portable Gravity Lift, the Deployable Cover, when activated, will be destroyed after a fall from a great height. The Cover has 3 forms. Blue, orange and then red. This can be used to waste most of the enemy's ammo unless a grenade is thrown.
Glitches
One of the most popular glitches that is used with a Deployable Cover is the HEV crate glitch. This glitch essentially allows the player to permit temporarily creating a sort of HEV. It is used in conjunction with a Gravity Lift and an open-ended crate. What you must do is find an open crate and place the gravity lift inside and then get the deployable cover and then throw it on top. The gravity lift will then lift up the deployable cover which in turns pushes on the crate and causes it to fly into the air. It may take a couple of tries to get this right and the only reasonable way you can pull this off is by arranging it on Forge or having a partner. The crate will fall when the gravity lift runs out, but firing from in here gives a good battle field vantage point and the player is only truly vulnerable to explosions. When you're against a Scarab and it's about to explode, put down a deployable cover to protect you from the blast radius and effective splash damage.
Trivia
- It is possible to shoot out of it by aiming down the middle of the Deployable Cover.
- Deployable cover is often used as an area to jump off of, as it is easier to use than the grenade jump, for some players. One of this tactic's best uses is to get the Famine and Catch Skull in Halo 3.
- Some people use it as wall to impede doorways in order to slow down the enemy and regroup with their team.
- There is a glitch that allows the player to become stuck, and have the Deployable Cover spawn through them.
- The only map the Deployable Cover isn't available in Forge Mode is Sandtrap.
- In Campaign mode, the Deployable Cover is completely immune to the projectiles fired by Flood Ranged Forms making it very useful on the eighth level of Halo 3, Cortana.
- The other main problem is that if you stand too close to a Deployable Cover then you still take damage (although not as much) and can be severely damaged, when the shield is destroyed.
- When the Deployable Cover has undergone tons of damage (Changing from Blue to Orange), you can just shoot through it as it will collapse thus injuring the enemy hiding behind it. After you leave it for a while, it will go back to blue and will not permit you to shoot through it once more.
- Enemies cannot detect you trough a Deployable Cover even on high difficulties, so you can just watch your enemies stand there while you pick them off with a Battle Rifle. This can be especially helpful on the part of Crow's Nest where you have to battle 8 Brutes and a Chieftain, since there are plenty of Deployable Covers around.
- This equiment is similiar to a bubble shield because it can go around you and enemies can go through it. While enemeies go around it.
Sources
- ^ September 2007 issue of Electronic Gaming Monthly
Gallery
- Deployable Cover.png
The Deployable Cover HUD icon.


