Fort Deen: Difference between revisions
From Halopedia, the Halo wiki
Lejellysoup (talk | contribs) mNo edit summary |
No edit summary |
||
| Line 1: | Line 1: | ||
{{Era|RW}} | {{Era|RW}} | ||
{{Title|Fort Deen}} | {{Title|Fort Deen}} | ||
{{Multiplayer | {{Multiplayer map infobox | ||
|name=Fort Deen | |name=Fort Deen | ||
|image=[[File:Fort Deen3D.jpg|300px]] | |image=[[File:Fort Deen3D.jpg|300px]] | ||
|game=''[[Halo Wars]]'' | |game=''[[Halo Wars]]'' | ||
|location=[[Fort Deen]] | |location=[[Fort Deen]], presumably on [[Arcadia]] | ||
|terrain=*Urban | |terrain=*Urban | ||
*Polluted | *Polluted | ||
*Foggy | *Foggy | ||
|gametypes= | |||
|playernumber= 3v3 (6 players) | |||
|gametypes= | |||
|playernumber=6 players | |||
}} | }} | ||
{{Article Quote|Named for a famous UNSC colonel who broke a Covenant siege, this divided map features highly defendable lanes, but strategically-placed teleports offer clever attackers alternatives.}} | |||
'''Fort Deen''' is a [[multiplayer]] map for ''[[Halo Wars]]''.<ref>[https://www.halowars.com/GameInfo/Maps.aspx '''Official Halo Wars Community Site''': ''Skirmish Maps'']</ref> | |||
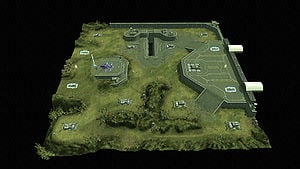
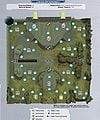
Fort Deen is a symmetrical map. It has three starting bases for the player and his/her allies on either side of the map. It also has four additional bases, each in close proximity to the starting bases, which are initially occupied by [[rebel base]]s and defended by [[unidentified insurrectionist group|rebels]]. In the middle of the map, there are two [[energy wall]]s, which, when garrisoned by infantry, activate impassable energy barriers, blocking any direct access to the other side of the map. There are, however, side-paths on each side of the map that can be used as a secondary route, but they also have garrisonable energy walls. If all routes to the other side of the map are blocked by energy barriers, there are a [[Forerunner teleporter|teleporters]] on each side that can transport the units to the other side of the map, beyond the energy walls, allowing quick access to the enemy's side of the map. Both teleporters have [[deployable lookout tower]]s stationed next to them. | |||
Fort Deen is a symmetrical map. It has three starting bases for the player and his/her allies on either side of the map. It also has four additional bases, each in close proximity to the starting bases, which are defended by | |||
==Tactics== | ==Tactics== | ||
*Fully upgraded Marines or [[Orbital Drop Shock Trooper|ODSTs]] can hold out for a long time in the energy | *Fully upgraded Marines or [[Orbital Drop Shock Trooper|ODSTs]] can hold out for a long time in the energy wall. [[AV-14 Hornet|Hornets]] can complement the Marines, hitting the enemy but staying safe behind the barrier. | ||
*Send forces to eliminate a side energy | *Send forces to eliminate a side energy wall that enemies have occupied. Have building killers go in a separate direction. | ||
* | *Stationing some units behind the teleporter near the player's base can help flank attackers. | ||
* | *Air units can pass over energy barriers without any problems. A "rush" with [[AV-22 Sparrowhawk|Sparrowhawks]] may surprise the opponents, and Pelicans can transport force over the barrier. | ||
==Trivia== | ==Trivia== | ||
The level and the eponymous fort are named after Tim Deen, one of [[Ensemble Studios]]' senior designers.<ref name=1up>[http://www.1up.com/do/previewPage?cId=3172311 '''1up.com''': ''Ten Things You Didn't Know About Halo Wars'' (defunct)]</ref> | |||
==Gallery== | ==Gallery== | ||
Revision as of 18:15, May 24, 2017
| Fort Deen | |
|---|---|

| |
| Map overview | |
|
Game: |
|
| Lore information | |
|
Location: |
|
| Gameplay overview | |
|
Terrain: |
|
|
Recommended number of players: |
3v3 (6 players) |
Template:Article Quote Fort Deen is a multiplayer map for Halo Wars.[1]
Fort Deen is a symmetrical map. It has three starting bases for the player and his/her allies on either side of the map. It also has four additional bases, each in close proximity to the starting bases, which are initially occupied by rebel bases and defended by rebels. In the middle of the map, there are two energy walls, which, when garrisoned by infantry, activate impassable energy barriers, blocking any direct access to the other side of the map. There are, however, side-paths on each side of the map that can be used as a secondary route, but they also have garrisonable energy walls. If all routes to the other side of the map are blocked by energy barriers, there are a teleporters on each side that can transport the units to the other side of the map, beyond the energy walls, allowing quick access to the enemy's side of the map. Both teleporters have deployable lookout towers stationed next to them.
Tactics
- Fully upgraded Marines or ODSTs can hold out for a long time in the energy wall. Hornets can complement the Marines, hitting the enemy but staying safe behind the barrier.
- Send forces to eliminate a side energy wall that enemies have occupied. Have building killers go in a separate direction.
- Stationing some units behind the teleporter near the player's base can help flank attackers.
- Air units can pass over energy barriers without any problems. A "rush" with Sparrowhawks may surprise the opponents, and Pelicans can transport force over the barrier.
Trivia
The level and the eponymous fort are named after Tim Deen, one of Ensemble Studios' senior designers.[2]
Gallery
Sources
| ||||||||||||||||||||||||||||
