Barrier tower: Difference between revisions
From Halopedia, the Halo wiki
m (Bot: Fixing redirects) |
No edit summary |
||
| Line 1: | Line 1: | ||
{{Era|Forerunner|HCW}} | {{Era|Forerunner|HCW}} | ||
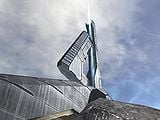
[[File:Barrier Tower.jpg|thumb|right|250px|A barrier tower.]] | |||
[[File:Barrier Tower.jpg|thumb|right|250px|A | |||
{{quote|We hit these three generators, and the barrier will fall?|[[Miranda Keyes]]}} | {{quote|We hit these three generators, and the barrier will fall?|[[Miranda Keyes]]}} | ||
A ''' | A '''barrier tower'''<ref>'''[[Halo 3: The Official Guide]]''', ''page 88''</ref> is a [[Forerunner]] shield-generation tower.<ref name="covenant">'''[[Halo 3]]''', campaign level ''[[The Covenant (level)|The Covenant]]''</ref> | ||
Three of these structures surrounded the [[ | Three of these structures surrounded the [[Installation 00 Citadel|Citadel]] on [[Installation 00]], projecting an energy shield that denied access to the Citadel. They could be individually deactivated by means of a holographic control panel on their upper floors.<ref name="covenant"/> Multiple similar structures also surrounded [[Installation 05]]'s [[Quarantine Zone]], most likely mounted on top of the [[Sentinel Wall]].<ref>'''Halo 2''', campaign level ''[[Sacred Icon]]''</ref> | ||
==Background== | ==Background== | ||
Barrier | Barrier towers are seen many times in the final two ''Halo'' games. ''Halo 2'' has the barrier towers placed either inside or on top of the Sentinel Wall, due to the fact that there is a shield projected unless it is deactivated manually. The towers on the Ark look similar to the [[Cartographer]] on the same structure, only smaller in size. The beam required to sustain the shield is projected from both the top of the tower's spire and from the bottom. | ||
The towers can be built on a variety of landscapes, with entrances if needed, as seen in | The towers can be built on a variety of landscapes, with entrances if needed, as seen in ''[[The Covenant (level)|The Covenant]]'' when the first tower is set in a small valley and has an access tunnel that penetrates through the rock. The second barrier tower is seen to be built in the side of a cliff, and has no entrances other than the ones that lead directly into the room. The final barrier tower was shown to be situated on a small plot of land with ramps that either vehicles or infantry could traverse. | ||
The towers also have an observation platform jutting out over them, possibly to watch for threats. Inside the control room, there is a large glass window that overlooks the Citadel or the spot that the barrier is protecting. [[Terminal/Halo 3|Terminals]] were also shown to be put inside some. The shield that the towers projected was shown to be strong enough to absorb plasma torpedoes fired from a {{Class|CAS|assault carrier}}. In or around a barrier tower, there is a cavern or tunnel that allows access behind the perimeter. It is possible that each tower has its own power source, as deactivating three barrier towers only allowed "a small section" to fall.<ref name="covenant"/> | |||
==Battle of Installation 00== | ==Battle of Installation 00== | ||
| Line 16: | Line 17: | ||
[[File:Barrier.jpg|thumb|[[John-117]] deactivating the first Tower Barrier.]] | [[File:Barrier.jpg|thumb|[[John-117]] deactivating the first Tower Barrier.]] | ||
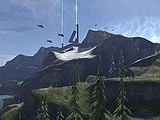
[[File:Snowy Ring.jpg|thumb|250px|right|Two Barrier Towers seen during the UNSC/Separatist assault on the Citadel.]] | [[File:Snowy Ring.jpg|thumb|250px|right|Two Barrier Towers seen during the UNSC/Separatist assault on the Citadel.]] | ||
During the battle of [[Installation 00]] in late [[2552]] between the [[United Nations Space Command]]/[[Covenant | During the battle of [[Installation 00]] in late [[2552]] between the [[United Nations Space Command]]/[[Covenant separatists|Covenant separatist]] alliance and the [[Covenant Empire|Covenant]] forces loyal to the [[Prophet of Truth]], the UNSC and the Elites sought access to the Citadel, but were barred by means of the energy shield of the three barrier towers. [[Commander]] [[Miranda Keyes]] coordinated a simultaneous assault on all three towers, ordering [[John-117|SPARTAN-117]] and a small [[Orbital Drop Shock Trooper]] and [[UNSC Marine Corps|Marine]] force to take the first east most barrier tower, the [[Thel 'Vadam|Arbiter]] and the [[Sangheili|Elites]] to take the middle barrier tower, and for [[Avery Junior Johnson|Avery J. Johnson]] and a Marine detachment to assault the west most barrier tower. | ||
Each tower was heavily protected. The tower which [[John | Each tower was heavily protected. The tower which [[John-117]] was assigned to take out was protected by an [[Type-52 Anti-Aircraft Artillery|Anti-Aircraft Wraith]] and a [[Jiralhanae War Chieftain]] as well as multiple [[Type-26 Anti-Infantry Stationary Gun|Shade turrets]], a Wraith, and a [[Jiralhanae Chieftain|Chieftain]] guarding the controls. Johnson's tower was protected by two [[Type-52 Anti-Aircraft Artillery|Anti-Aircraft Wraiths]], one normal [[Type-26 Assault Gun Carriage|Wraith]], a War Chieftain lookout, a pair of [[Mgalekgolo|Hunters]] and a swarm of [[Yanme'e|Drones]]. The controls were protected by [[Jiralhanae Stalker|Brute Stalkers]] and a War Chieftain. | ||
While SPARTAN-117's | While SPARTAN-117's and the Arbiter's groups managed to deactivate their two assigned barrier towers, Johnson's force ran into heavy Covenant resistance at the third tower, and Johnson's men were killed while Johnson was taken prisoner by the Brutes and taken to the Citadel itself. John-117 was ordered to take a [[AV-14 Hornet|Hornet]] VTOL to attack and land on the third barrier tower, deactivate it and attempt to find Johnson. Even though the Spartan successfully deactivated the last barrier tower, he was unable to find Johnson. Immediately after the third tower's deactivation, the [[The Flood|Flood]]-infested [[High Charity]] appeared and crashed on the Ark's surface nearby. As it went down, it released large chunks of debris, as well as [[Flood dispersal pod]]s, one of which smashed through the window of the tower's control room, allowing numerous [[Flood combat form|combat forms]] and [[Flood infection form|infection forms]] to reach the tower and its exterior. | ||
Afterward, the shield around the Citadel was lowered and the [[UNSC Marine Corps]] launched an all-out assault on the [[Jiralhanae|Brute]]-held Citadel. | Afterward, the shield around the Citadel was lowered and the [[UNSC Marine Corps]] launched an all-out assault on the [[Jiralhanae|Brute]]-held Citadel. | ||
==Trivia== | ==Trivia== | ||
*The [[Halo 3 Skulls#Thunderstorm|Thunderstorm]] skull on ''[[Halo 3]]'' can be found on an exterior balcony on the middle | *The [[Halo 3 Skulls#Thunderstorm|Thunderstorm]] skull on ''[[Halo 3]]'' can be found on an exterior balcony on the middle barrier tower where the Arbiter and his Elites went in the start of the level, ''The Covenant''. | ||
*All three of the | *All three of the Forerunner [[Terminal/Halo 3|Terminal]]s found on this level lie within barrier towers. | ||
==Gallery== | ==Gallery== | ||
<gallery> | <gallery> | ||
File:Ark Beam.jpg|A | File:Ark Beam.jpg|A barrier tower on the Ark. | ||
File:Barrier Covenant Battle.jpg|A | File:Barrier Covenant Battle.jpg|A barrier tower as seen in ''The Covenant'' during the separatist insertion. | ||
</gallery> | </gallery> | ||
==Sources== | |||
<references/> | |||
==Related articles== | ==Related articles== | ||
*[[Forerunner]]s | *[[Forerunner]]s | ||
*[[Installation 00]] | *[[Installation 00]] | ||
*[[Beam emitter | *[[Beam emitter]] | ||
{{Forerunner2}} | {{Forerunner2}} | ||
[[Category:Forerunner buildings]] | [[Category:Forerunner buildings]] | ||
[[Category:Forerunner technology]] | [[Category:Forerunner technology]] | ||
Revision as of 15:16, February 17, 2012

- "We hit these three generators, and the barrier will fall?"
- — Miranda Keyes
A barrier tower[1] is a Forerunner shield-generation tower.[2]
Three of these structures surrounded the Citadel on Installation 00, projecting an energy shield that denied access to the Citadel. They could be individually deactivated by means of a holographic control panel on their upper floors.[2] Multiple similar structures also surrounded Installation 05's Quarantine Zone, most likely mounted on top of the Sentinel Wall.[3]
Background
Barrier towers are seen many times in the final two Halo games. Halo 2 has the barrier towers placed either inside or on top of the Sentinel Wall, due to the fact that there is a shield projected unless it is deactivated manually. The towers on the Ark look similar to the Cartographer on the same structure, only smaller in size. The beam required to sustain the shield is projected from both the top of the tower's spire and from the bottom.
The towers can be built on a variety of landscapes, with entrances if needed, as seen in The Covenant when the first tower is set in a small valley and has an access tunnel that penetrates through the rock. The second barrier tower is seen to be built in the side of a cliff, and has no entrances other than the ones that lead directly into the room. The final barrier tower was shown to be situated on a small plot of land with ramps that either vehicles or infantry could traverse.
The towers also have an observation platform jutting out over them, possibly to watch for threats. Inside the control room, there is a large glass window that overlooks the Citadel or the spot that the barrier is protecting. Terminals were also shown to be put inside some. The shield that the towers projected was shown to be strong enough to absorb plasma torpedoes fired from a CAS-class assault carrier. In or around a barrier tower, there is a cavern or tunnel that allows access behind the perimeter. It is possible that each tower has its own power source, as deactivating three barrier towers only allowed "a small section" to fall.[2]
Battle of Installation 00
- Main article: Battle of Installation 00


During the battle of Installation 00 in late 2552 between the United Nations Space Command/Covenant separatist alliance and the Covenant forces loyal to the Prophet of Truth, the UNSC and the Elites sought access to the Citadel, but were barred by means of the energy shield of the three barrier towers. Commander Miranda Keyes coordinated a simultaneous assault on all three towers, ordering SPARTAN-117 and a small Orbital Drop Shock Trooper and Marine force to take the first east most barrier tower, the Arbiter and the Elites to take the middle barrier tower, and for Avery J. Johnson and a Marine detachment to assault the west most barrier tower.
Each tower was heavily protected. The tower which John-117 was assigned to take out was protected by an Anti-Aircraft Wraith and a Jiralhanae War Chieftain as well as multiple Shade turrets, a Wraith, and a Chieftain guarding the controls. Johnson's tower was protected by two Anti-Aircraft Wraiths, one normal Wraith, a War Chieftain lookout, a pair of Hunters and a swarm of Drones. The controls were protected by Brute Stalkers and a War Chieftain.
While SPARTAN-117's and the Arbiter's groups managed to deactivate their two assigned barrier towers, Johnson's force ran into heavy Covenant resistance at the third tower, and Johnson's men were killed while Johnson was taken prisoner by the Brutes and taken to the Citadel itself. John-117 was ordered to take a Hornet VTOL to attack and land on the third barrier tower, deactivate it and attempt to find Johnson. Even though the Spartan successfully deactivated the last barrier tower, he was unable to find Johnson. Immediately after the third tower's deactivation, the Flood-infested High Charity appeared and crashed on the Ark's surface nearby. As it went down, it released large chunks of debris, as well as Flood dispersal pods, one of which smashed through the window of the tower's control room, allowing numerous combat forms and infection forms to reach the tower and its exterior.
Afterward, the shield around the Citadel was lowered and the UNSC Marine Corps launched an all-out assault on the Brute-held Citadel.
Trivia
- The Thunderstorm skull on Halo 3 can be found on an exterior balcony on the middle barrier tower where the Arbiter and his Elites went in the start of the level, The Covenant.
- All three of the Forerunner Terminals found on this level lie within barrier towers.
Gallery
A barrier tower on the Ark.
A barrier tower as seen in The Covenant during the separatist insertion.


Sources
- ^ Halo 3: The Official Guide, page 88
- ^ a b c Halo 3, campaign level The Covenant
- ^ Halo 2, campaign level Sacred Icon


