Sentinel wall: Difference between revisions
From Halopedia, the Halo wiki
mNo edit summary |
No edit summary |
||
| Line 1: | Line 1: | ||
{{Era|Forerunner|HCW}} | {{Era|Forerunner|HCW}} | ||
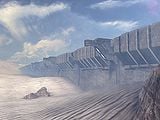
[[File:H2 Containment Shield.jpg|300px|thumb|right|A [[Type-52 Troop Carrier|Phantom]] approaching the Sentinel wall, with the [[Library]] in the background.]] | |||
[[File:H2 Containment Shield.jpg|300px|thumb|right|A [[Type-52 Troop Carrier|Phantom]] approaching the Sentinel | |||
'''Sentinel Walls''' are massive walls | '''Sentinel Walls''' are massive walls on [[Halo Array|Halo installations]] intended to serve as means of containment if primary measures fail in the event of a severe [[The Flood|Flood]] outbreak. As their name suggests, the walls house numerous [[Sentinel]]s to both repair the facility and keep the Flood from spreading beyond the wall. A Sentinel wall surrounded the [[Quarantine Zone]] around the [[Library]] of [[Installation 05]] to keep the Flood from spreading.<ref name="icon">'''[[Halo 2]]''', campaign level ''[[Sacred Icon]]''</ref> | ||
==Background== | ==Background== | ||
The wall appears to have been designed to keep the outbreak of Flood around Delta Halo's Library contained within the Quarantine Zone. It is honeycombed with tunnels for the [[Sentinel]]s to travel through. Sentinels and [[Enforcer]]s keep the Flood contained, while [[Constructor]]s keep repairing the damage that the Flood inflict on the wall. In addition to the massive physical wall, the Sentinel Wall also projected an energy barrier known as a [[Containment Shield]].<ref name="icon"/> | |||
The | |||
===Battle of Installation 05=== | ===Battle of Installation 05=== | ||
{{Main|Battle of Installation 05}} | {{Main|Battle of Installation 05}} | ||
Despite the efforts of the robotic keepers, the Flood were released when [[Thel 'Vadam|the Arbiter]] penetrated the defenses and deactivated the containment shield around the wall | Despite the efforts of the robotic keepers, the Flood were released when [[Thel 'Vadam|the Arbiter]] penetrated the defenses and deactivated the containment shield around the wall. During the battle on Installation 05 the Arbiter was sent into the wall to deactivate the shields keeping the [[Flood]] in the Quarantine Zone in order to let other [[Covenant]] forces fly over the wall towards the Library.<ref name="icon"/> | ||
== | ==Installation 00== | ||
[[Installation 00]] contained a similar, though far smaller, security wall structure near its [[Cartographer]]. Inside the wall was a deep chasm and an [[energy bridge]] allowing passage over it. A [[terminal]] was located within the wall near the activation switch for the energy bridge.<ref>'''Halo 3''', campaign level ''[[The Ark]]''</ref> | |||
[[ | |||
When the UNSC forces landed on the Ark, they were to secure a landing zone for the | When the UNSC forces landed on the Ark during the [[Battle of Installation 00]], they were to secure a landing zone for the {{UNSCShip|Forward Unto Dawn}} to land. The ground teams pushed through Covenant loyalist forces but were prevented access to the Cartographer by the wall. After the ''Forward Unto Dawn'' landed nearby and deployed a convoy of multiple vehicles, [[Miranda Keyes|Commander Keyes]] suggested they go through the wall. The UNSC forces returned to the wall and with the assistance of [[343 Guilty Spark]], successfully passed through. | ||
==Trivia== | ==Trivia== | ||
*A section of the Sentinel Wall is clearly visible on the ''[[Halo 2]]'' campaign levels [[Delta Halo (level)|Delta Halo]] and [[Regret (level)|Regret]], as well as the multiplayer map [[Containment]]. The Sentinel Wall can be visible and seen ''beyond'' the [[Prophet of Regret]]'s [[Temple (Installation 05)|Forerunner temple]] on the level Regret, denoting its massive structure and size. | |||
*It is unknown whether the other Installations have this feature, as the player would have bypassed the wall due to the Monitor's use of the [[teleportation grid]] on [[Installation 04]]. | |||
*A section of the Sentinel Wall is clearly visible on the ''[[Halo 2]]'' | |||
*It is unknown whether the other Installations have this feature, as the player would have bypassed the wall due to the Monitor's use of the teleportation | |||
==Gallery== | |||
<gallery> | |||
File:Nwh2mp.jpg|A [[Containment|small section]] of [[Installation 05]]'s Sentinel Wall. | |||
File:Ark wall 1.jpg|The wall structure on The Ark. | |||
</gallery> | |||
==Sources== | ==Sources== | ||
<references/> | <references/> | ||
{{Forerunner2}} | {{Forerunner2}} | ||
[[Category:Installation 05]] | [[Category:Installation 05]] | ||
[[Category: | [[Category:Forerunner buildings]] | ||
Revision as of 10:59, June 8, 2011

Sentinel Walls are massive walls on Halo installations intended to serve as means of containment if primary measures fail in the event of a severe Flood outbreak. As their name suggests, the walls house numerous Sentinels to both repair the facility and keep the Flood from spreading beyond the wall. A Sentinel wall surrounded the Quarantine Zone around the Library of Installation 05 to keep the Flood from spreading.[1]
Background
The wall appears to have been designed to keep the outbreak of Flood around Delta Halo's Library contained within the Quarantine Zone. It is honeycombed with tunnels for the Sentinels to travel through. Sentinels and Enforcers keep the Flood contained, while Constructors keep repairing the damage that the Flood inflict on the wall. In addition to the massive physical wall, the Sentinel Wall also projected an energy barrier known as a Containment Shield.[1]
Battle of Installation 05
- Main article: Battle of Installation 05
Despite the efforts of the robotic keepers, the Flood were released when the Arbiter penetrated the defenses and deactivated the containment shield around the wall. During the battle on Installation 05 the Arbiter was sent into the wall to deactivate the shields keeping the Flood in the Quarantine Zone in order to let other Covenant forces fly over the wall towards the Library.[1]
Installation 00
Installation 00 contained a similar, though far smaller, security wall structure near its Cartographer. Inside the wall was a deep chasm and an energy bridge allowing passage over it. A terminal was located within the wall near the activation switch for the energy bridge.[2]
When the UNSC forces landed on the Ark during the Battle of Installation 00, they were to secure a landing zone for the UNSC Forward Unto Dawn to land. The ground teams pushed through Covenant loyalist forces but were prevented access to the Cartographer by the wall. After the Forward Unto Dawn landed nearby and deployed a convoy of multiple vehicles, Commander Keyes suggested they go through the wall. The UNSC forces returned to the wall and with the assistance of 343 Guilty Spark, successfully passed through.
Trivia
- A section of the Sentinel Wall is clearly visible on the Halo 2 campaign levels Delta Halo and Regret, as well as the multiplayer map Containment. The Sentinel Wall can be visible and seen beyond the Prophet of Regret's Forerunner temple on the level Regret, denoting its massive structure and size.
- It is unknown whether the other Installations have this feature, as the player would have bypassed the wall due to the Monitor's use of the teleportation grid on Installation 04.
Gallery
- Nwh2mp.jpg
A small section of Installation 05's Sentinel Wall.
The wall structure on The Ark.


