
Skirmish at Two Giants: Difference between revisions
From Halopedia, the Halo wiki
No edit summary |
|||
| (13 intermediate revisions by 3 users not shown) | |||
| Line 1: | Line 1: | ||
{{ | {{Status|Canon}} | ||
{{Callsign}} | {{Callsign}} | ||
{{Battle infobox | {{Battle infobox | ||
| Line 8: | Line 8: | ||
|conflict=[[Post-Covenant War conflicts]] | |conflict=[[Post-Covenant War conflicts]] | ||
*[[Requiem Campaign]] | *[[Requiem Campaign]] | ||
|date= | |date=[[2558#February|February 2558]] | ||
|place="[[Two Giants]]," [[Requiem]], [[Epoloch system]] | |place="[[Two Giants]]," [[Requiem]], [[Epoloch system]] | ||
|result=*'''UNSC victory''' | |result=*'''UNSC victory''' | ||
| Line 14: | Line 14: | ||
**Forerunner towers investigated | **Forerunner towers investigated | ||
**[[Jul 'Mdama's Covenant|Covenant]] assault repelled | **[[Jul 'Mdama's Covenant|Covenant]] assault repelled | ||
**{{ | **{{Pattern|Zanar|light cruiser}} destroyed | ||
|side1=*[[United Earth Government]] | |side1=*[[United Earth Government]] | ||
**[[United Nations Space Command]] | **[[United Nations Space Command]] | ||
| Line 21: | Line 21: | ||
|commanders1=*[[Spartan Commander]] [[Sarah Palmer]] | |commanders1=*[[Spartan Commander]] [[Sarah Palmer]] | ||
*Spartan [[Jared Miller]] | *Spartan [[Jared Miller]] | ||
*[[Captain]] [[Cyrus Shaw]] | *[[Captain]] [[Cyrus Shaw]]{{Ref/Reuse|shootoutvalhalla}} | ||
|commanders2=Unknown | |commanders2=Unknown | ||
|forces1=*[[Expeditionary Strike Group 1]] | |forces1=*[[Expeditionary Strike Group 1]] | ||
**[[D79-TC Pelican]]s | **[[D79-TC Pelican]]s | ||
**[[Mantis]]es | **[[Mantis]]es{{Ref/Reuse|shootoutvalhalla}} | ||
**1 {{Class|Strident|heavy frigate}} | **1 {{Class|Strident|heavy frigate}} | ||
***''[[Infinity Sub-Vessel 3]]'' | ***''[[Infinity Sub-Vessel 3]]''{{Ref/Reuse|shootoutvalhalla}} | ||
**3 [[M3063 | **3 [[M3063 deployable turret]]s{{Ref/Reuse|shootoutvalhalla}} | ||
**[[Spartan Operations]] | **[[Spartan Operations]] | ||
***[[SPARTAN-IV Program|SPARTAN-IV]]s | ***[[SPARTAN-IV Program|SPARTAN-IV]]s | ||
****[[Fireteam Crimson]] | ****[[Fireteam Crimson]] | ||
****[[Mountain Squad]] | ****[[Mountain Squad]] | ||
*****[[Fredric Zurenia]]† | *****[[Fredric Zurenia]]†{{Ref/Reuse|spartanmountain}} | ||
*****[[Scott Macrae]]† | *****[[Scott Macrae]]†{{Ref/Reuse|spartanmountain}} | ||
|forces2= | |forces2= | ||
*1 {{ | *1 {{Pattern|Zanar|light cruiser}} | ||
* | *{{Pattern|Zurdo|Wraith}}s | ||
*[[Type-26 Banshee]]s | *[[Type-26 Banshee]]s | ||
* | *{{Pattern|Karo'etba|Ghost}}s | ||
|casual1= | |casual1= | ||
*[[Mountain Squad]] | *[[Mountain Squad]] | ||
|casual2=*Total | |casual2=*Total | ||
**1 {{ | **1 {{Pattern|Zanar|light cruiser}} | ||
}} | }} | ||
During the [[Requiem Campaign]], a '''skirmish took place at [[Two Giants]]''' between forces of the {{UNSCShip|Infinity}} and [[Jul 'Mdama's Covenant]]. | During the [[Requiem Campaign]], a '''skirmish took place at [[Two Giants]]''' between forces of the {{UNSCShip|Infinity}} and [[Jul 'Mdama's Covenant]].{{Ref/Reuse|spartanmountain}}{{Ref/SpOps|Id=shootoutvalhalla|Catherine|Shootout In Valhalla}} | ||
==Battle== | ==Battle== | ||
===Rescuing Mountain Squad=== | ===Rescuing Mountain Squad=== | ||
Mountain Squad engaged with Covenant forces | As Mountain Squad engaged with Covenant forces, [[Fireteam Crimson]] was deployed by Spartan Palmer in the middle of the fighting, though contact with the ''Infinity'' was lost soon after. The forces of Fireteam Crimson and Mountain Squad joined together to fight back. They eventually pushed back and destroyed the jammer blocking communications.{{Ref/SpOps|Id=spartanmountain|Catherine|Spartan Mountain}} | ||
===Studying the area=== | ===Studying the area=== | ||
At the request of ''Infinity'' Science, Fireteam Crimson was tasked with studying the towers in the canyon. This involved bringing down the shields of those towers while intermittently fighting Covenant forces. With the shields knocked | At the request of ''Infinity'' Science, Fireteam Crimson was tasked with studying the [[beacon tower|towers]] in the canyon. This involved bringing down the shields of those towers while intermittently fighting Covenant forces. With the shields knocked out, [[Catherine Halsey|Dr. Catherine Halsey]] was brought on station to study the towers and Crimson activated the tower at the doctor's request. This caused the tower to fire an energy pulse into the sky and generated a vast amount of data for examination. Immediately after this, the Covenant returned and were eliminated. Crimson was ordered to return to Mountain Squad's Pelican.{{Ref/Reuse|spartanmountain}} | ||
===Defending the canyon=== | ===Defending the canyon=== | ||
After regrouping at Mountain's Pelican, further Covenant forces mobilized onto the canyon. Previous Marine forces had established several [[M3063 | After regrouping at Mountain's Pelican, further Covenant forces mobilized onto the canyon. Previous Marine forces had established several [[M3063 deployable turret|turrets]] in the canyon. Crimson began to active them while fighting off the Covenant including [[Zurdo-pattern Wraith|Wraiths]]. In a lull during combat, several Pelicans offloaded Mantises onto the field. The Covenant began to launch a large air assault on Crimson with a {{Pattern|Zanar|light cruiser}} moving in to attack. Spartan Palmer requested to extract Crimson, but it was too dangerous with the cruiser nearby. Crimson continued to hold their ground as the cruiser moved into position over the battlefield. ''[[Infinity Sub-Vessel 3]]'' arrived on station and destroyed the cruiser, allowing Crimson to escape.{{Ref/Reuse|shootoutvalhalla}} | ||
==Aftermath== | ==Aftermath== | ||
Following their successful extraction, Fireteam Crimson was quickly redeployed to [[Assassination of Parg Vol|hunt down]] [[Parg Vol]]. | Following their successful extraction, Fireteam Crimson was quickly redeployed to [[Assassination of Parg Vol|hunt down]] [[Parg Vol]].{{Ref/Reuse|shootoutvalhalla}} | ||
==Gallery== | ==Gallery== | ||
| Line 64: | Line 64: | ||
File:H4 Screenshot ShooutoutinValhalla1.png|The turrets setup in the canyon as the Covenant move into position. | File:H4 Screenshot ShooutoutinValhalla1.png|The turrets setup in the canyon as the Covenant move into position. | ||
File:H4 Screenshot ShootoutinValhalla2.png|[[D79-TC Pelican]]s deploying [[HRUNTING/YGGDRASIL Mark IX Mantis|Mantises]] into the canyon. | File:H4 Screenshot ShootoutinValhalla2.png|[[D79-TC Pelican]]s deploying [[HRUNTING/YGGDRASIL Mark IX Mantis|Mantises]] into the canyon. | ||
File:H4 Screenshot ShootoutinValhalla4.png|A Mantis looking at Covenant air forces coming from the {{ | File:H4 Screenshot ShootoutinValhalla4.png|A Mantis looking at Covenant air forces coming from the {{Pattern|Zanar|light cruiser}}. | ||
</gallery> | </gallery> | ||
| Line 72: | Line 72: | ||
==Sources== | ==Sources== | ||
{{Ref/Sources}} | |||
{{Engagements in the Requiem Campaign}} | {{Engagements in the Requiem Campaign}} | ||
[[Category:UNSC | [[Category:UNSC victories]] | ||
Latest revision as of 21:41, January 15, 2025
| This article's title is a callsign, an alias, or a nickname, as no proper name for the subject has been revealed. |
|
Previous: |
|||
|
Next: |
|||
| Skirmish at Two Giants | |||
|---|---|---|---|

| |||
|
Conflict: |
|||
|
Date: |
|||
|
Location: |
|||
|
Outcome: |
| ||
| |||
During the Requiem Campaign, a skirmish took place at Two Giants between forces of the UNSC Infinity and Jul 'Mdama's Covenant.[2][1]
Battle[edit]
Rescuing Mountain Squad[edit]
As Mountain Squad engaged with Covenant forces, Fireteam Crimson was deployed by Spartan Palmer in the middle of the fighting, though contact with the Infinity was lost soon after. The forces of Fireteam Crimson and Mountain Squad joined together to fight back. They eventually pushed back and destroyed the jammer blocking communications.[2]
Studying the area[edit]
At the request of Infinity Science, Fireteam Crimson was tasked with studying the towers in the canyon. This involved bringing down the shields of those towers while intermittently fighting Covenant forces. With the shields knocked out, Dr. Catherine Halsey was brought on station to study the towers and Crimson activated the tower at the doctor's request. This caused the tower to fire an energy pulse into the sky and generated a vast amount of data for examination. Immediately after this, the Covenant returned and were eliminated. Crimson was ordered to return to Mountain Squad's Pelican.[2]
Defending the canyon[edit]
After regrouping at Mountain's Pelican, further Covenant forces mobilized onto the canyon. Previous Marine forces had established several turrets in the canyon. Crimson began to active them while fighting off the Covenant including Wraiths. In a lull during combat, several Pelicans offloaded Mantises onto the field. The Covenant began to launch a large air assault on Crimson with a Zanar-pattern light cruiser moving in to attack. Spartan Palmer requested to extract Crimson, but it was too dangerous with the cruiser nearby. Crimson continued to hold their ground as the cruiser moved into position over the battlefield. Infinity Sub-Vessel 3 arrived on station and destroyed the cruiser, allowing Crimson to escape.[1]
Aftermath[edit]
Following their successful extraction, Fireteam Crimson was quickly redeployed to hunt down Parg Vol.[1]
Gallery[edit]
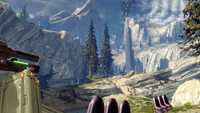
The turrets setup in the canyon as the Covenant move into position.
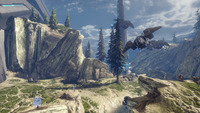
D79-TC Pelicans deploying Mantises into the canyon.
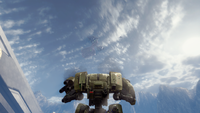
A Mantis looking at Covenant air forces coming from the Zanar-pattern light cruiser.


List of appearances[edit]
- Halo 4
- Spartan Ops (First appearance)
Sources[edit]
- ^ Jump up to: a b c d e f g Halo 4 - Spartan Ops, episode Catherine, level Shootout In Valhalla
- ^ Jump up to: a b c d e Halo 4 - Spartan Ops, episode Catherine, level Spartan Mountain
| ||


