
Control schemes: Difference between revisions
From Halopedia, the Halo wiki
NightHammer (talk | contribs) No edit summary |
BaconShelf (talk | contribs) (→Halo 3) |
||
| (53 intermediate revisions by 20 users not shown) | |||
| Line 1: | Line 1: | ||
{{ | {{Status|RealWorld}} | ||
This is a list of '''controller layouts''' available in the [[:Category:Games|''Halo'' games]] for the [[Xbox]], the [[Xbox 360]], and the [[Xbox One]]. | This is a list of '''controller layouts''' available in the [[:Category:Games|''Halo'' games]] for the [[Xbox]], the [[Xbox 360]], and the [[Xbox One]]. | ||
==Stick | ==Stick layouts== | ||
All ''Halo'' games save for the ''Halo Wars'' feature the same four stick layouts. | All ''Halo'' games save for the ''Halo Wars'' feature the same four stick layouts. | ||
===Default=== | ===Default=== | ||
| Line 9: | Line 9: | ||
===Southpaw=== | ===Southpaw=== | ||
''"For Lefties"'' | ''"For Lefties"''<br /> | ||
'''Left Stick''' - Look Up/Down | Rotate Left/Right<br /> | '''Left Stick''' - Look Up/Down | Rotate Left/Right<br /> | ||
'''Right Stick''' - Move Forward/Backward | Strafe Left/Right<br /> | '''Right Stick''' - Move Forward/Backward | Strafe Left/Right<br /> | ||
| Line 24: | Line 24: | ||
'''Left Stick''' - Look Up/Down | Strafe Left/Right<br /> | '''Left Stick''' - Look Up/Down | Strafe Left/Right<br /> | ||
'''Right Stick''' - Move Forward/Backward | Rotate Left/Right<br /> | '''Right Stick''' - Move Forward/Backward | Rotate Left/Right<br /> | ||
== ''General'' == | |||
=== Alert carry === | |||
{{Main|Alert carry}} | |||
Alert carry is a feature introduced in ''Halo 2'' for machinima purposes. The feature can be accessed by pressing "down" on the D-pad (''Halo 2'' only) or using a combination of buttons (''Halo 3'' and subsequent games). | |||
== ''Halo: Combat Evolved'' == | == ''Halo: Combat Evolved'' == | ||
{{Main|Halo: Combat Evolved}} | |||
<div class="tabcontainer"> | <div class="tabcontainer"> | ||
<div class="tabbox"> | <div class="tabbox"> | ||
<div class="tab">Xbox</div> | <div class="tab">Xbox</div> | ||
[[File:Xbox controller diagram.jpg | [[File:Xbox controller diagram.jpg|thumb|300px|Xbox Controller]] | ||
'''A''' - Jump<br /> | '''A''' - Jump<br /> | ||
'''B''' - [[Melee]] attack<br /> | '''B''' - [[Melee]] attack<br /> | ||
| Line 40: | Line 46: | ||
'''Right Trigger''' - Fire primary weapon<br /> | '''Right Trigger''' - Fire primary weapon<br /> | ||
'''Left Trigger''' - Throw [[grenade]]<br /> | '''Left Trigger''' - Throw [[grenade]]<br /> | ||
<br /> | |||
'''"Back" Button''' - Go back/Multiplayer score<br /> | '''"Back" Button''' - Go back/Multiplayer score<br /> | ||
'''"Start" Button''' - Pause | '''"Start" Button''' - Pause game<br /> | ||
''' | '''↑ D-Pad''' - Teamspeak<br /> | ||
<br /> | |||
'''Black Button''' - Switch [[grenade]]s<br /> | '''Black Button''' - Switch [[grenade]]s<br /> | ||
'''White Button''' - Flashlight/Teamspeak<br /> | '''White Button''' - Flashlight/Teamspeak<br /> | ||
</div> | </div> | ||
<div class="tabbox"> | <div class="tabbox"> | ||
<div class="tab">Xbox 360</div> | <div class="tab">Xbox 360</div> | ||
[[File: | [[File:Xbox controller diagram.jpg|thumb|300px|Xbox Controller]] | ||
'''A''' - Jump<br /> | '''A''' - Jump<br /> | ||
'''B''' - Melee attack<br /> | '''B''' - [[Melee]] attack<br /> | ||
'''X''' - Reload weapon/Action<br /> | '''X''' - Reload weapon/Action<br /> | ||
'''Y''' - Switch weapons<br /> | '''Y''' - Switch weapons<br /> | ||
| Line 58: | Line 66: | ||
'''Right Analog''' - Camera<br /> | '''Right Analog''' - Camera<br /> | ||
'''Right Analog Click''' - Zoom<br /> | '''Right Analog Click''' - Zoom<br /> | ||
'''Right Trigger''' - Fire weapon<br /> | '''Right Trigger''' - Fire primary weapon<br /> | ||
'''Left Trigger''' - Throw grenade<br /> | '''Left Trigger''' - Throw [[grenade]]<br /> | ||
<br /> | |||
'''"Back" Button''' - Go back/Multiplayer score<br /> | '''"Back" Button''' - Go back/Multiplayer score<br /> | ||
'''"Start" Button''' - Pause<br /> | '''"Start" Button''' - Pause game<br /> | ||
''' | '''↑ D-Pad''' - Teamspeak<br /> | ||
<br /> | |||
'''Right Bumper''' - Switch | '''Right Bumper''' - Switch [[grenade]]s<br /> | ||
'''Left Bumper''' - Flashlight/Teamspeak<br /> | '''Left Bumper''' - Flashlight/Teamspeak<br /> | ||
</div></div> | </div> | ||
</div> | |||
== ''Halo 2'' == | == ''Halo 2'' == | ||
{{Main|Halo 2}} | |||
<div class="tabcontainer"> | <div class="tabcontainer"> | ||
<div class="tabbox"> | <div class="tabbox"> | ||
| Line 75: | Line 86: | ||
'''B''' - Melee attack<br /> | '''B''' - Melee attack<br /> | ||
'''X''' - Reload weapon/Swap weapon/Action<br /> | '''X''' - Reload weapon/Swap weapon/Action<br /> | ||
'''Y''' - Switch weapons/ | '''Y''' - Switch weapons/Dual wield weapons<br /> | ||
'''Left Analog''' - Movement<br /> | '''Left Analog''' - Movement<br /> | ||
'''Left Analog Click''' - Crouch<br /> | '''Left Analog Click''' - Crouch<br /> | ||
| Line 82: | Line 93: | ||
'''Right Trigger''' - Fire weapon<br /> | '''Right Trigger''' - Fire weapon<br /> | ||
'''Left Trigger''' - Throw grenade/Fire secondary weapon/E-brake/Boost<br /> | '''Left Trigger''' - Throw grenade/Fire secondary weapon/E-brake/Boost<br /> | ||
<br /> | |||
'''"Back" Button''' - Go back/Multiplayer score<br /> | '''"Back" Button''' - Go back/Multiplayer score<br /> | ||
'''"Start" Button''' - Pause<br /> | '''"Start" Button''' - Pause<br /> | ||
''' | '''↑ D-Pad''' - Teamspeak<br /> | ||
''' | '''↓ D-Pad''' - Lower weapon<br /> | ||
<br /> | |||
'''Black Button''' - Switch grenades<br /> | '''Black Button''' - Switch grenades<br /> | ||
'''White Button''' - Flashlight/Invisibility/Teamspeak<br /> | '''White Button''' - Flashlight/Invisibility/Teamspeak<br /> | ||
</div> | </div> | ||
<div class="tabbox"> | <div class="tabbox"> | ||
<div class="tab">Xbox 360</div> | <div class="tab">Xbox 360</div> | ||
| Line 95: | Line 108: | ||
'''B''' - Melee attack<br /> | '''B''' - Melee attack<br /> | ||
'''X''' - Reload weapon/Swap weapon/Action<br /> | '''X''' - Reload weapon/Swap weapon/Action<br /> | ||
'''Y''' - Switch weapons/ | '''Y''' - Switch weapons/Dual wield weapons<br /> | ||
'''Left Analog | '''Left Analog''' - Movement<br /> | ||
''' | '''Left Analog Click''' - Crouch<br /> | ||
'''Right Analog | '''Right Analog''' - Camera<br /> | ||
''' | '''Right Analog Click''' - Zoom<br /> | ||
'''Right Trigger''' - Fire weapon<br /> | '''Right Trigger''' - Fire weapon<br /> | ||
'''Left Trigger''' - Throw grenade/Fire secondary weapon/E-brake/Boost<br /> | '''Left Trigger''' - Throw grenade/Fire secondary weapon/E-brake/Boost<br /> | ||
<br /> | |||
'''"Back" Button''' - Go back/Multiplayer score<br /> | '''"Back" Button''' - Go back/Multiplayer score<br /> | ||
'''"Start" Button''' - Pause<br /> | '''"Start" Button''' - Pause<br /> | ||
''' | '''↑ D-Pad''' - Teamspeak<br /> | ||
''' | '''↓ D-Pad''' - Lower weapon<br /> | ||
<br /> | |||
'''Right Bumper''' - Switch grenades<br /> | '''Right Bumper''' - Switch grenades<br /> | ||
'''Left Bumper''' - Flashlight/Teamspeak<br /> | '''Left Bumper''' - Flashlight/Invisibility/Teamspeak<br /> | ||
</div></div> | </div></div> | ||
== ''Halo 3'' == | == ''Halo 3'' == | ||
{{Main|Halo 3}} | |||
<div class="tabcontainer"> | <div class="tabcontainer"> | ||
<div class="tabbox"> | <div class="tabbox"> | ||
<div class="tab">Default</div> | <div class="tab">Default</div> | ||
[[File:H3 PosterController.jpg|thumb|300px|A poster included in physical copies of ''[[Halo 3]]'', showcasing the game's controller layout.]] | |||
{{Article quote|Default.}} | |||
'''A''' - Jump<br /> | '''A''' - Jump<br /> | ||
'''B''' - Melee Attack<br /> | '''B''' - Melee Attack<br /> | ||
| Line 137: | Line 154: | ||
<div class="tabbox"> | <div class="tabbox"> | ||
<div class="tab">Southpaw</div> | <div class="tab">Southpaw</div> | ||
{{Article | {{Article quote|For lefties.}} | ||
'''A''' - Jump<br /> | '''A''' - Jump<br /> | ||
'''B''' - Melee Attack<br /> | '''B''' - Melee Attack<br /> | ||
| Line 153: | Line 170: | ||
This is the same as default except that the triggers are switched. | This is the same as default except that the triggers are switched. | ||
Please note that if you compare new players using all button layouts this is the most accurate. Because unlike all of the other layouts offered in the game this is the only one that you are not required to use the same hand to shoot and aim with. Therefore having more reaction time and accuracy. | Please note that if you compare new players using all button layouts this is the most accurate. Because unlike all of the other layouts offered in the game this is the only one that you are not required to use the same hand to shoot and aim with. Therefore, having more reaction time and accuracy. | ||
</div></div> | </div></div> | ||
<div class="tabbox"> | <div class="tabbox"> | ||
<div class="tab">Boxer</div> | <div class="tab">Boxer</div> | ||
{{Article | {{Article quote|Pulling the left trigger will melee.}} | ||
'''A''' - Jump<br /> | '''A''' - Jump<br /> | ||
| Line 178: | Line 195: | ||
<div class="tabbox"> | <div class="tabbox"> | ||
<div class="tab">Green Thumb</div> | <div class="tab">Green Thumb</div> | ||
{{Article | {{Article quote|Pressing the right stick will melee.}} | ||
'''A''' - Jump<br /> | '''A''' - Jump<br /> | ||
| Line 197: | Line 214: | ||
Please note that it is not possible to aim while zooming, jumping, and deploying equipment without use of the "claw grip." | Please note that it is not possible to aim while zooming, jumping, and deploying equipment without use of the "claw grip." | ||
Also this is very similar to the default [[ | Also this is very similar to the default [[callofduty:|Call of Duty]] controls. | ||
</div></div> | </div></div> | ||
<div class="tabbox"> | <div class="tabbox"> | ||
<div class="tab">Bumper Jumper</div> | <div class="tab">Bumper Jumper</div> | ||
{{Article | {{Article quote|Jump and Melee are on the bumpers.}} | ||
'''A''' - Reload/Swap Left Weapon/change grenade type<br /> | '''A''' - Reload/Swap Left Weapon/change grenade type<br /> | ||
| Line 220: | Line 237: | ||
Please note that it is not possible to aim while deploying equipment without use of the "claw grip," although this is not much of a deterrent for most. | Please note that it is not possible to aim while deploying equipment without use of the "claw grip," although this is not much of a deterrent for most. | ||
Bungie originally considered this as the default control scheme of ''Halo 3'', but thought it would be too radically different to players used to ''Halo: Combat Evolved'' and ''Halo 2'' and so altered it into the actual default configuration.{{ | Bungie originally considered this as the default control scheme of ''Halo 3'', but thought it would be too radically different to players used to ''Halo: Combat Evolved'' and ''Halo 2'' and so altered it into the actual default configuration.{{citation needed}} However, with its relative popularity among Bungie workers, it was kept as an alternate configuration. | ||
Using the [[Type-26 Ground Support Aircraft|Banshee]] becomes much easier with this control scheme, seeing as how you can use your cannon and aim, as well as perform tricks and determine your trajectory at the same time. | Using the [[Type-26 Ground Support Aircraft|Banshee]] becomes much easier with this control scheme, seeing as how you can use your cannon and aim, as well as perform tricks and determine your trajectory at the same time. | ||
| Line 226: | Line 243: | ||
<div class="tabbox"> | <div class="tabbox"> | ||
<div class="tab">Walkie Talkie</div> | <div class="tab">Walkie Talkie</div> | ||
{{Article | {{Article quote|Multiplayer team broadcasting is on the Left Bumper.}} | ||
'''A''' - Jump<br /> | '''A''' - Jump<br /> | ||
| Line 276: | Line 293: | ||
== ''Halo 3: ODST'' == | == ''Halo 3: ODST'' == | ||
{{Main|Halo 3: ODST}} | |||
The controls in ''Halo 3: ODST'' are largely the same as in ''Halo 3'', except the "Back" button accesses the [[VISR]] Database, the '''X''' button activates VISR Mode, and D-pad "up" views waypoints. | The controls in ''Halo 3: ODST'' are largely the same as in ''Halo 3'', except the "Back" button accesses the [[VISR]] Database, the '''X''' button activates VISR Mode, and D-pad "up" views waypoints. | ||
== ''Halo Wars'' == | == ''Halo Wars'' == | ||
{{Main|Halo Wars}} | |||
'''A''' - Press to select/Hold to select with "paintbrush" tool <br /> | '''A''' - Press to select/Hold to select with "paintbrush" tool <br /> | ||
'''B''' - Cancel selection<br /> | '''B''' - Cancel selection<br /> | ||
| Line 297: | Line 316: | ||
== ''Halo: Reach'' == | == ''Halo: Reach'' == | ||
{{Main|Halo: Reach}} | |||
<div class="tabcontainer"> | <div class="tabcontainer"> | ||
<div class="tabbox"> | <div class="tabbox"> | ||
| Line 448: | Line 468: | ||
== ''Halo: Combat Evolved Anniversary'' == | == ''Halo: Combat Evolved Anniversary'' == | ||
{{Main|Halo: Combat Evolved Anniversary}} | |||
<div class="tabcontainer"> | <div class="tabcontainer"> | ||
<div class="tabbox"> | <div class="tabbox"> | ||
| Line 595: | Line 616: | ||
== ''Halo 4'' == | == ''Halo 4'' == | ||
{{Main|Halo 4}} | |||
<div class="tabcontainer"> | <div class="tabcontainer"> | ||
<div class="tabbox"> | <div class="tabbox"> | ||
| Line 716: | Line 738: | ||
</div></div> | </div></div> | ||
== ''Halo: Spartan Assault '' == | == ''Halo: Spartan Assault and Spartan Strike'' == | ||
{{Main|Halo: Spartan Assault}} | |||
[[File:HSA control layout.jpg|right|400px]] | [[File:HSA control layout.jpg|right|400px]] | ||
'''B''' - Switch Grenade<br/> | '''B''' - Switch Grenade<br/> | ||
| Line 723: | Line 746: | ||
'''Left Analog''' - Movement<br/> | '''Left Analog''' - Movement<br/> | ||
'''Right Analog''' - Look<br/> | '''Right Analog''' - Look<br/> | ||
'''Right Trigger''' - | '''Right Trigger''' - Fire Weapon<br/> | ||
'''Left Trigger''' - | '''Left Trigger''' - Throw Grenade<br/> | ||
'''Right Bumper''' - Melee<br/> | '''Right Bumper''' - Melee<br/> | ||
'''Left Bumper''' - Use Armor Ability<br/> | '''Left Bumper''' - Use Armor Ability<br/> | ||
| Line 730: | Line 753: | ||
== ''Halo: The Master Chief Collection'' == | == ''Halo: The Master Chief Collection'' == | ||
{{Main|Halo: The Master Chief Collection}} | |||
In addition to the specific control schemes of each individual game in the collection, ''The Master Chief Collection'' features several "Universal" control setups that span all four games. | |||
<div class="tabcontainer"> | <div class="tabcontainer"> | ||
<div class="tabbox"> | <div class="tabbox"> | ||
| Line 832: | Line 858: | ||
</div></div> | </div></div> | ||
== | ==''Halo 5: Guardians''== | ||
Halo 5 Guardians introduced Spartan Abilities, which will be in parenthesis. | |||
<div class="tabcontainer"> | |||
<div class="tabbox"> | |||
<div class="tab">Default</div> | |||
[[File:H5G beta - controller layout.jpg|right|300px]] | |||
'''A''' - Jump (& Clamber)<br/> | |||
'''B''' - (Thruster Pack)<br/> | |||
'''X''' - Action & Reload<br/> | |||
'''Y''' - Change Weapon<br/> | |||
'''Left Analog''' - Movement<br/> | |||
'''Left Analog Click''' - (Sprint) & Secondary Zoom<br/> | |||
'''Right Analog Click''' - Crouch (& Slide)<br/> | |||
'''Right Analog''' - Look<br/> | |||
'''Right Trigger''' - Fire Weapon<br/> | |||
'''Left Trigger''' - (Smart-Link)<br/> | |||
'''Left Bumper''' - Throw Grenade<br/> | |||
'''Right Bumper''' - Melee Attack (& Spartan Charge & Ground Pound [HOLD])<br/> | |||
'''←/→ D-Pad''' - Switch Grenades <br/> | |||
</div> | |||
<div class="tabbox"> | |||
<div class="tab">Southpaw</div> | |||
'''A''' - Jump (& Clamber)<br/> | |||
'''B''' - Crouch (& Slide)<br/> | |||
'''X''' - Action & Reload<br/> | |||
'''Y''' - Change Weapon<br/> | |||
'''Left Analog''' - Movement<br/> | |||
'''Left Analog Click''' - (Sprint)<br/> | |||
'''Right Analog Click''' - (Smart-Link) & Zoom<br/> | |||
'''Right Analog''' - Look<br/> | |||
'''Right Trigger''' - Throw Grenade<br/> | |||
'''Left Trigger''' - Fire Weapon<br/> | |||
'''Left Bumper''' - Melee Attack (& Spartan Charge & Ground Pound [HOLD])<br/> | |||
'''Right Bumper''' - (Thruster Pack)<br/> | |||
'''←/→ D-Pad''' - Switch Grenades <br/> | |||
</div> | |||
<div class="tabbox"> | |||
<div class="tab">Boxer</div> | |||
'''A''' - Jump (& Clamber)<br/> | |||
'''B''' - (Sprint)<br/> | |||
'''X''' - Action & Reload<br/> | |||
'''Y''' - Switch Weapons<br/> | |||
'''Left Analog''' - Movement<br/> | |||
'''Left Analog Click''' - Crouch (& Slide)<br/> | |||
'''Right Analog Click''' - (Smart-Link) & Zoom<br/> | |||
'''Right Analog''' - Look<br/> | |||
'''Right Trigger''' - Fire Weapon<br/> | |||
'''Left Trigger''' - Melee Attack (& Spartan Charge & Ground Pound [HOLD])<br/> | |||
'''Left Bumper''' - (Thruster Pack)<br/> | |||
'''Right Bumper''' - Throw Grenade<br/> | |||
'''←/→ D-Pad''' - Switch Grenades <br/> | |||
</div> | |||
<div class="tabbox"> | |||
<div class="tab">Green Thumb</div> | |||
'''A''' - Jump (& Clamber)<br/> | |||
'''B''' - Crouch (& Slide)<br/> | |||
'''X''' - Action & Reload<br/> | |||
'''Y''' - Switch Weapons<br/> | |||
'''Left Analog''' - Movement<br/> | |||
'''Left Analog Click''' - (Sprint) & Zoom<br/> | |||
'''Right Analog Click''' - Melee Attack (& Spartan Charge & Ground Pound [HOLD])<br/> | |||
'''Right Analog''' - Look<br/> | |||
'''Right Trigger''' - Fire Weapon<br/> | |||
'''Left Trigger''' - (Smart-Link)<br/> | |||
'''Left Bumper''' - Throw Grenade<br/> | |||
'''Right Bumper''' - (Thruster Pack)<br/> | |||
'''←/→ D-Pad''' - Switch Grenades <br/> | |||
</div> | |||
<div class="tabbox"> | |||
<div class="tab">Bumper Jumper</div> | |||
'''A''' - (Sprint)<br/> | |||
'''B''' - Action & Reload<br/> | |||
'''X''' - (Thruster Pack)<br/> | |||
'''Y''' - Switch Weapons<br/> | |||
'''Left Analog''' - Movement<br/> | |||
'''Left Analog Click''' - Crouch (& Slide)<br/> | |||
'''Right Analog Click''' - (Smart-Link) & Zoom<br/> | |||
'''Right Analog''' - Look<br/> | |||
'''Right Trigger''' - Fire Weapon<br/> | |||
'''Left Trigger''' - Throw Grenade<br/> | |||
'''Left Bumper''' - Jump (& Clamber)<br/> | |||
'''Right Bumper''' - Melee Attack (& Spartan Charge & Ground Pound [HOLD])<br/> | |||
'''←/→ D-Pad''' - Switch Grenades <br/> | |||
</div> | |||
<div class="tabbox"> | |||
<div class="tab">Recon</div> | |||
'''A''' - Jump (& Clamber)<br/> | |||
'''B''' - Melee Attack (& Spartan Charge & Ground Pound [HOLD])<br/> | |||
'''X''' - (Sprint)<br/> | |||
'''Y''' - Switch Weapons<br/> | |||
'''Left Analog''' - Movement<br/> | |||
'''Left Analog Click''' - Crouch (& Slide)<br/> | |||
'''Right Analog Click''' - (Smart-Link) & Zoom<br/> | |||
'''Right Analog''' - Look<br/> | |||
'''Right Trigger''' - Fire Weapon<br/> | |||
'''Left Trigger''' - Throw Grenade<br/> | |||
'''Left Bumper''' - (Thruster Pack)<br/> | |||
'''Right Bumper''' - Action & Reload<br/> | |||
'''←/→ D-Pad''' - Switch Grenades <br/> | |||
</div> | |||
<div class="tabbox"> | |||
<div class="tab">Fishstick</div> | |||
'''A''' - Jump (& Clamber)<br/> | |||
'''B''' - Crouch (& Slide)<br/> | |||
'''X''' - Action & Reload<br/> | |||
'''Y''' - Switch Weapons<br/> | |||
'''Left Analog''' - Movement<br/> | |||
'''Left Analog Click''' - (Sprint) & Zoom<br/> | |||
'''Right Analog Click''' - Melee Attack (& Spartan Charge & Ground Pound [HOLD])<br/> | |||
'''Right Analog''' - Look<br/> | |||
'''Right Trigger''' - Fire Weapon<br/> | |||
'''Left Trigger''' - (Smart-Link)<br/> | |||
'''Left Bumper''' - (Thruster Pack)<br/> | |||
'''Right Bumper''' - Throw Grenade<br/> | |||
'''←/→ D-Pad''' - Switch Grenades <br/> | |||
</div> | |||
<div class="tabbox"> | |||
<div class="tab">Halo 4</div> | |||
'''A''' - Jump (& Clamber)<br/> | |||
'''B''' - Crouch (& Slide)<br/> | |||
'''X''' - Action & Reload<br/> | |||
'''Y''' - Switch Weapons<br/> | |||
'''Left Analog''' - Movement<br/> | |||
'''Left Analog Click''' - (Sprint)<br/> | |||
'''Right Analog Click''' - (Smart-Link) & Zoom<br/> | |||
'''Right Analog''' - Look<br/> | |||
'''Right Trigger''' - Fire Weapon<br/> | |||
'''Left Trigger''' - Throw Grenade<br/> | |||
'''Left Bumper''' - (Thruster Pack)<br/> | |||
'''Right Bumper''' - Melee Attack (& Spartan Charge & Ground Pound [HOLD])<br/> | |||
'''←/→ D-Pad''' - Switch Grenades <br/> | |||
</div> | |||
<div class="tabbox"> | |||
<div class="tab">Helljumper</div> | |||
'''A''' - (Sprint) & Zoom<br/> | |||
'''B''' - Action & Reload<br/> | |||
'''X''' - (Thruster Pack)<br/> | |||
'''Y''' - Switch Weapons<br/> | |||
'''Left Analog''' - Movement<br/> | |||
'''Left Analog Click''' - Crouch (& Slide)<br/> | |||
'''Right Analog Click''' - Melee Attack (& Spartan Charge & Ground Pound [HOLD])<br/> | |||
'''Right Analog''' - Look<br/> | |||
'''Right Trigger''' - Fire Weapon<br/> | |||
'''Left Trigger''' - (Smart-Link)<br/> | |||
'''Left Bumper''' - Jump (& Clamber)<br/> | |||
'''Right Bumper''' - Throw Grenade<br/> | |||
'''←/→ D-Pad''' - Switch Grenades <br/> | |||
</div></div> | |||
==Trivia== | ==Trivia== | ||
*The ''Duke'' button layout from ''Halo: Combat Evolved Anniversary'', which mimics that of ''Halo: Combat Evolved'', is named in reference to the first version of the [[Wikipedia:Xbox Controller|Xbox Controller]]. The unwieldy "Duke" was soon replaced with the more ergonomic "Controller S". | *The ''Duke'' button layout from ''Halo: Combat Evolved Anniversary'', which mimics that of ''Halo: Combat Evolved'', is named in reference to the first version of the [[Wikipedia:Xbox Controller|Xbox Controller]]. The unwieldy "Duke" was soon replaced with the more ergonomic "Controller S". | ||
*The ''Fishstick'' control scheme from ''Halo | *The ''Fishstick'' control scheme from ''Halo 5'' is nearly identical to the default controller layout for the ''[[callofduty:|Call of Duty]]'' series. The layout's name is a play on the series' ''CoD'' abbreviation: cod is a species of fish. | ||
==Gallery== | ==Gallery== | ||
| Line 851: | Line 1,031: | ||
[[Category:Halo 3: ODST]] | [[Category:Halo 3: ODST]] | ||
[[Category:Halo: Reach]] | [[Category:Halo: Reach]] | ||
[[Category:Halo: Combat Evolved Anniversary]] | |||
[[Category:Halo 4]] | |||
[[Category:Halo: Spartan Assault]] | |||
[[Category:Halo: The Master Chief Collection]] | |||
[[Category:Lists]] | [[Category:Lists]] | ||
Latest revision as of 08:12, October 12, 2024
This is a list of controller layouts available in the Halo games for the Xbox, the Xbox 360, and the Xbox One.
Stick layouts[edit]
All Halo games save for the Halo Wars feature the same four stick layouts.
Default[edit]
Left Stick - Move Forward/Backward | Strafe Left/Right
Right Stick - Look Up/Down | Rotate Left/Right
Southpaw[edit]
"For Lefties"
Left Stick - Look Up/Down | Rotate Left/Right
Right Stick - Move Forward/Backward | Strafe Left/Right
Legacy[edit]
"An older way of doing things."
Left Stick - Move Forward/Backward | Rotate Left/Right
Right Stick - Look Up/Down | Strafe Left/Right
Legacy Southpaw[edit]
"An older way of doing things for lefties"
Left Stick - Look Up/Down | Strafe Left/Right
Right Stick - Move Forward/Backward | Rotate Left/Right
General[edit]
Alert carry[edit]
- Main article: Alert carry
Alert carry is a feature introduced in Halo 2 for machinima purposes. The feature can be accessed by pressing "down" on the D-pad (Halo 2 only) or using a combination of buttons (Halo 3 and subsequent games).
Halo: Combat Evolved[edit]
- Main article: Halo: Combat Evolved

A - Jump
B - Melee attack
X - Reload weapon/Action
Y - Switch weapons
Left Analog - Movement
Left Analog Click - Crouch
Right Analog - Camera
Right Analog Click - Zoom
Right Trigger - Fire primary weapon
Left Trigger - Throw grenade
"Back" Button - Go back/Multiplayer score
"Start" Button - Pause game
↑ D-Pad - Teamspeak
Black Button - Switch grenades
White Button - Flashlight/Teamspeak
Halo 2[edit]
- Main article: Halo 2
A - Jump
B - Melee attack
X - Reload weapon/Swap weapon/Action
Y - Switch weapons/Dual wield weapons
Left Analog - Movement
Left Analog Click - Crouch
Right Analog - Camera
Right Analog Click - Zoom
Right Trigger - Fire weapon
Left Trigger - Throw grenade/Fire secondary weapon/E-brake/Boost
"Back" Button - Go back/Multiplayer score
"Start" Button - Pause
↑ D-Pad - Teamspeak
↓ D-Pad - Lower weapon
Black Button - Switch grenades
White Button - Flashlight/Invisibility/Teamspeak
Halo 3[edit]
- Main article: Halo 3

| “ | Default. | ” |
A - Jump
B - Melee Attack
X - Use Equipment
Y - Swap Weapons
Left Analog - Movement
Left Analog Click - Crouch
Right Analog Click - Zoom View
Right Analog - Aiming
Right Trigger - Use Right Weapon
Left Trigger - Use Left Weapon/Throw Grenade
Up on Directional Pad - Team Chat
Right Bumper - Action/Reload Right Weapon
Left Bumper - Reload/Swap Left Weapon
D-Pad - Activates/Deactivates Flashlight
This is the most common control scheme despite many flaws (see below) that often become apparent to more experienced players. This is the control scheme that Bungie starts you with, but it is suggested that one quickly learns to either use the claw grip, bumper jumper, walkie talkie, or possibly even green thumb, all of which are more often used by experienced players.
Please note that it is not possible to aim while meleeing, jumping, and deploying equipment without use of the "claw grip."
Halo 3: ODST[edit]
- Main article: Halo 3: ODST
The controls in Halo 3: ODST are largely the same as in Halo 3, except the "Back" button accesses the VISR Database, the X button activates VISR Mode, and D-pad "up" views waypoints.
Halo Wars[edit]
- Main article: Halo Wars
A - Press to select/Hold to select with "paintbrush" tool
B - Cancel selection
X - Move/Gather/Primary attack
Y - Special/Secondary attack
Left Analog - Move crosshair
Right Analog - Camera
Right Trigger - Cycle through selection
Left Trigger - Hold to speed up camera
"Back" Button" - Objectives
"Start" Button" - Pause
Up on D-pad - Leader abilities menu
Down on D-pad - Move/cycle to next army
Right on D-pad - Move to last alert location
Left on D-pad - Move/cycle to base locations
Right Bumper - Select local units
Left Bumper - Select global units
Halo: Reach[edit]
- Main article: Halo: Reach

A - Jump
B - Switch Grenades
X - Action/Reload
Y - Swap Weapons
Left Analog - Movement
Left Analog Click - Crouch
Right Analog Click - Zoom View
Right Analog - Aiming
Right Trigger - Use Weapon
Left Trigger - Use Grenades
Right Bumper - Melee Attack
Left Bumper - Use Equipment
↑ D-Pad - Team Chat
↓ D-Pad - Open Mic/Regoup
← D-Pad - Night Vision


Halo: Combat Evolved Anniversary[edit]
- Main article: Halo: Combat Evolved Anniversary
A - Jump
B - Switch Grenades
X - Action/Reload
Y - Change Weapon
Left Analog - Movement
Left Analog Click - Crouch
Right Analog Click - Zoom
Right Analog - Look
Right Trigger - Fire
Left Trigger - Use Grenades
Right Bumper - Melee
Left Bumper - Flashlight
Back - Toggle Visuals
Halo 4[edit]
- Main article: Halo 4

A - Jump
B - Crouch
X - Action/Reload
Y - Switch Weapons
Left Analog - Movement
Left Analog Click - Sprint
Right Analog Click - Zoom
Right Analog - Look
Right Trigger - Fire Weapon
Left Trigger - Throw Grenade
Right Bumper - Melee
Left Bumper - Use Armor Ability
←/→ D-Pad - Switch Grenade


Halo: Spartan Assault and Spartan Strike[edit]
- Main article: Halo: Spartan Assault

B - Switch Grenade
X - Action
Y - Switch Weapons
Left Analog - Movement
Right Analog - Look
Right Trigger - Fire Weapon
Left Trigger - Throw Grenade
Right Bumper - Melee
Left Bumper - Use Armor Ability
Halo: The Master Chief Collection[edit]
- Main article: Halo: The Master Chief Collection
In addition to the specific control schemes of each individual game in the collection, The Master Chief Collection features several "Universal" control setups that span all four games.
- Default (Halo 2)
- Universal Default (Recon)
- Universal Reclaimer
- Universal Zoom and Shoot
- Universal Bump and Jump
- Universal Green Fingers

A - Jump
B - Melee
X - Action/Reload
Y - Change Weapon
Left Analog - Movement
Left Analog Click - Crouch
Right Analog Click - Zoom
Right Analog - Look
Right Trigger - Use Right Weapon
Left Trigger - Throw Grenade/Use Left Weapon
Left Bumper - Flashlight
Right Bumper - Switch Grenades
.jpg)


Halo 5: Guardians[edit]
Halo 5 Guardians introduced Spartan Abilities, which will be in parenthesis.

A - Jump (& Clamber)
B - (Thruster Pack)
X - Action & Reload
Y - Change Weapon
Left Analog - Movement
Left Analog Click - (Sprint) & Secondary Zoom
Right Analog Click - Crouch (& Slide)
Right Analog - Look
Right Trigger - Fire Weapon
Left Trigger - (Smart-Link)
Left Bumper - Throw Grenade
Right Bumper - Melee Attack (& Spartan Charge & Ground Pound [HOLD])
←/→ D-Pad - Switch Grenades
Trivia[edit]
- The Duke button layout from Halo: Combat Evolved Anniversary, which mimics that of Halo: Combat Evolved, is named in reference to the first version of the Xbox Controller. The unwieldy "Duke" was soon replaced with the more ergonomic "Controller S".
- The Fishstick control scheme from Halo 5 is nearly identical to the default controller layout for the Call of Duty series. The layout's name is a play on the series' CoD abbreviation: cod is a species of fish.
Gallery[edit]
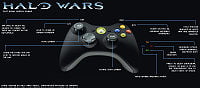
The post alpha control scheme for Halo Wars (outdated).


