
Halo: Envoy: Difference between revisions
From Halopedia, the Halo wiki
mNo edit summary |
|||
| Line 99: | Line 99: | ||
***[[UNSC Armed Forces]] | ***[[UNSC Armed Forces]] | ||
****[[UNSC Marine Corps]] {{Mo}} | ****[[UNSC Marine Corps]] {{Mo}} | ||
*****[[Orbital Drop Shock Troopers]] | *****[[Orbital Drop Shock Troopers]] | ||
****[[UNSC Navy]] | ****[[UNSC Navy]] | ||
*****[[UNSC Special Forces|Naval Special Weapons]] | *****[[UNSC Special Forces|Naval Special Weapons]] | ||
| Line 153: | Line 153: | ||
|title-5=Events| | |title-5=Events| | ||
*[[Blooding Years]] {{Mo}} | *[[Blooding Years]] {{Mo}} | ||
*[[First Immolation]] {{Mo}} | *[[First Immolation]] {{Mo}} | ||
*[[Great Schism]] {{Mo}} | *[[Great Schism]] {{Mo}} | ||
| Line 160: | Line 159: | ||
***[[Battle of Mombasa]] {{Mo}} | ***[[Battle of Mombasa]] {{Mo}} | ||
**[[Battle of Installation 00]] {{Mo}} | **[[Battle of Installation 00]] {{Mo}} | ||
**[[Battle of Installation 05]] {{Mo}} | |||
***[[Changing of the Guard]] {{Mo}} | |||
**[[Fall of Reach]] {{Mo}} | **[[Fall of Reach]] {{Mo}} | ||
**[[Operation: SUNSPEAR]] {{Fm}} | **[[Operation: SUNSPEAR]] {{Fm}} | ||
| Line 171: | Line 172: | ||
*[[Energy projector]] | *[[Energy projector]] | ||
*[[HAVOK tactical nuclear weapon]] {{Mo}} | *[[HAVOK tactical nuclear weapon]] {{Mo}} | ||
*[[M19 surface-to-surface missile]] | |||
*[[M39 rocket turret]] | |||
*[[M392 DMR]] | *[[M392 DMR]] | ||
*[[M68 Gauss cannon]] | *[[M68 Gauss cannon]] | ||
| Line 201: | Line 204: | ||
**''[[Fighter's Blood]]'' {{1st}} | **''[[Fighter's Blood]]'' {{1st}} | ||
**''[[Hammerstrike]]'' {{1st}} | **''[[Hammerstrike]]'' {{1st}} | ||
*[[EV-44 Nightingale]] | *[[EV-44 Nightingale]] | ||
*[[F-99 Wombat]] {{Mo}} | *[[F-99 Wombat]] {{Mo}} | ||
| Line 209: | Line 211: | ||
**[[M12 Warthog LRV]] | **[[M12 Warthog LRV]] | ||
*[[M121 Jackrabbit]] | *[[M121 Jackrabbit]] | ||
*[[M313 Elephant]] | |||
*[[M400 Kodiak]] | *[[M400 Kodiak]] | ||
*[[Marauder]] | *[[Marauder]] | ||
| Line 237: | Line 240: | ||
*[[Automated surgery suite]] | *[[Automated surgery suite]] | ||
*[[Biofoam]] | *[[Biofoam]] | ||
*[[Cryo chamber]] | *[[Cryonics]] | ||
**[[Cryo chamber]] | |||
*[[Data pad]] | *[[Data pad]] | ||
*[[Energy shielding]] | *[[Energy shielding]] | ||
| Line 243: | Line 247: | ||
**[[Kig-Yar point defense gauntlet]] | **[[Kig-Yar point defense gauntlet]] | ||
*[[Halo Array]] {{Mo}} | *[[Halo Array]] {{Mo}} | ||
*[[Heads-up display]] | |||
*[[Helmet recorder]] | |||
*[[Holography]] | *[[Holography]] | ||
*[[Holotank]] | **[[Holotank]] | ||
*[[Impulse drive]] | *[[Impulse drive]] | ||
*[[Jetpack]] | *[[Jetpack]] | ||
**[[Jump pack]] | **[[Jump pack]] | ||
**[[Portable jump-jet]] {{Mo}} | **[[Portable jump-jet]] {{Mo}} | ||
*[[Jiralhanae power armor]] | |||
*[[Malakost tracker]] {{1st}} | *[[Malakost tracker]] {{1st}} | ||
*[[MJOLNIR Powered Assault Armor]] | *[[MJOLNIR Powered Assault Armor]] | ||
**MJOLNIR [GEN1] | |||
***[[MJOLNIR Powered Assault Armor/Mark V|Mark V]] | |||
**[[MJOLNIR Powered Assault Armor (GEN2)|MJOLNIR [GEN2]]] {{Im}} | |||
*[[Nanotechnology]] | *[[Nanotechnology]] | ||
*[[Neural interface]] | *[[Neural interface]] | ||
*[[Sangheili combat harness]] | *[[ODST armor]] | ||
*[[Sangheili harness]] | |||
**[[Sangheili combat harness]] | |||
*[[Shaw-Fujikawa Translight Engine]] {{Mo}} | *[[Shaw-Fujikawa Translight Engine]] {{Mo}} | ||
*[[Stasis field]] | *[[Stasis field]] | ||
Revision as of 13:17, April 26, 2017
| Halo: Envoy | |
|---|---|

| |
| Attribution information | |
|
Author(s): |
|
| Publication information | |
|
Publisher: |
Simon & Schuster |
|
Publication date: |
|
|
Media type: |
Print[2] |
|
Pages: |
416 pages[2] |
|
ISBN: |
|
Halo: Envoy is a novel set in the Halo universe by Tobias S. Buckell. It was released on April 25, 2017.[2][3] Envoy has narrative connections with the Halo: Fractures short story Oasis, also written by Buckell.[1]
Official summary
Appearances
Production note
The novel's cover is illustrated by concept artist Chase Toole, who also designed the cover of Halo: Saint's Testimony and provided artwork for Halo Mythos. The novel includes a map, drawn and annotated by Sarah Campbell, which shows several key locations shown in the novel.
Gallery
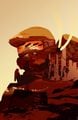
The novel's full cover illustration
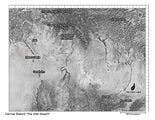
Carrow's map
.jpg)


